background image

6.  Your 236I - WRX Receiver will now be able to communicate with your 236i Panel. Test all functions via remote i.e. 

arm/disarm, panic etc, and then test all wireless sensors that have been programmed into your  236i - WRX Receiver. 


4

2

1

Channel   1                2                 3                 4                 5                 6                  7                 8 

8

4

2

1

STICKER SHOWING 

 4 DIGIT PIN NUMBER

MODE 

CHANNEL SELECT

Z

o

n

e

 3

 D

e

te

c

to

O

u

tp

u

Z

o

n

e

 4

 D

e

te

c

to

O

u

tp

u

Z

o

n

e

 5

 D

e

te

c

to

O

u

tp

u

T

a

m

p

e

O

u

tp

u

F

a

u

lt

 O

u

tp

u

Z

o

n

e

 2

 D

e

te

c

to

O

u

tp

u

K

e

y

p

a

d

 D

a

ta

 O

u

tp

u

Z

o

n

e

 1

 D

e

te

c

to

O

u

tp

u

TO ENTER PROGRAMMING MODE:  


1.  Disconnect power from the receiver. 
2.  Press & keep holding down the green (left) button. 
3.  While still holding down the green button, reconnect power to the receiver. 
4.  Keep holding the green button down until the LED lights stop scrolling. 
5.  You are now in Programming Mode. 


TO EXIT PROGRAMMING MODE: 

 
1.  Press & keep holding down the green (left) button, until the LED lights begin to scroll again (approx. 5 seconds). 


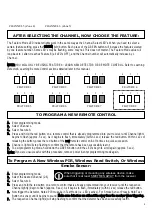
SELECTING THE CHANNEL YOU WISH TO PROGRAM: 


IMPORTANT 


When  programming, 

make sure that no 

detectors are 

transmitting, as they 

will interfere with your 

programming 

procedure.

Each of the four channel LED lights represent a channel number (8, 4, 2 or 1). Each press of the BLUE button will increase 
by one the channel number. To select the channel you want, add the values of the lights that are on. That is, if you want 
channel 5 then you should press the blue button until channel lights 4 and 1 will be on (4+1=5). When selecting a channel 
disregard the three (3) feature mode LED lights. The Channel Select LED's can indicate up to Channel 15 (8+4+2+1). The 
channel value will loop back to channel 1 after it reaches channel 15 (the highest channel). 


8

4

2

1

8

4

2

1

8

4

2

1

8

4

2

1


3


CHANNEL 2 (Zone 1)

CHANNEL 1 

CHANNEL 3 (Zone 2) 

CHANNEL 4 (Zone 3)


8

4

2

1

8

4

2

1

8

4

2

1

8

4

2

1

Summary of Contents for 236i-WRX

Page 1: ...4 6 Wireless PIR Output Zone 3 5 Wireless PIR Output Zone 2 4 Wireless PIR Output Zone 1 3 Keypad Data Output Connect to DATA 2 Connect to C 1 Connect to KEY Antenna Wire Do Not Cut Optimum operation...

Page 2: ...6 and push the key 1 3 Enter the 4 digit 236I WRX User Pin Number located on the white sticker near the connector on the receiver module and then push the key 4 Enter the new PIN again and push the ke...

Page 3: ...PROGRAMMING MODE 1 Press keep holding down the green left button until the LED lights begin to scroll again approx 5 seconds SELECTING THE CHANNEL YOU WISH TO PROGRAM IMPORTANT When programming make s...

Page 4: ...mote control on off 4 times in quick succession E Channel 1 light will stop flashing to confirm that the remote has been successfully learnt F To exit programming mode hold down the GREEN button until...

Page 5: ...amming mode again Learning a new detector into a channel which already had a detector learnt into that channel will erase the original detector code replace it with the new detector s code After learn...

Page 6: ...TURE MODE lights press the GREEN Button to select the desired Channel Zone that you wish to enable or disable supervision for as shown in diagram below FLASHING MODE LIGHTS indicate supervision is OFF...

Page 7: ...ill switch low for 2 seconds to indicate that the detector has a flat battery The tamper output will switch low for 2 seconds whenever the front case is removed and the tamper switch is released on a...

Reviews: