background image


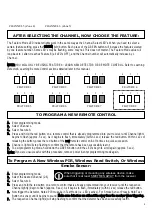
During the normal operation of the unit and when it is first powered, the LED lights located near the outputs of the 

236i - 

WRX

 will light up sequentially  (scrolling). If the unit has a fault, all 4 channel select LED's will flash. If a problem occurs 

contact your C & K dealer. 


YOU MUST ENTER YOUR 236I - WRX USER PIN, SHOWN ON THE STICKER NEAR THE    CONNECTOR 

BLOCK ON THE RECEIVER. FOLLOW THE PROCEDURE DETAILED BELOW  

TO ENTER THE NEW PIN NUMBER


1.  Enter your Panel Master Pin, then push the * key, enter the digit "0", then push the # key. 


The Power, Service, & Arm lights will slowly flash on your keypad. 


2.  Enter the User number (1-6), and push the # key.  


3.  Enter the 4 digit 236I - WRX User Pin Number, located on the white sticker near the connector on the receiver module, 

and then push the # key. 


4.  Enter the new PIN again and push the # key. 


Note: This will make the Master PIN number the same as the User PIN of your receiver. User 1 can use his Master 
PIN to delete the PIN's of Users 2-6. Follow steps 1 through 4 for changing a User PIN. To delete a user PIN, enter 
4 zeros in place of a new PIN number in steps 3 & 4. 


If the new PIN is accepted, the keypad will beep twice. If you make a mistake while programming, or if the system 
rejects the new PIN, the keypad will beep five times. Try again if necessary.  


If no key is pressed for 5 minutes, the system will automatically exit the programming mode. 


2

5.  Exit the programming mode by pushing the *key, then the # key. 


Summary of Contents for 236i-WRX

Page 1: ...4 6 Wireless PIR Output Zone 3 5 Wireless PIR Output Zone 2 4 Wireless PIR Output Zone 1 3 Keypad Data Output Connect to DATA 2 Connect to C 1 Connect to KEY Antenna Wire Do Not Cut Optimum operation...

Page 2: ...6 and push the key 1 3 Enter the 4 digit 236I WRX User Pin Number located on the white sticker near the connector on the receiver module and then push the key 4 Enter the new PIN again and push the ke...

Page 3: ...PROGRAMMING MODE 1 Press keep holding down the green left button until the LED lights begin to scroll again approx 5 seconds SELECTING THE CHANNEL YOU WISH TO PROGRAM IMPORTANT When programming make s...

Page 4: ...mote control on off 4 times in quick succession E Channel 1 light will stop flashing to confirm that the remote has been successfully learnt F To exit programming mode hold down the GREEN button until...

Page 5: ...amming mode again Learning a new detector into a channel which already had a detector learnt into that channel will erase the original detector code replace it with the new detector s code After learn...

Page 6: ...TURE MODE lights press the GREEN Button to select the desired Channel Zone that you wish to enable or disable supervision for as shown in diagram below FLASHING MODE LIGHTS indicate supervision is OFF...

Page 7: ...ill switch low for 2 seconds to indicate that the detector has a flat battery The tamper output will switch low for 2 seconds whenever the front case is removed and the tamper switch is released on a...

Reviews: