background image

EN-Rev IM/GN-AM-EN/A12 Copyright © July, 2018. Canadian Solar Inc.

10 | 

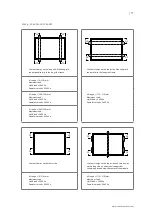
 Use four clamps on the short side.

Use four clamps on the short side and two clamps 
on the long side. An additional support bar should 
be placed below the center of the module.

A2

A2

A2

A2

A2

A2

A2

A2

A2 range = (0 – 250) mm
Maximum Load: 
Uplift load   2400 Pa

Downforce load   2400 Pa

A2 range = (200 – 250) mm
Maximum Load: 
Uplift load   2400 Pa

Downforce load   5400 Pa

Use four clamps on the long side. Mounting rails 
run parallel to the long side frame. 

A1

A1

A1

A1

A1 range = (270 – 330) mm
Maximum Load: 
Uplift load   2400 Pa

Downforce load   4000 Pa

A3

A3

A5

A5

Use six clamps on the long side. Mounting rails 
run perpendicularly to the long side frame.

A3 range = (80 –380) mm
A5 range = (80 –380) mm
Maximum Load: 
Uplift load   4000 Pa

Downforce load   6000 Pa

A4

A4

A4

A4

Summary of Contents for Standard CS1K-MS

Page 1: ...InstallatIon manual of stanDaRD solaR moDules for professional use only ...

Page 2: ... 2 lImItatIon of lIaBIlItY 2 0 safetY PReCautIons 3 0 meCHanICal eleCtRICal sPeCIfICatIons 4 0 unPaCKInG anD stoRaGe 5 0 moDule InstallatIon 5 1 moDule WIRInG 5 2 GRounDInG 6 0 mountInG InstRuCtIons 6 1 mountInG metHoD BoltInG 7 0 maIntenanCe amenDeD eDItIons anD Dates 1 0 GeneRal InfoRmatIon 3 3 3 3 3 4 5 6 7 9 10 11 13 13 ...

Page 3: ...anadian Solar Inc shall not be held responsible for damages of any kind including without limitation bodily harm injury or damage to property in connection with handling PV modules system installation or compliance or non compliance with the instructions set forth in this manual 2 0 safetY PReCautIons Warning Before attempting to install wire operate and or service the module and other electrical ...

Page 4: ...der Standard Test Conditions STC of 1000 W m2 irradiance with an AM1 5 spectrum and a cell temperature of 25 C Detailed electrical and mechanical characteristics of Canadian Solar Inc crystalline silicon PV modules can be found in our Installation Manual Annex Section Annex C Module Specifications on www canadiansolar com Main electrical characteristics at STC are also stated on each module label ...

Page 5: ...or jump on modules under any circumstances Localized heavy loads may cause severe micro cracks at cell level which in turn may compromise module reliability and void Canadian Solar Inc s warranty Do not support the backsheet when handling or installing the module Do not carry modules on your head Do not drop or place objects such as tools on the modules Do not lift modules by their wires or juncti...

Page 6: ...ting systems with a System Fire Class Rating Class A B or C tested in conjunction with fire rated Type 1 or Type 4 rated modules are considered acceptable for use with Canadian Solar Inc modules provides the mounting system does not violate any other requirements of this manual Any mounting system limitations on inclination or accessories required to maintain a specific System Fire Class Rating sh...

Page 7: ...e safely fixed to bear all expected loads including wind and snow loads A minimum clearance of 6 5 mm 0 25 in between modules is required to allow for thermal expansion of the frames The small drainage holes on the underside of the module must not be blocked oPtImum oRIentatIon anD tIlt To maximize your annual yield find out the optimum orientation and tilt for PV modules in your region The highes...

Page 8: ...mm 0 98in for side without mounting clamps in order to meet system cable scheme and proper actions should be taken to avoid dust and moisture penetration inside the connectors For CS3U CS3K CS3W and CS3L series modules Canadian Solar Inc offers optional cable specifications to match various system configurations Recommended system cable schemes are shown in Table 2 below For CS1V and CS1K series m...

Page 9: ... direct sunlight A minimum bending radius of 60 mm 2 36 in is required when securing the junction box cables to the racking system Do not place connectors in locations where water could easily accumulate 5 2 GRounDInG For grounding requirements in North America a module with exposed conductive parts is considered to comply with UL 1703 only when it is electrically grounded in accordance with both ...

Page 10: ...e mounting instructions included in this installation manual Any module without a frame laminate shall not be considered to comply with the requirements of UL 1703 unless the module is mounted with hardware that has been tested and evaluated with the module under this standard or by a field inspection certifying that the installed module complies with the requirements of UL 1703 Canadian Solar Inc...

Page 11: ...se follow local structural code or contact your professional structural engineer 6 1 mountInG metHoD BoltInG This mounting method has been qualified by Canadian Solar Inc as well as certified by VDE and CSA Modules should be bolted to supporting structures through the mounting holes in the rear frame flanges only Each module must be securely fastened at a minimum of 4 points on two opposite sides ...

Page 12: ...um Load Uplift load 2400 Pa Downforce load 5400 Pa Compatible module types CS1V MS CS1K MS CS3K P CS3K MS CS6A P CS6A M CS6V P CS6V M CS6K P CS6K M CS6K MS CS6V MS CS6VL MS and CS6A MS Bolting on long frame side using four innermost mounting holes Mounting rails run parallel to the long frame side Maximum Load Uplift load 2400 Pa Downforce load 4000 Pa Compatible module types CS1V MS CS1K MS CS3K ...

Page 13: ... or injury electrical or mechanical inspections and maintenance should be performed by qualified personnel only Please refer to Annex D Module Cleaning Guide for additional information on this topic amenDeD eDItIons anD Dates The first edition Rev 1 0 was released in June 2017 Rev 1 1 was released in October 2017 Rev 1 2 was released in April 11th 2018 Rev 1 3 was released in April 20th 2018 Rev 1...

Page 14: ...INSTALLATION MANUAL ANNEX OF STANDARD SOLAR MODULES For professional use only ...

Page 15: ...D EDITIONS AND DATES 26 INSTALLATION MANUAL DISCLAIMER The information contained in this manual is subject to change by Canadian Solar Inc without prior notice Canadian Solar Inc gives no warranty of any kind whatsoever either explicitly or implicitly with respect to the information contained herein In the event of any inconsistency among different language versions of this document the English ve...

Page 16: ...e used for this clamping method Tightening torques should be within 17 23 Nm 12 5 17 0 ft lbs for M8 5 16 coarse thread bolts depending on the bolt class For the bolt grade the technical guideline from the fastener suppliers should be followed Different recommendations from specific clamping hardware suppliers should prevail The system designer and installer are responsible for load calculations a...

Page 17: ...410 490 mm Maximum Load Uplift load 3600 Pa Downforce load 5400 Pa A1 range 340 550 mm Maximum Load Uplift load 2400 Pa Downforce load 2400 Pa Min 15 mm overlap width Clamp Rail Module frame A1 A1 Use two clamps on the long side and two clamps on the short side Mounting rails run perpendicular to the long side frame A1 range 300 550 mm A2 range 200 250 mm Maximum Load Uplift load 2400 Pa Downforce...

Page 18: ...000 Pa A1 range 331 550 mm Maximum Load Uplift load 2400 Pa Downforce load 2400 Pa A1 A1 A1 A1 A1 range 240 330 mm Maximum Load Uplift load 3600 Pa Downforce load 5400 Pa A2 A2 A2 A2 A1 A1 A1 A1 Use four clamps on the long side Mounting rails run parallel to the long side frame A1 range 410 490 mm Maximum Load Uplift load 2400 Pa Downforce load 5400 Pa A2 A2 A2 A2 Use four clamps on the short side...

Page 19: ...le Use four clamps on the long side Mounting rails run parallel to the long side frame A1 range 240 330 mm Maximum Load Uplift load 2400 Pa Downforce load 4000 Pa A1 A1 A1 A1 A3 A3 A5 A5 Use six clamps on the long side Mounting rails run perpendicularly to the long side frame A3 range 80 380 mm A5 range 80 380 mm Maximum Load Uplift load 4000 Pa Downforce load 6000 Pa A4 A4 A4 A4 A1 A1 Use two cla...

Page 20: ...be installed in heavy snow area please inform Canadian Solar Inc s technical support department in writing for advices Failure to follow this notice may violate the warranty A3 A3 A5 A5 Use six clamps on the long side Mounting rails run perpendicularly to the long side frame A3 range 140 440 mm A5 range 140 440 mm Maximum Load Uplift load 3600 Pa Downforce load 5400 Pa Notice this method is recomm...

Page 21: ...a 32 inches 0 81 m 10 7 inches 0 27 m 5400 Pa 2400 Pa Cantilever Span Span Cantilever Rafter 24 inches 0 61 m Support Clamp Interlock portrait installation clamping on short side frame Mounting Orientation Max Span Max Cantilever length Downforce Uplift Portrait 48 inches 1 22 m 16 inches 0 41 m 1800 Pa 800 Pa 32 inches 0 81 m 10 7 inches 0 27 m 1800 Pa 1200 Pa 24 inches 0 61 m 8 inches 0 2 m 1800...

Page 22: ...side frame A1 A1 A1 A1 A1 range 240 330 mm Maximum Load Uplift load 2400 Pa Downforce load 4000 Pa CS6A p CS6A M CS6vL MS and CS6A MS Use four clamps on the long side Mounting rails run perpendicularly to the long side frame Use four clamps on the short side Mounting rails run parallel to the long side frame A1 range 0 219 mm Maximum Load Uplift load 2000 Pa Downforce load 2000 Pa A2 range 200 250...

Page 23: ...plift load 2400 Pa Downforce load 2400 Pa A2 range 200 250 mm Maximum Load Uplift load 2400 Pa Downforce load 5400 Pa Use four clamps on the long side Mounting rails run parallel to the long side frame A1 A1 A1 A1 A1 range 270 330 mm Maximum Load Uplift load 2400 Pa Downforce load 4000 Pa A3 A3 A5 A5 Use six clamps on the long side Mounting rails run perpendicularly to the long side frame A3 range...

Page 24: ...0 Pa Downforce load 2400 Pa A1 A1 A1 A1 A1 range 240 550 mm Maximum Load Uplift load 2400 Pa Downforce load 2400 Pa A1 range 240 330 mm Maximum Load Uplift load 2400 Pa Downforce load 5400 Pa A2 A2 A2 A2 Use four clamps on the short side Use four clamps on the short side and two clamps on the long side An additional support bar should be placed below the center of the module A2 range 0 210 mm Maxi...

Page 25: ... Maximum Load Uplift load 4000 Pa Downforce load 6000 Pa A4 A4 A4 A4 CS1v MS Use four clamps on the long side Mounting rails run perpendicularly to the long side frame Use four clamps on the short side Mounting rails run parallel to the long side frame A1 range 0 239 mm Maximum Load Uplift load 2000 Pa Downforce load 2000 Pa A2 range 170 210 mm Maximum Load Uplift load 2400 Pa Downforce load 2400 ...

Page 26: ...ow the center of the module A2 range 0 210 mm Maximum Load Uplift load 2000 Pa Downforce load 2000 Pa A2 range 170 210 mm Maximum Load Uplift load 2400 Pa Downforce load 5400 Pa A2 A2 A2 A2 A2 A2 A2 A2 Use four clamps on the long side Mounting rails run parallel to the long side frame A1 A1 A1 A1 A1 range 240 330 mm Maximum Load Uplift load 2400 Pa Downforce load 4000 Pa ...

Page 27: ... in cases where improper insertion systems or unsuitable installation methods are found When installing insertion profiles please take the following measures into account Do not bend the module frame Do not touch the front glass or cast shadow onto it Do not damage the surface of the frame Ensure that the insertion profiles overlap the module frame by at least 10 mm 0 39 in Ensure that the module ...

Page 28: ...v M and CS6v MS Use two insertion profiles running perpendicularly to the long side frame An additional support bar should be placed below the module Use two clamps on the support bar Maximum Load Uplift load 2400 Pa Downforce load 5400 Pa Use two insertion profiles running parallel to the long side frame Maximum Load Uplift load 2400 Pa Downforce load 2400 Pa Use two insertion profiles running pe...

Page 29: ...rame Maximum Load Uplift load 2400 Pa Downforce load 4000 Pa CS1k MS Use two insertion profiles running perpendicularly to the long side frame An additional support bar should be placed below the module Use two clamps on the support bar Maximum Load Uplift load 2400 Pa Downforce load 5400 Pa Use two insertion profiles running parallel to the long side frame Maximum Load Uplift load 2000 Pa Downfor...

Page 30: ... HZ Tracking System V3 Clamp Ear V3 Uplift load 2400 Pa Downforce load 2400 Pa DuraTrack HZ Solar Tracker Installation Guide January 2017 Rev B 01 CS3U P CS3U MS CS6U P and CS6U M NEXTracker NX Horizon 400 mm Short Rail mounting holes Uplift load 2400 Pa Downforce load 2400 Pa NEXTracker NX Horizon 2 3 1 Installation Manual PDM 000149 Rev B CS3W P NEXTracker NX Horizon V2 3 Top Clamp Rails Rail pa...

Page 31: ... method M8 bolt M8 plain washer O D 24 mm 1155 mm holes position Rail drawing No CS2018007 Uplift load 2400 Pa Downforce load 2400 Pa SSMFIM rev01 SkySmart Module Fixing Installation Manual CS3U P Soltec SF7 Single Axis Tracker 2454 mm rail Bolting method M6 bolt M6 plain washer O D 18 mm 1300 mm 400 mm holes position Rail drawing No SF7 MR 04 101_Dr_ P00 SF7 MR 06 102_Dr_ P00 Uplift load 1800 Pa ...

Page 32: ...l Free Mounting System Quick Rack Rail Free Mounting System for Composition Asphalt Shingle Roofs Installation Manual May 2014 Rev F Cantsink Mfg Inc 1 4 serrated flange bolt serrated flange nut Brilliant Rack Ground Mount System Brilliant Rack Ground Mount System Installation Manual Revision 12 05 2014 Everest Solar Systems LLC WEEB KMC Clips Crossrail 36 Crossrail 48 And Crossrail 80 Mounting Sy...

Page 33: ... 15 00 CS6A 240MS 240 25 9 9 27 32 0 9 76 15 00 CS6A 245MS 245 26 1 9 39 32 2 9 84 15 00 CS6A 195p 195 24 0 8 13 29 6 8 69 15 00 1324 x 984 x 40 52 1 ˣ 38 7 ˣ 1 57 in 15 5 34 2 lbs CS6A 200p 200 24 1 8 30 29 8 8 87 15 00 CS6A 205p 205 24 2 8 47 29 9 9 03 15 00 CS6A 210p 210 24 3 8 63 30 0 9 19 15 00 CS6A 215p 215 24 5 8 78 30 2 9 35 15 00 CS6A 220p 220 24 6 8 95 30 4 9 45 15 00 CS6v 200M 200 25 2 ...

Page 34: ...4 5 ˣ 32 5 ˣ 1 57 in 16 0 35 3 lbs CS6v 195p 195 24 8 7 87 30 7 8 44 15 00 CS6v 200p 200 24 9 8 03 30 8 8 59 15 00 CS6v 205p 205 25 0 8 19 30 9 8 76 15 00 CS6v 210p 210 25 1 8 35 31 1 8 92 15 00 CS6v 215p 215 25 3 8 51 31 2 9 07 15 00 CS6v 220p 220 25 5 8 64 31 4 9 21 15 00 CS6v 225p 225 25 7 8 75 31 6 9 32 15 00 CS6v 230p 230 25 9 8 90 31 7 9 47 15 00 CS6v 235p 235 26 1 8 99 31 8 9 58 15 00 CS6k ...

Page 35: ...6 4 8 52 44 9 9 08 15 00 CS6U 315p 315 36 6 8 61 45 1 9 18 15 00 CS6U 320p 320 36 8 8 69 45 3 9 26 15 00 CS6U 325p 325 37 0 8 78 45 5 9 34 15 00 CS6U 330p 330 37 2 8 88 45 6 9 45 15 00 CS6U 335p 335 37 4 8 96 45 8 9 54 15 00 CS6U 340p 340 37 6 9 05 45 9 9 62 15 00 CS6U 345p 345 37 8 9 13 46 0 9 69 15 00 CS6U 350p 350 38 1 9 21 46 2 9 79 15 00 CS6U 290M 290 36 3 8 00 44 7 8 51 15 00 1960 992 40 35 ...

Page 36: ...47 4 9 83 30 CS3k 280MS 280 31 7 8 84 38 5 9 49 30 1675 x 992 x 40 35 65 9 ˣ 39 1 ˣ 1 57 1 38 in 18 5 40 8 lbs CS3k 285MS 285 31 9 8 94 38 7 9 57 30 CS3k 290MS 290 32 1 9 04 38 9 9 65 30 CS3k 295MS 295 32 3 9 14 39 1 9 73 30 CS3k 300MS 300 32 5 9 24 39 3 9 82 30 CS3k 305MS 305 32 7 9 33 39 5 9 9 30 CS3k 310MS 310 32 9 9 43 39 7 9 98 30 CS3k 315MS 315 33 1 9 52 39 9 10 06 30 CS3k 320MS 320 33 3 9 6...

Page 37: ...0 CS1k 305MS 305 30 0 10 17 36 3 10 97 20 CS1k 310MS 310 30 2 10 27 36 5 11 06 20 CS1k 315MS 315 30 3 10 39 36 6 11 14 20 CS1k 320MS 320 30 5 10 49 36 8 11 23 20 CS1k 325MS 325 30 7 10 59 37 0 11 31 20 CS1k 330MS 330 30 9 10 69 37 1 11 40 20 CS1k 335MS 335 31 1 10 79 37 3 11 48 20 CS1k 340MS 340 31 2 10 89 37 5 11 57 20 CS1k 345MS 345 31 4 10 99 37 7 11 66 20 CS3w 385p 385 38 1 10 11 46 6 10 66 20...

Page 38: ...lt in injury Ensure that the array has been disconnected from other active components such as inverter or combiner boxes before starting with the cleaning Wear suitable protection clothes insulated gloves etc hANDLINg NOTICE Use a proper cleaning solution and suitable cleaning equipment Do not use abrasive or electric cleaners on the module Particular attention should be taken to avoid the module ...

Page 39: ... may be used with caution AMENDMENT EDITIONS AND DATES The first edition Rev A1 was released in April 2014 Rev A2 was amended and released in December 2014 Rev A3 was amended and released in August 2015 Rev A4 was amended and released in March 2016 Rev A5 was amended and released in June 2016 Rev A6 was amended and released in December 2016 Rev A7 was amended and released in March 2017 Rev A8 was ...

Reviews: