4. Replace the antenna.
Clean the mounting place and the antenna feet with the supplied special cleaning fluid
"Reiniger1" and the supplied fleece (please wear the supplied Latex gloves!). Grind the
marked fixing areas and antenna feet with sandpaper (not too much, the surface must
be rough a little bit only), clean the surface and antenna feet with cleaning fluid 1 again
and wait another 10 minutes.
Attention! Now do not touch the cleaned surface any more!
5. Apply (with the help of the wool wiper - please wear the supplied Latex gloves!) the
Primer 2 evenly and thin onto the cleaned surface and feet. Then please wait another
10 minutes.
Attention! Do not touch the cleaned surfaces any more!
Close the Primer 2 bottle at once after use.
Note
:
If the surface of the mounting place is made from unknown material, we recommend a
"test sticking". If necessary we can arrange a material analysis at your cost.
Sticking the antenna to your vehicle's roof:
1. Cut the tip of the supplied cartouche special glue "Spezialkleber 3" (please wear the
supplied Latex gloves!).
2. Apply evenly the glue onto the antenna feet (thickness of glue layer approx. 3 to 4mm
3. Please put the antenna (max. 5 minutes after applying the glue!) on the selected
mounting place on the car roof. Press the antenna feet smoothly onto the roof and fix
the antenna with tape e.g. to avoid moving. After pressing the antenna feet onto the
roof the minimum thickness of the glue layer must be approx. 2mm. Now the glue
needs a hardening time of approx. 48 hours (air humidity of 50%). If the air humidity is
lower than 50% please spray some water into the air in the surrounding of the antenna
feet.
4. Remove the outcropped glue on the sides of antenna feet and clean the surface with
the supplied fleece and special cleaning fluid "Reiniger1".
5. In addition you can fix the antenna feet with the help of 4 screws. Please set the screw
after
hardening of the glue.
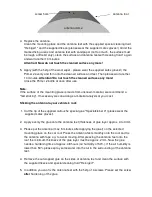
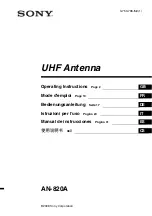
antenna foot
antenna dome
screw hole


