background image

10

Отключите прибор от электросети и убедитесь, что он достаточно остыл перед 

тем, как начать чистку.

удаление упаковочного материала

Для удаления следов от клейкой ленты можно использовать нейтральное мою

-

щее средство или растительное масло.

После удаления упаковочных материалов корпус прибора можно обработать 

полировочным средством.

Не  рекомендуется  чистить  прокладку  дверцы.  Если  прокладка  дверцы  имеет 

следы рассыхания или потертости, замените ее.

чистка камеры духовки

Для  чистки  внутренней  камеры  используйте 

нейтральное моющее средство.

•  Снимите решетку вентилятора, отвинтив кре

-

пежные элементы, и почистите пространс

-

тво за ней.

•  После завершения чистки протрите поверх

-

ность камеры мягкой тканью.

•  Не  забудьте  установить  решетку  вентилято

-

ра на место после чистки.

чистка дверцы

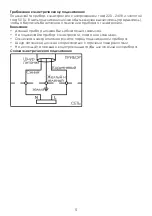
1.  Снятие дверцы.

  Откройте дверцу и снимите застежки с петель. Частично закройте дверцу и 

поднимите ее вверх.

2.  Установка дверцы.

  Повторите процедуру снятия дверцы в обратном порядке. Совместите креп

-

ления дверцы с петлями на духовке. Откройте дверцу и закрепите застежки 

на петлях.

Замечание: Будьте аккуратны при монтаже и демонтаже дверцы.

Чтобы снять стекло, приподнимите его со сто

-

роны петель и сдвиньте в направлении стрелки, 

рисунок справа.

•  Используйте  нейтральное  моющее  средс

-

тво  и  губку  для  чистки  дверцы.  Следите  за 

тем, чтобы вода не попадала в вентиляцион

-

ные отверстия.

•  Сок  некоторых  продуктов  может  привести 

к  окрашиванию  дверцы  истекла,  удаляйте 

остатки сока после каждого использования 

прибора. 

•  Не используйте средства для чистки духовок и абразивные моющие средс

-

чистка и уход

Summary of Contents for EO-930

Page 1: ...EO 930...

Page 2: ...CAMERON 1 2 3 4 5 6 7 8 9 10 11 12 13 14 15 16 17 18 19 20 21 22 23 24...

Page 3: ...25 26 27 28 29 30 31 32 33 34 75 C 85 C 35 3 1 2 3 4 5 6 7 8 80...

Page 4: ...1 16 2 3 50 120 C...

Page 5: ...220 240 50...

Page 6: ...1 2 3 4 5 6 7 8 9 10 11 12 13 14 15 16...

Page 7: ...1 2 3 6 1 2 3 4 5 6 1 2 3 4 OFF...

Page 8: ...B C A A B C B C B C B C B C 10 1 2 3 4 1 2 0 45 C 10 7 8 25 0 45 0 7 C 6 5 C 8 6 C 12 11 30 C 10 7 8 C 15 14 16 50 60 C 25 20 25 0 8 1 A 35 10 15 5 10 2 4 150 220 B 13 16...

Page 9: ...6 12 C 5 5 25 B 8 8 5 10 0 5 2 12 C 10 10 2 25 B 13 13 2 25 280 335 C 10 9 C 12 10 C 14 12 2 35 500 B 16 12 14...

Page 10: ...10 1 2...

Page 11: ...11 1 2 3 25...

Page 12: ...12 1 2 2...

Page 13: ...13 220 240 50 3400 240 2900 220 A 50 250 C 597 x 597 x 540 57 36 18 148...

Page 14: ...14...

Page 15: ...Built in electric oven Instruction Manual EO 930...

Page 16: ...g curtains or drapes a safe distance from your oven 10 Always keep dish towels dish cloths pot holders and other linens a safe distance from your oven 11 Always keep wooden and plastic utensils and ca...

Page 17: ...ored in an oven can ignite 33 Do not leave paper products cooking utensils or food in the oven when not in use 34 After broiling always take the broiler pan out of the oven and clean it Leftover greas...

Page 18: ...en door may be removed to facilitate installation These ovens are not approved for stackable or side by installation Warning Be sure your oven is installed and grounded properly by a qualified install...

Page 19: ...C 220 240 V 50 Hz and connected to an individual properly grounded branch circuit pro tected by a circuit breaker The voltage on the brand which located on the frame of oven WARNING ELECTRICAL SHOCK H...

Page 20: ...d 14 Tray 15 Door element 16 Handles of oven door Mode knob GRILL MODE This method of cooking utilises the top element which directs heat downwards onto the food Ideal when additional cooking is requi...

Page 21: ...t and meat etc FAN AND LOWER ELEMENT This method of cooking utilizes the bottom element in conjunction with the fan which helps to circulate the heat This function is suitable for sterilizing and pres...

Page 22: ...se the function which the roasting food needs 2 Adjust the appropriate temperature to that which the food needs 3 Turn the timer knob deasil adjust the timing hour which the broiling food needs or tur...

Page 23: ...ed in the oven as exact as pos sible Pans should not touch each other or the walls of the oven If you need to use two shelves stagger the pans so that one is not directly above the other How to set th...

Page 24: ...half broiling Fish fillets 6 to 12 mm thick C 5 5 Handle and turn very carefully Brush with lemon butter before and dur ing cooking if desired Preheat broiler to increase browning Ham slices precooke...

Page 25: ...ter to clean two sides of the oven and the bottom of the oven Take out the ventilation cover and using the soap and water or detergent to clean Take out the ventilation cover by losen the screws Wipe...

Page 26: ...ood idea to wipe the control panel after each use Clean it with dry soft cloth Do not use abrasive cleansers strong liquid cleansers plastic scouring pads or oven cleansers on the control panel they w...

Page 27: ...ing the oven section Improper shelf position being used See the Broiling Guide Food being cooked in a hot pan Use the tray and grid that came with your oven Make sure it is cool Cookware not suited fo...

Page 28: ...An odor from the insulation around the inside of the oven is normal for the first few times the oven is used This is temporal The new oven should burning two hours under high tempera ture Fan noise A...

Reviews: