User
Guide
Page 52
Basic Installation for Local and Remote Monitoring
6.
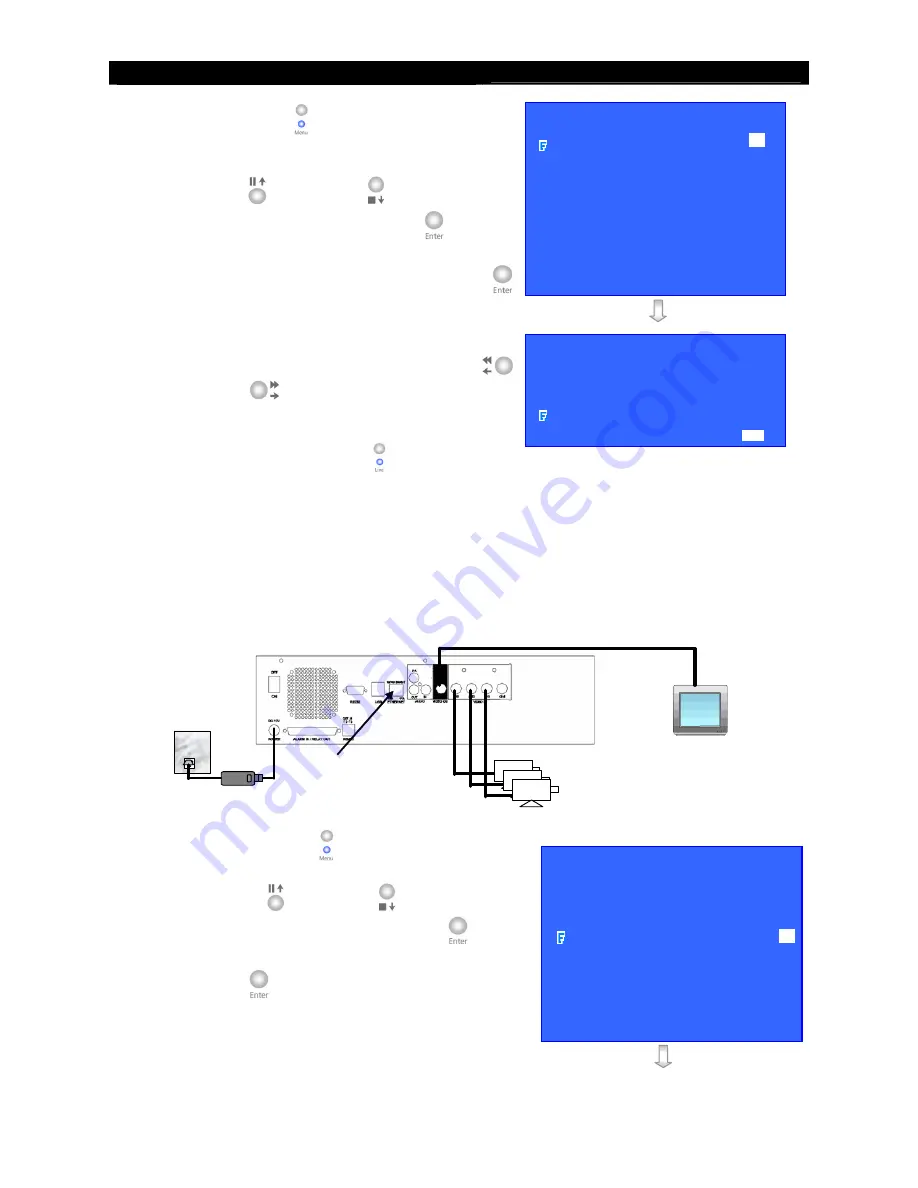
Press the “
Menu
” button to pop up the
[MAIN
MENU]
on OSD.
7.
Use “
Up
”
or “
Down
”
button to select
[SETUP]
option and press “
Enter
”
button to
enter the
[SETUP]
sub-menu.
8.
Select
[VIDEO]
option and press “
Enter
”
button
9.
Select
[VIDEO FORMAT]
and press “
Left
”
or “
Right
”
button to set either
[NTSC]
or
[PAL]
option. (All cameras should have the same
video format).
10.
You can always press “
Live
” button to exit any
menu operation and start live monitoring.
Setup
RX
video recording server IP through CCTV monitor, please go to step
11a.
Setup
RX
video recording server IP through PC, please go to step11b.
11a: Configure
RX
video recording server modem connection setting through
CCTV Monitor
RG59 cable
Power Adapter
Ethernet
Socket
RX
Cameras
192.168.0.2
CCTV
Monitor
RG59 cable
11.a.1.
Press the “
Menu
” button such that the OSD
[MAIN MENU]
pop up on the monitor.
11.a.2.
Use “
Up
”
or “
Down
”
button to select
[SETUP]
option and press “
Enter
”
button
and select
[CONNECTION]
option and press
“
Enter
” button.
SETUP MENU
VIDEO
. . .
RECORDING
. . .
SWITCHES
. . .
DATE / TIME
. . .
CONNECTION
. . .
EVENT HANDLER
. . .
TRANSMITTER
. . .
PASSWORD
. . .
USER ACCOUNT . . .
RX-SE
. . .
SETTING IMPORT/EXPORT . . .
RESTORE FACTORY SETTING ENTER
VIDEO
CAMERA SETTING
. . .
LOCAL MONITORING
. . .
SPOT VIDEO
. . .
VGA SETTING
. . .
OSD COLOR
BLUE
VIDEO FORMAT
PAL
SETUP MENU
VIDEO
. . .
RECORDING
. . .
SWITCHES
. . .
DATE / TIME
. . .
CONNECTION
. . .
EVENT HANDLER
. . .
TRANSMITTER . . .
PASSWORD
. . .
USER ACCOUNT . . .
RX-SE
. . .
SETTING IMPORT/EXPORT . . .
RESTORE FACTORY SETTING
ENTER


