background image

CX-EPD1289L Electric Preload RIM Strike

INSTALLATION INSTRUCTIONS

Page 5 of 7

Rotate 180°

to Change

Operation Mode

Rotate 180°

to Change

Operation Mode

Fail-Secure type

Fail-Safe type

Remove 6 screws To 

Change Mode Of 

Operation

Remove Cover 

Plate

Remove Cover 

Plate

Rotate 180°

to Change

Operation Mode

Rotate 180°

to Change

Operation Mode

Fail-Secure type

Fail-Safe type

Remove 6 screws To 

Change Mode Of 

Operation

Remove Cover 

Plate

Remove Cover 

Plate

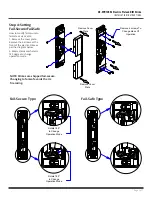
Fail-Secure Type

Fail-Safe Type

Step 4: Setting     
Fail-Secure/Fail-Safe

How to modify fail-secure to 

fail-safe or vice versa.
1. Remove the cover plate. 

Remove the 6 screws at the 

front of the electric strike as 

per the diagram below.
2. Rotate status mechanism 

180 degree to change 

operation mode.

NOTE: Strikes are shipped fail-secure. 
Changing to fail-safe voids the UL 
fire rating.

Rotate 180°

to Change

Operation Mode

Rotate 180°

to Change

Operation Mode

Fail-Secure type

Fail-Safe type

Remove 6 screws To 

Change Mode Of 

Operation

Remove Cover 

Plate

Remove Cover 

Plate
Summary of Contents for CX-EPD1289L

Page 1: ...15lbs Endurance 1 000 000 Cycles Factory Tested 250 000 Cycles UL Verified Latch Projection 3 4 Fire Rating UL 10C CAN4 S104 3 hrs Fail Secure Only Mode Field Selectable Fail Safe Fail Secure Mechanic...

Page 2: ...te with the Jamb edge If the door keeper does not align with the template cavity Adjust the template Note 1 Open door slightly Place template on door jamb aligning templates edge with jamb edge Note 1...

Page 3: ...strike and mark the remaining 2 middle mounting screw positions on frame 5 Open the door and remove the strike from the frame drill and thread the 2 middle mounting screw holes for the 1 4 20 x 1 1 4...

Page 4: ...input wires Door Status Sensor Closed Position White N O Orange COM Grey N C Red Green Black Blue 12V 24V Black Red Blue Green 12V Varistor 24V Varistor Orange White Grey Black Red 12V 24V Blue Green...

Page 5: ...e type Fail Secure Type Fail Safe Type Step 4 Setting Fail Secure Fail Safe How to modify fail secure to fail safe or vice versa 1 Remove the cover plate Remove the 6 screws at the front of the electr...

Page 6: ...common reason for a strike failing Position the RIM strike so that the strike jaws lightly rest against the latch of the exit device Check that the door is not binding on the frame An electric strike...

Page 7: ...adlocking latch as shown here If exit device has a deadlocking latch the CX EPD1289L RIM strike must be mounted so that the deadlocking latch does not enter the latch cavity of the RIM strike Position...

Reviews: