background image

All rights reserved. No spreading abroad without permission of Caltta.

PH600 Radio Maintenance Manual

24

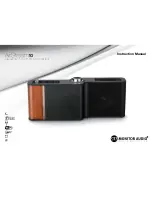
2. Remove the two back cover/clip screws with cross screwdriver to remove the clip;

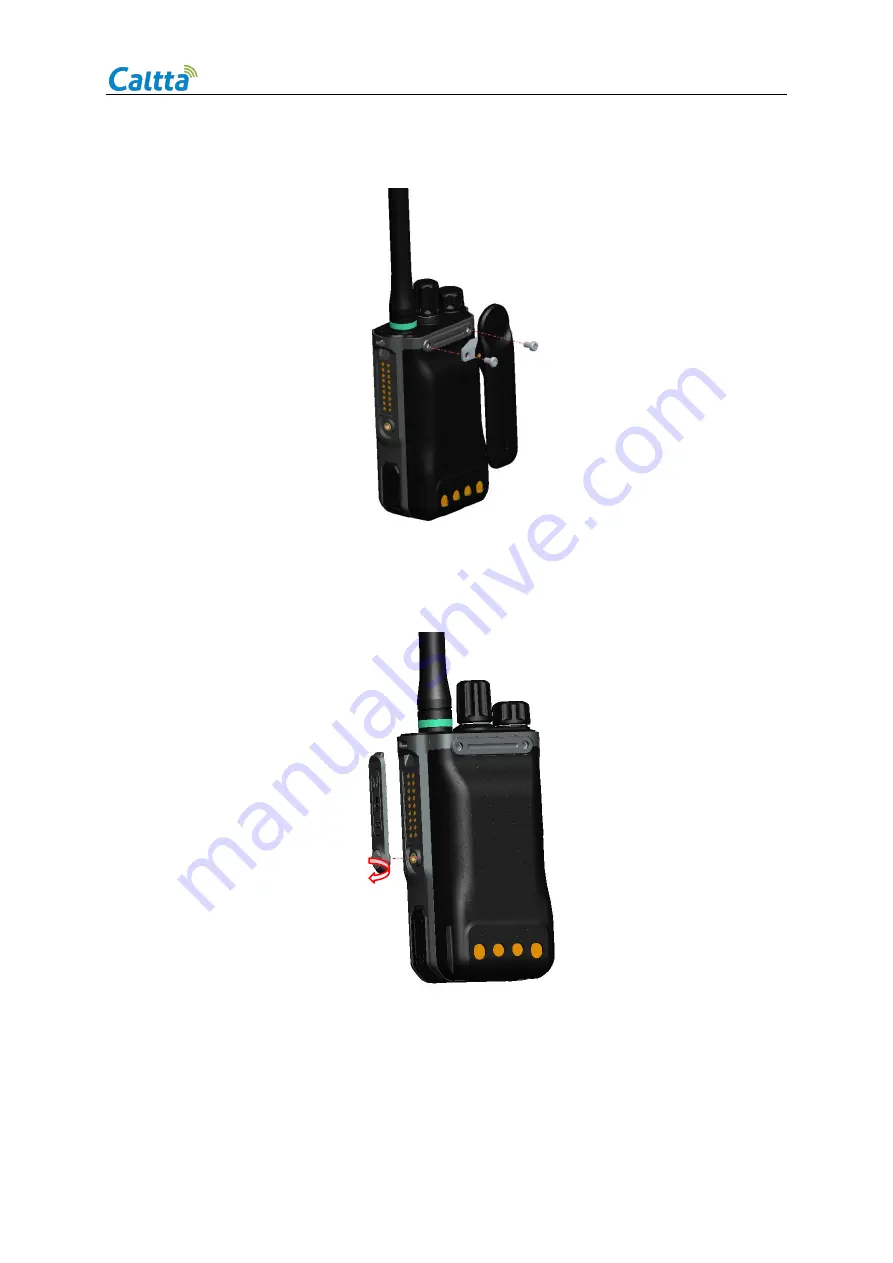
3. Remove the screw of accessory interface cover with slotted screwdriver to remove the

accessory interface cover;

4. Push the battery lock to remove the battery;

Summary of Contents for PH600

Page 1: ...PH600 Radio MAINTENANCE MANUAL Level1 V1 0 All rights reserved No spreading abroad without permission of Caltta...

Page 2: ......

Page 3: ...o Caltta Technologies Co Ltd Text contains proprietary information owned by Caltta Technologies Co Ltd without the written permission of Caltta Technologies Co Ltd any unit or individual shall not use...

Page 4: ...mware Version and Device Information 5 3 Software Upgrade 5 3 1 Before Upgrade 5 3 2 Upgrade Procedure 6 3 3 CPS Software 14 4 Radio Disassemble Demonstration 22 4 1 Tools 22 4 2 Procedure 23 4 3 Disa...

Page 5: ...e or Power Off Automatically 38 6 5 Charge Failure 39 6 6 No Voice MIC Failure 40 6 7 No Sound Speaker Failure 41 6 8 Side Key Failure 42 6 9 Keypad Failure 43 6 10 Accessory Failure 44 6 11 TF Missin...

Page 6: ......

Page 7: ...t permission of Caltta 1 1 Overview 1 1Appearance Note This picture is for reference only please refer to the actual product 1 2Standard Package SN Item Quantity PCS 1 PH600 Radio Unit 1 2 Battery 1 3...

Page 8: ...Voice Announcement Support Vocoder AMBE Man down Support Vibration Support Optional Board Support Bluetooth Support BT2 1 EDR 4 0 Optional Location GPS Optional TF Card Support Real time Clock Suppor...

Page 9: ...KHz Voice And Data 7K60F1W Conducted Radiate d Emission 36dBm 1GHz 30dBm 1GHz Modulation Limiting 2 5KHz 12 5KHz 4KHz 20KHz 5 0KHz 25KHz FM Hum and Noise 40 dB 12 5KHz 43dB 20KHz 45 dB 25KHz Adjacent...

Page 10: ...battery can power on normally 2 Detect the fault according to the customer description to confirm if it can be re presented Radio Unit Battery 3 Function Test 1 Test the PTT call to confirm the funct...

Page 11: ...ay contact after sales to get version comparison table 3 Software Upgrade 3 1Before Upgrade 1 Get the one click upgrade software for the target version 2 Prepare the radio to upgrade take away the cov...

Page 12: ...ntenance Manual 6 3 2Upgrade Procedure 1 Install the upgrade software package 1 Click to open the upgrade software choose the language according to your requirement Cn for Chines En for English 2 Doub...

Page 13: ...PH600 Radio Maintenance Manual All rights reserved No spreading abroad without permission of Caltta 7 4 Select I accept and click Next in the below interface...

Page 14: ...spreading abroad without permission of Caltta PH600 Radio Maintenance Manual 8 5 Select Complete and click Next if you use the default installation path Select Custom and click Next if you choose your...

Page 15: ...PH600 Radio Maintenance Manual All rights reserved No spreading abroad without permission of Caltta 9 Click Change to modify the installation path then click Next...

Page 16: ...All rights reserved No spreading abroad without permission of Caltta PH600 Radio Maintenance Manual 10 6 Click Install to confirm installation...

Page 17: ...ade procedure 8 An icon will be on desktop after installation 2 Radio Upgrade 1 Connect the radio to the PC through the data cable 2 Double click the upgrade tools icon to run it 3 The radio enters in...

Page 18: ...nce Manual 12 The LED indicator glows green 4 After the upgrade software detects the USB port and displays it you can select the corresponding USB port and click to upgrade 5 You can choose Chinese or...

Page 19: ...dicator flashes green during the upgrade 7 Upgrade complete prompt After upgrade completes the software tools will display as below Note Don t power off the radio during the upgrade If upgrade fails p...

Page 20: ...broad without permission of Caltta PH600 Radio Maintenance Manual 14 3 3CPS Software 1 CPS Software Installation Procedure 1 Start installation double click to install 2 Click Next following the promp...

Page 21: ...PH600 Radio Maintenance Manual All rights reserved No spreading abroad without permission of Caltta 15 4 Select Complete and click Next if you use the default installation path...

Page 22: ...ed No spreading abroad without permission of Caltta PH600 Radio Maintenance Manual 16 Select Custom and click Next if you choose your own installation path Click Change to modify the installation path...

Page 23: ...PH600 Radio Maintenance Manual All rights reserved No spreading abroad without permission of Caltta 17 5 Click Install to confirm installation...

Page 24: ...allation procedure 7 An icon will be on desktop after installation 2 CPS Read CPS read function can be started by shortcut key combination Ctrl R or shortcut icon to read data from the radio Precondit...

Page 25: ...cess after about 10 seconds the radio goes back to home display The CPS will indicate read success as below 4 Click OK to complete CPS read 3 CPS Write CPS write function can be started by shortcut ke...

Page 26: ...Manual 20 mode 1 CPS software is used to configure data in template 2 Connect the radio with data cable and connect data cable USB port to the computer click CPS write to display the following interfa...

Page 27: ...ance Manual All rights reserved No spreading abroad without permission of Caltta 21 4 The radio automatically reboots after about 10 seconds The CPS will indicate write success as below 5 Click OK to...

Page 28: ...ion of Caltta PH600 Radio Maintenance Manual 22 4 Radio Disassemble Demonstration 4 1Tools SN Item 1 Anti static Glove 2 Anti static Wrist Strap 3 Tweezers 4 Sockets 5 Screwdriver Cross Screwdriver Sl...

Page 29: ...Remove the screws of main PCB End Remove the FPC of accessory interface Remove the main PCB Remove the speaker Remove the PTT button and Side Key Remove the battery Remove accessory interface cover De...

Page 30: ...00 Radio Maintenance Manual 24 2 Remove the two back cover clip screws with cross screwdriver to remove the clip 3 Remove the screw of accessory interface cover with slotted screwdriver to remove the...

Page 31: ...PH600 Radio Maintenance Manual All rights reserved No spreading abroad without permission of Caltta 25 5 Rotate the antenna count clockwise to remove it 6 Pull out the volume knob and coding knob...

Page 32: ...ithout permission of Caltta PH600 Radio Maintenance Manual 26 7 Use the sockets to remove the antenna nut and switch nuts 8 Use the T6 torx screwdriver to remove the screws of aluminum cover component...

Page 33: ...9 Use the soldering iron to disconnect speaker leads A and disconnect MIC leads B 10 Take out the FPC of accessory interface A and the FPC of keypad B be careful the obstruction of accessory interfac...

Page 34: ...reading abroad without permission of Caltta PH600 Radio Maintenance Manual 28 11 Remove the six screws of main PCB with the cross screwdriver 12 Lift the main PCB up obliquely to remove the LCD FPC A...

Page 35: ...d No spreading abroad without permission of Caltta 29 13 Use the slotted screwdriver to open the buckles at the arrows to push out the PTT button A rubber B holder C side key D and E holder F The hold...

Page 36: ...ts reserved No spreading abroad without permission of Caltta PH600 Radio Maintenance Manual 30 14 To dismantle the speaker remove the white sealing A around the speaker and use the screwdriver to take...

Page 37: ...them out with tweezers When assembling the speaker pay attention to its direction Meanwhile the edge of the speaker needs to be glued model TONSAN1527 The dispensing tool can use the 5ML syringe and t...

Page 38: ...a PH600 Radio Maintenance Manual 32 4 5 Components SN Item SN Item 1 Clip 8 PTT Button Cover 2 Battery 9 Side Key Rubber 3 Aluminum Cover 10 PTT Rubber 4 Coding Knob 11 Screw 5 Volume Knob 12 Main PCB...

Page 39: ...Maintenance Manual All rights reserved No spreading abroad without permission of Caltta 33 5 Hardware Pictures 5 1 Front of Main PCB SN Item 1 Emergency Button 2 Vibrator 3 Bluetooth IC none for low c...

Page 40: ...Caltta PH600 Radio Maintenance Manual 34 5 2 Back of Main PCB SN Item 1 Main Antenna Connector 2 Emergency Button 3 Channel Knob 4 Power Volume Knob 5 Side Key Interface Connected to FPC and includin...

Page 41: ...peaker Soldering Point 8 TF Card Slot 9 Accessory FPC Plug 10 GPS Module none for low configuration 11 MIC Soldering Point 12 Option Board FPC Plug 6 Troubleshooting Maintenance Flow 6 1 Structural Pa...

Page 42: ...permission of Caltta PH600 Radio Maintenance Manual 36 6 2 Battery Failure Start Battery Failure Can the battery be charged No Replace battery Yes Charge the battery for one hour Can the radio power o...

Page 43: ...ing abroad without permission of Caltta 37 6 3 No Power On Start No Power On Is the battery normal No Replace battery Yes End Is the battery connector normal No Repair the battery connector Yes Are th...

Page 44: ...without permission of Caltta PH600 Radio Maintenance Manual 38 6 4 Radio Freeze or Power Off Automatically Start Radio freeze after power on or power off automatically Is the battery normal No Replac...

Page 45: ...out permission of Caltta 39 6 5 Charge Failure Start Charge failure Are the charger and power adaptor normal No Replace charger or power adaptor Yes Replace the battery if corroded or clean it if dirt...

Page 46: ...on of Caltta PH600 Radio Maintenance Manual 40 6 6 No Voice MIC Failure Start No voice MIC failure Is the MIC hole dirty and blocked Yes Clean or replace the front cover No Replace the main PCB End Is...

Page 47: ...ding abroad without permission of Caltta 41 6 7 No Sound Speaker Failure Start No Sound Speaker failure Is the volume setting normal No Reset the volume Yes Replace the main PCB End Are the speaker an...

Page 48: ...Side Key failure Are the main PCB and back cover assembled correctly Is the button touch feeling normal No Reassemble correctly Yes Replace the main PCB End Is the main PCB Side Key metal dome collaps...

Page 49: ...ng abroad without permission of Caltta 43 6 9 Keypad Failure Start Keypad failure Are the front cover keypad and the FPC normal No Replace the front cover keypad or FPC Yes Replace the main PCB End Is...

Page 50: ...dirty Yes Clean or replace the accessory interface FPC No Replace the main PCB End Is the signal pin of accessory interface connector broken Yes Replace the accessory Yes No Is the accessory interfac...

Page 51: ...ng Start TF missing Is the TF card normal Are the gold finger contacts corroded or dirty Yes Clean TF card or replace it No Replace the main PCB End Does the firmware version support the TF card No Re...

Page 52: ...tra screws 2 Check if the touch feeling of button is normal for PTT button up button down button and top button Check if the volume knob and coding knob operate normally 3 Install the battery and powe...

Reviews: