


5
5
14
14
1.5 Wires Connection Description
RED R
WHITE L
RCA LINE OUT
RCA LINE OUT
FRONT(BLACK)
REAR(GRAY)
The Description of the Wiring Diagram for Socket 1
1. Parking wire must be connected. And the parking brake must be engaged in order for the monitor to work.
2. Use the clip end of the Ground Wire provided by manufacturer to connect Mounting Screw, using the other
end of the Ground Wire to connect the negative pole of the power source. Otherwise, the video on screen
maybe flashes.
The Description of the Wires Connection
Description of Connecting the Parking Brake Line to the Parking Brake System Built in the Car
Parking brake
Parking brake switch
(inside the car)
Parking brake wire(Green)
To metallic body or chassis of the car
NOTE: after connecting the Parking Line, the video on the small monitor of the front panel will be display only after braking the car.
The Description of the Wiring Diagram for Socket 2
NOTES:
1. Only speakers with 4 ohms impedance may be used.
2. Ensure that the blue auto antenna cable does not make contact
with any ground connection.
GREY
YELLOW
YELLOW
VIDEO RCA OUT
PARKING LINE
GREEN
REAR VIEW CAMERA
BLACK
YELLOW
REVERSAL LINE
WHITE
Fixing Screw Bolt
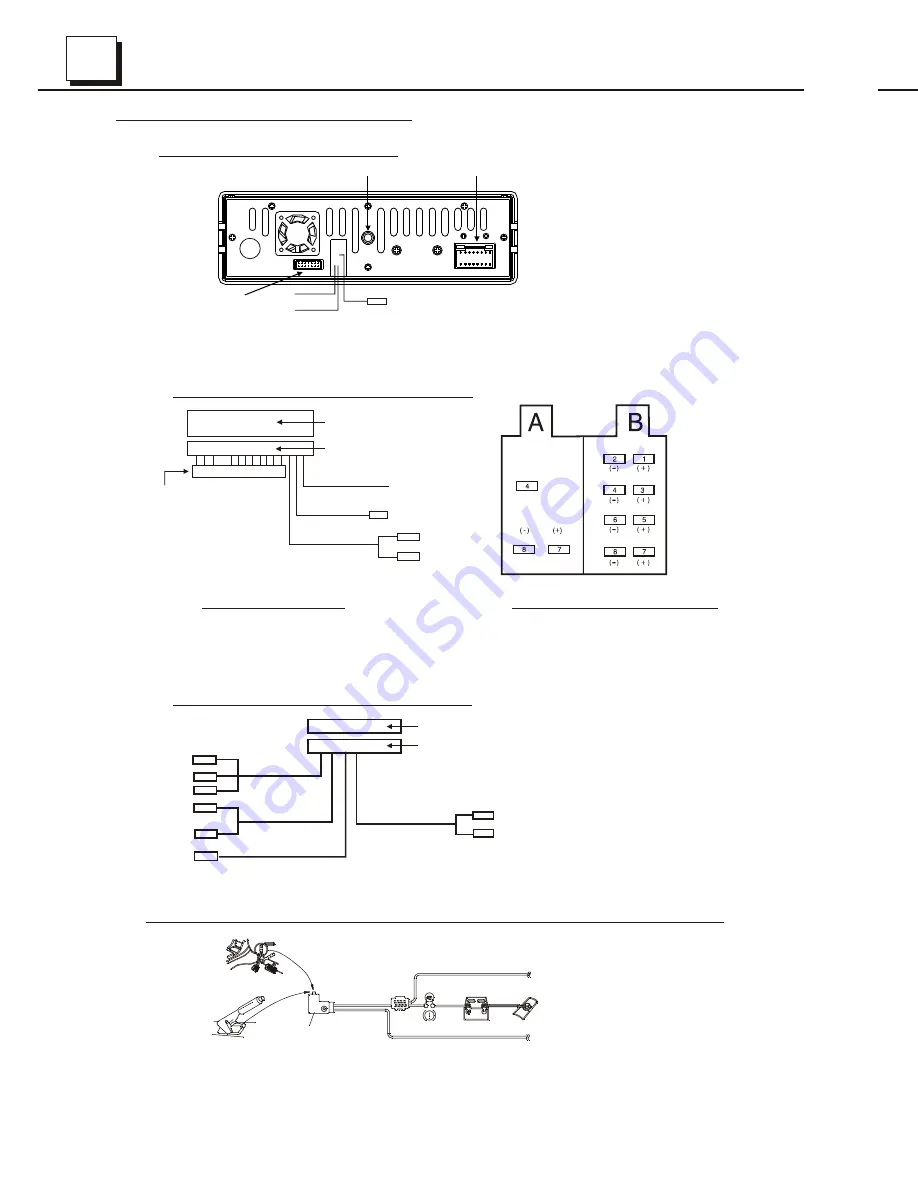
Wiring Connecting Socket 1
Wiring Connecting Socket 2
Radio Antenna jack
Black
Black
WIRING CONNECTING SOCKET 2
WIRING CONNECTING PLUG 2
BROWN
AUDIO RCA AUX IN
RED R
WHITE L
YELLOW VIDEO
CONNECTOR A
4. Yellow
7. Red
8. Black
CONNECTOR B
1. Violet
2. Violet/black
3. Grey
4. Grey/black
5. White
6. White/black
7. Green
8. Green/black
)
Ground
Ignition
Rear right speaker
Front right speaker
Front left speaker
Rear left speaker
ISO FEMALE CONNECTOR
BLUE AUTO ANT
GREEN
WOOFER LINE OUT
RED R
WHITE L
WIRING HARNESS SOCKET
WIRING HARNESS PLUG
ISO FEMALE CONNECTOR
WIRING HARNESS
5. Trouble Shooting
Please read the user manual carefully before using the this player. If you have any troubles
in using this player, try to solve the problems by the suggestions mentioned below. If you can
not remove the trouble after using all the suggestions, please contact the company or the
technical service centre authorized by us. For the sake of your safety, please do not open the
cover and repair the player by yourself, if that, it may cause electric shock.
NO PICTURE, SOUND AND INDICATION
* Ensure that the power switch is on.
* Ensure that the inlet is ok.
* Ensure that the power cord is not damaged or the fuse is not blown.
* Ensure that the power plug is connected to the inlet tightly.
NO SOUND BUT HAVE PICTURE
* Ensure that the player’s audio output has a good connection with monitor’s audio input.
* Check whether the audio connector is damaged.
* Check whether you have turned down the volume.
* Ensure that you have set the right AUDIO setup of the player.
* Ensure that the audio is not under mute.
NO PICTURE BUT HAVE SOUND
* Ensure that the player’s video output has a good connection with monitor’s video input.
* Check whether the video connector is damaged.
* Ensure that you have set the right VIDEO settings of the player.
BLACK AND WHITE PICTURE OR SCREEN ROLLING
* Ensure that you have set the right video SYSTEM setting.
FLAWS OF PICTURE OR SOUND
* Check whether the setting of AUDIO is right.
* Check whether the AV connector and the output terminal is stained.
* Check whether there is condensation inside the Lens. If so, leave the player off for an hour
or so, then try again.
REMOTE CONTROL IS INSENSITIVE OR DOES NOT WORK
* Check the batteries of remote control and make sure that they are to be powerful and
good conductivity.
* Direct the remote control to the IR sensor of the player.
* Check whether there are some obstacles between the remote control and IR sensor.
SOME FUNCTION BUTTONS DO NOT WORK
* Turn off the power, then turn on again.
* Reset the unit to zero, then turn on again.
* Remove the front panel from the unit, then install it again and then turn on again.
THE RADIO DOES NOT WORK
* Check whether the antenna cable is connected firmly. Or manually tune for a station.


