background image

EN - 16

DVD Setup

Press 

SETUP

 to display setup menu on the 

screen. 

Use 

 to select setup items:

SYSTEM - LANGUAGE - AUDIO - VIDEO
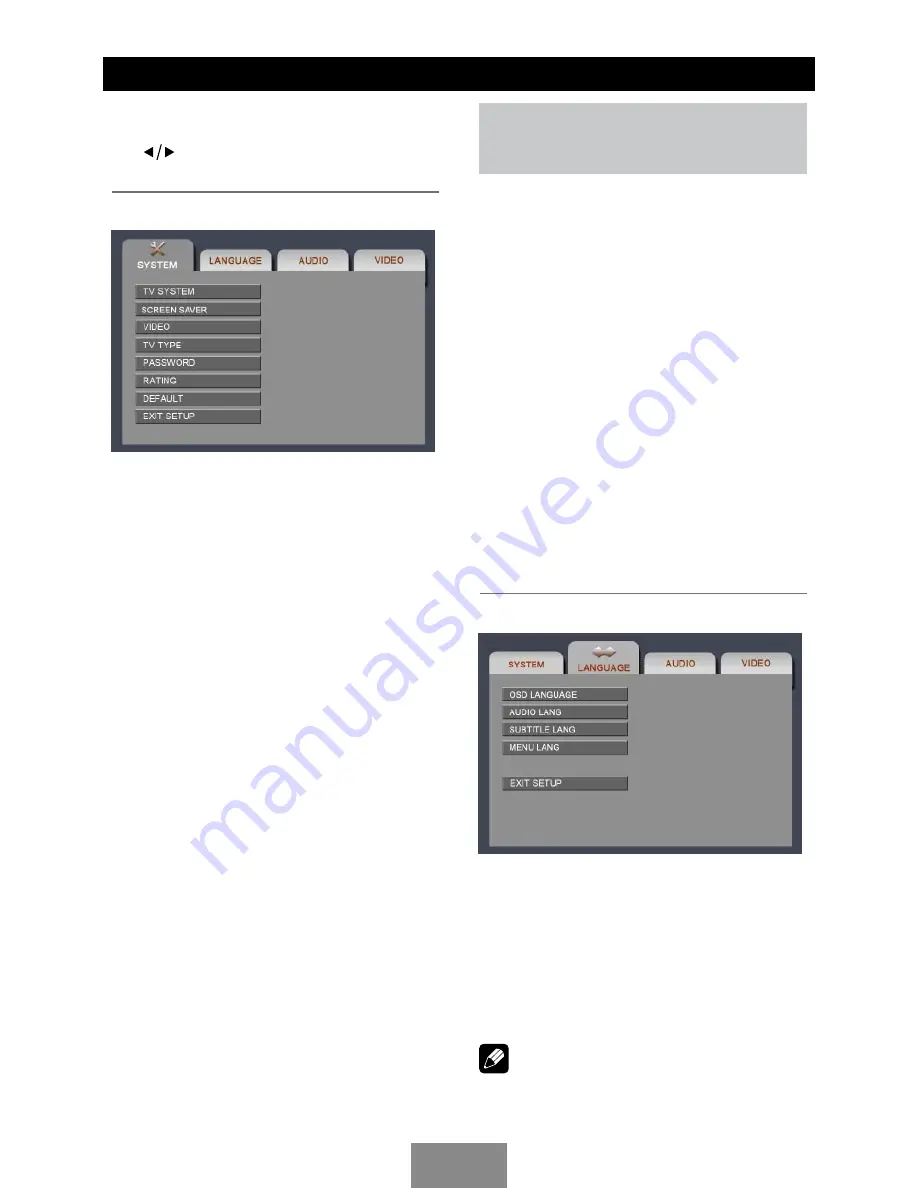
 

SYSTEM

TV System:

PAL/NTSC/AUTO

Select the output video format in the setting 

menu.

Screen Saver:

ON/OFF

The  screen  saver  appears  if  disc  stop  last 

more than 3 minutes. Original setting: ON.

Video Output Mode:

S-VIDEO

Setting TV type:

4:3PS/4:3LB/16:9

Select TV type to watch wide screen movies.

4:3 Pan Scan: For 4:3 TV, left and right edges 

will be cut.

4:3  Letter  Box:  For  4:3  TV,  black  bars  will 

appear on top and bottom.

16:9: For 16:9 wide screen TV.

Password:

1.  Press number button " 0000 " on the remote 

control, then press the 

ENTER

 button to 

confirm.

2.  Press  the  desired  4-digit  password,  and 

then press 

ENTER

 button to confirm.

3.  Record the password and keep it in a safe 

place for future reference.

    If you forget the password, please 

    enter 0000 to reset a new password.


Setting Rating:

1 KID SAFE / 2 G / 3 PG / 4 PG13 / 5 PG-R / 
6 R / 7 NC-17 / 8 ADULT

The rating of the disc is from 1 to 8: 

(1) with the most limits when playing.

(8) with the least limits when playing.

Original setting: 8

Note:

The  rating  can  be  selected  only  under  the 

password unlocked status, and the limits can 

be worked only under the password locked 

status.

Load Default:

RESTORE

If this item is selected, the unit will return to 

original setting.

LANGUAGE

OSD Language

Select one language that you are familiar with 

to display system menu.

Audio Language

Select one dialogue language that you are 

familiar with when playing back DVD discs.


Note:

If  the  DVD  disc  has  the  audio  file  in  the 

selected language, the dialogues you listened 

Summary of Contents for MCD893

Page 1: ...DVD VCD CD MP3 MP4 USB PLAYER WITH FM MW TUNER BLUETOOTH AND GPS NAVIGATION SYSTEM MCD893 Operating Instructions...

Page 2: ...power supply with negative grounding MUTE OK MUTE OK Never install this unit where the operation condition for safety driving is restrained MUTE OK MUTE OK Install the product correctly so that the d...

Page 3: ...and annoying interference use only the included components Caution of disc using 1 DO NOT use irregular shaped disc 2 Disc Cleaning Use a dry soft cloth to wipe the disc from center to edge only neutr...

Page 4: ...rectly depending on the application used to encode WMA files About MP3 Supply of this product only conveys a license for private non commercial use and does not convey a license or imply any right to...

Page 5: ...r 4 Mute 5 Select the following sources Radio Disc when disc inserted USB when USB connected AV1 AV2 front AV in Blue tooth Navigation 6 Navigation 7 Turn the unit on off 8 Press to adjust volume leve...

Page 6: ...ideo system PAL NTSC 7 Sound display setting Setting menu press 2 sec 8 System setup 9 Close the panel step by step 10 Open the panel step by step 11 Zoom DVD VCD 12 Enter 13 Menu cursor 14 Stop Retur...

Page 7: ...battery wrap it in tape and insulate otherwise the battery may give off heat crack or start a fire Basic Operations Turn on off the power 1 Press POWER button to turn on the unit The unit goes back t...

Page 8: ...d hold a button on the steering wheel more than 2 seconds then the function is saved into the button on steering wheel At the same time all other steering wheel settings are clear you must reset them...

Page 9: ...sion discs Stop playback temporarily During playback press to pause playback The sound will be muted Display PAUSE in the screen Press again to continue playback To resume normal play repeat the opera...

Page 10: ...button on the remote control track or DVD Title Chapter and time display on top of the screen Current item is highlighted Use to select desired item Use digit button to select number Press ENTER to c...

Page 11: ...on to access desired function 1 Display source menu 2 Track intro play 3 Stop 4 Track skip seek 5 Display select menu 6 Repeat play 7 Random play 8 Play Pause Touch the icon to access desired function...

Page 12: ...c information TA Traffic Announcements Identification Radio announcements on traffic conditions Source menu SETTING menu RDS Setting menu TA ON OFF When TA mode is turned on the TA indicator will blin...

Page 13: ...on Tuner Operation Bluetooth Operation Note For your safety avoid talking on the phone as much as possible while driving Bluetooth is a wireless transmission way for short distance The built in Blueto...

Page 14: ...e you should select to connect it and then input the pairing code 1234 by default When music playback touch to play pause and press key on the TFT or remote control to previous next track if the optio...

Page 15: ...ayback General Notes for Bluetooth 1 For N7X N9X PHILIPS Sony Ericssion SAMSUNG mobile phones during our test after the mobile phones appear connection successful the unit still appear waiting for pai...

Page 16: ...close if the map card was not fully inserted or did not remove after popped it up Using USB device 1 Connect your USB device to the USB cable which you placed in the dashboard or glove box during ins...

Page 17: ...rd and then press ENTER button to confirm 3 Record the password and keep it in a safe place for future reference If you forget the password please enter 0000 to reset a new password Setting Rating 1 K...

Page 18: ...tle will be displayed in the default language You can change the language by pressing Subtitle key of the remote controller Menu Language Select one language that you are familiar with to display DVD...

Page 19: ...urn button beep sound on off 12 24 HOURS Press to select 12 hours or 24 hours mode AM PM Press to set hours and press to set minutes VOL LAST ADJUST Press to choose VOL LAST the turn on volume level i...

Page 20: ...ment and connect to the car battery Otherwise a high possibility of serious short circuit to the electrical system may be occurred Replacing a new fuse with 15A rating when the old one is broken using...

Page 21: ...rking Brake Cable Connections Reverse Driving Cable Connections Device Connections Key A Connect to steering wheel control cable Key A SWC Key B standby Key B GND GND Steering Wheel Control Cable Conn...

Page 22: ...ctor Fuse 15A USB SLOT VIDEO 1 IN Yellow CAMERA IN Yellow VIDEO OUT 2 Yellow REAR AUDIO OUT R Red REAR AUDIO OUT L White FRONT AUDIO OUT R Red FRONT AUDIO OUT L White AUX 1 IN L White AUX 1 IN R Red S...

Page 23: ...the wire that activates the reversing camera to the reversing sensor or to a reversing light If necessary connect your reversing camera to the car radio s reversing camera input using a video cable no...

Page 24: ...s d u e t o vibration Mounting angle is over 30 Mounting is unstable Adjust mounting angle to less than 30 Mount the unit securely with the supplied parts TUNER mode Unable to receive stations The ant...

Page 25: ...gnal input NTSC PAL 7 INCH TFT LCD Display resolution dot 1440 W x 234 H Active area mm 154 08 x 86 58 Screen size inch 7 0 Diagonal Dot pitch mm 0 107 0 370 Contrast ratio 300 Brightness 350 nits FM...

Page 26: ...CLASS 1 LASER PRODUCT...

Reviews: