background image

Setup Menu

Time: ON/OFF

Time. M: 12/24

Clock setting:

VOL+/-

1. Press

to select a menu item to adjust.

2.

the item you

have selected.

Turns the clock display ON/OFF.

Use this menu item to select 12 hour
clock mode or 24 hour clock mode.

Use this menu item to set or make
changes to the time displayed on the
clock after select this menu item,
1. Press

to select hour or minute.
2. Rotate the

knob on the head

unit or press the

button on the

remote control, you can a just the hour
or minute.

the

or

button on the head

unit, or ▲/▼/◄/► button on the remote
control

Rotate the

knob on the head

unit, or press the

or

button on

the remote control to adjust

the

or

button on the head

unit, or ◄/► button on the remote control

▲/▼

d

VOL+/-

VOL+

VOL-

S E T U P

SYSTEM

CLOCK

SYSTEM

TIME

TIME.M

ON

24

11 : 58

CLOCK

Hour

Minute

Disc Operations

Loading/Removing a Disc

To select the disc mode

1. Press the

(

) button on the

front panel to flip down the front panel
and then insert a disc into the disc slot
with the label side facing upward; and
close the front panel, the player will play
the disc automatically.
2.To eject the disc, press the

(

)

button to open the front panel and then
press the

(

) button.

Press the

button to select the disc

mode, if necessarily.

Press the

button to display the

following screen.

For MP3/JPEG/MPEG4:
Use the cursor buttons (

) to

OPEN

OPEN

EJECT

MODE

DISP

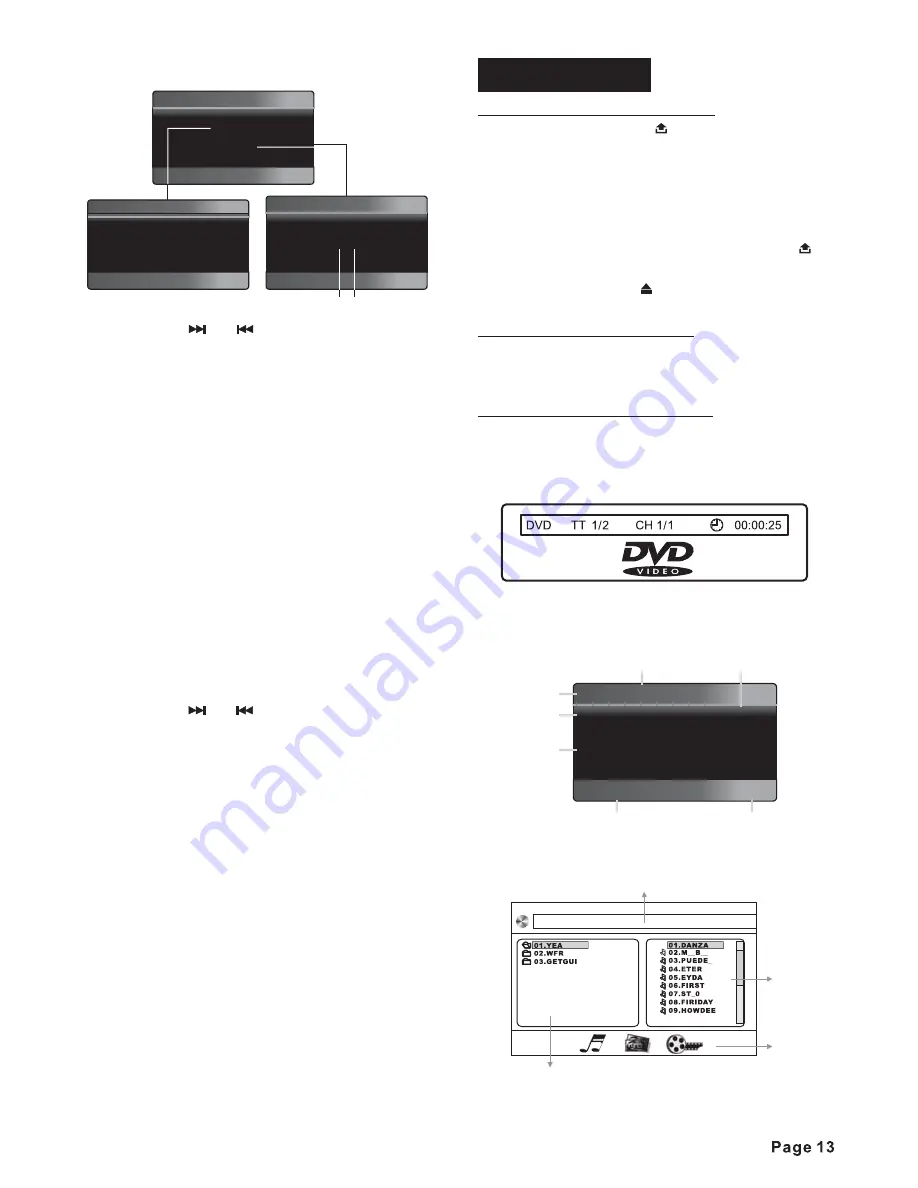
Disc Information Screens

When you insert a DVD disc, a screen
with information similar to the one below
will appear when you press and hold the

button.

When you insert a CD, MP3, WMA,
JPEG, or MPEG4 disc, the following
screen appears.

▲/▼/◄/►

SUB-T

8:25

VOL 33

MP3

1/23

00:04:14

DANZA

NTIC SATR

Source

Status

Main display
( MP3 only)

Clock

Volume level

PLAY

Playing time

Track
number

[MP3] DANZA.MP3

Information display

Folders list

Files list

Files type

Summary of Contents for MCD 782

Page 1: ...Compatible AV Output Socket Sub woofer Output Socket Front panel AV input SD MMC Memory card slot Front Panel USB Input Port 4 x 75W High Power Output FM Stereo Radio RDS Radio Broadcast System Functi...

Page 2: ...unction of Keys 06 Using The Remote Control 07 General Operations 08 Radio Operations 09 RDS Radio Data System Operations 10 AV Menu Settings 11 Disc Operations 12 Special Disc Operations 15 Data Disc...

Page 3: ...uthorized by Macro vision Corporation Reverse engineering or disassembly is prohibited Region Management Information This Mobile DVD Player is designed and manufactured to respond to the Region Manage...

Page 4: ...it where it would be subject to high temperature such as from direct sunlight or from hot air from the heater or where it would be subject to dust dirt or excessive vibration Din Front Rear Mount This...

Page 5: ...r Not all tabs will be able to make contact so examine which ones will be most effective Bending open the appropriate tabs behind the dashboard to secure the sleeve in place 1 DIN FRONT MOUNT Method A...

Page 6: ...t out to remove it 5 Insert both of the supplied keys into the slots at the middle left and right sides of the unit then pull the unit out of the dashboard Using The Detachable Front Panel 2 Grasp the...

Page 7: ...G WHITE WHITE BLACK GREEN GREEN BLACK VIOLET VIOLET BLACK GREY GREY BLACK FRONT LEFT SPEAKER REAR RIGHT SPEAKER MEMORY B GROUND B ACC B BLUE TO ANTENNA RED YELLOW FRONT REAR PINK BLACK TO PARKING BRAK...

Page 8: ...23 22 25 21 24 1 2 3 9 10 15 16 5 8 6 11 12 13 17 18 20 19 4 7 14 AV IN MODE GOTO 6 TA ST 1 4 RDM 2 INT 5 BND AF REG PTY LOC RPT AS PS MIC...

Page 9: ...k up track next Button TITLE DVD Title Menu PBC Playback Control Button Play Pause Button Pre set M1 M6 Button Numeric 1 6 Button TA Traffic Announcement Button Numeric 7 Button AF List of Alternative...

Page 10: ...s on press and hold the button long to turn off the unit Rotate the knob on the head unit or use the or button on the remote control to adjust volume level OPEN RESET OPEN EJECT POWER VOL VOL VOL ESP...

Page 11: ...anually search upward or downward step by step for the desired radio station within the current band For fast manual searching press and hold the or button In manual search process if the both buttons...

Page 12: ...F off Segment AF on Segment AF flashing When AF switching mode is selected the radio checks the signal strength of the AF all the time The interval of checking time of each AFs depends on the signal s...

Page 13: ...distant PTY TA AF REG AFFAIRS ALARM PTY list HGTES234 ALARM Current PTY information NEWS AV menu settings AV Menu Overwiew VOL MENU VOL ENTER VOL VOL VOL MODE ZOOM MENU You can adjust various setting...

Page 14: ...Display monitor type 16 9 4 3 Default VOL VOL VOL 1 Press to select a menu item to adjust 2 the item you have selected 0 63 Adjust this setting if the picture is too bright or too dark 0 63 Use this...

Page 15: ...sc Operations Loading Removing a Disc To select the disc mode 1 Press the button on the front panel to flip down the front panel and then insert a disc into the disc slot with the label side facing up...

Page 16: ...BACKWARD RPT RPT Single Track Selection Fast Forward Fast Reverse Pause Playback Stopping Playback Repeat Playback For CD VCD SVCD For MP3 For DVD REP 1 REP DIR REP CHAPTER REP TITLE REP ALL REP OFF A...

Page 17: ...EREO MONO L For DVD discs which have multiple language soundtracks you can press the button to switch between the audio languages recorded on the disc The number of available languages varies from dis...

Page 18: ...PLAY CLEAR PROGRAM PLAY CLEAR On Screen Display GOTO Function Press and hold the button during playback to display information of the current disc on the screen Current title Total title Current Chapt...

Page 19: ...MPEG4 or picture JPEG files into the disc slot the following main menu will appear Press the button on the remote control to change the source Press the button on the remote control to switch to the f...

Page 20: ...the battery from the MP3 player and then connect it to the USB port Otherwise it may cause battery burst When reading a USB device be sure not to remove it from the USB port change mode beforehand US...

Page 21: ...calls automatically In many countries this is a prerequisite for legal operation of hands free equipment while driving 1 Pairing 2 CONNECT ST LOC AUDIO 3 DIAL CALL 0 9 DEL 4 Caller ID 5 Accepting an i...

Page 22: ...lect the next or prev phone number that stored on preset number list by pressing the button When you access the preset phone number list You can see 1 6 on the LCD display if you haven t stored any ph...

Page 23: ...nected to an NTSC TV Select PAL format when the unit is connected to a PAL TV You can also choose AUTO SELECT SETUP ENTER ENTER SETUP NOTE System Setup 1 TV SYSTEM Setup TV SYSTEM SCREEN SAVER TV TYPE...

Page 24: ...password system is used in conjunction with the Parental Controls settings to prevent a young person from changing the settings without permission The factory default password is 0000 If you wish to c...

Page 25: ...screen ENGLISH GERMAN SPANISH FRENCH P ORTUGUESE ITALIAN RUSSIAN POLISH ENGLISH GERMAN SPANISH FRENCH P ORTUGUESE ITALIAN RUSSIAN POLISH ENGLISH GERMAN SPANISH FRENCH P ORTUGUESE ITALIAN RUSSIAN POLI...

Page 26: ...censorship has occurred Attachment 1 2 3 4 5 6 7 8 Unlock Unlock KID SAFE G PG PG 13 PG R R NC 17 ADULT Playing MP3 discs What is MP3 Corresponding file systems Playing a JPEG disc MP3 MPEG 1 Audio L...

Page 27: ...ty please first consult this checklist It may be that something simple has been overlooked Under no circumstances should you try to repair the player yourself as this will void the warranty Only quali...

Page 28: ...acity 2GB SD MMC Card Slot Maximum Handling Capacity 2 GB MONITOR SCREEN USB SD MMC CARD Specifications No Sound The Player Does Not Respond to the Remote Control Check the audio connections Aim the r...

Reviews: