background image

1

Barbecue Island Assembly

LTR50001101, Rev. A

www.calflamebbq.com

Planning the Best Location

Here are some of the things that you will need to consider when determin-

ing where to place your new barbecue island.

Safety First

Do not place your barbecue island near trees and shrubs.

Be certain that your installation will meet all city and local safety codes and 
requirements.

Consider How You Will Use Your Barbecue Island

Your barbecue island is mainly used for family recreation. Be sure to leave 
plenty of room around it for activity.

Ventilation and Access

If you place your barbecue island close to a wall or fence, make sure you 
allow room for ventilation. Also, if you have storage areas in your barbecue 
island, make sure they can be conveniently accessed.

Enclosures and Awnings

Your barbecue island is for outdoor use ONLY.

You can locate your barbecue island any place where there is adequate 

ventilation. The size and configuration of your house and yard will determine 

how you should locate your barbecue island, but as a general rule, do not 
place it under or near windows that can be opened into your home.

Do not locate your barbecue island in an enclosed room such as a garage, 
shed, or breezeway or under a sealed overhead structure.

You  can  place  your  barbecue  island  in  your  patio  as  long  as  there  is 

adequate ventilation and no fire risk. We do not recommend placing your 

barbecue  island  in  any  enclosed  area,  that  is,  any  covered  area  that  is 
walled on two, three or four sides.

You can install an awning over your barbecue island, provided you make 

sure it is high enough to prevent damage or fire. Maintain sufficient distance 

as to not overheat any overhead combustible material. We recommend 

you check with local inspectors and your homeowner’s association.

Plan for Your Environment

If  you  live  in  a  region  where  it  snows  in  the  winter  or  rains  frequently, 
place the barbecue island near a house entry. Consider adding a covered 
walkway from your barbecue island to your house or patio.

Summary of Contents for KD6002

Page 1: ......

Page 2: ...rth defects or other reproductive harm are found in and or created by the combustion of natural gas propane butane and other fuels Always op erate this unit as described in the owner s manual and in w...

Page 3: ...ventilation The size and configuration of your house and yard will determine how you should locate your barbecue island but as a general rule do not place it under or near windows that can be opened i...

Page 4: ...or each model can be found in in the Cal Flame Barbecue Island Pre Delivery Guide available from your dealer the Cal Flame web site or through Cal Flame customer service Although a permanent slab is r...

Page 5: ...ies with State and local code We recommend you hire a certified contractor if you do not wish to do the installation yourself If your dealer is not a certified contractor you will need to hire a contr...

Page 6: ...h models is the same except where it is specifically called out Three base slats Base for refrigerator Handling the pieces You will need two or more people for assembly Do NOT twist or bend the granit...

Page 7: ...5 Barbecue Island Assembly LTR50001101 Rev A www calflamebbq com Two side pieces Front piece...

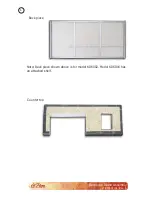
Page 8: ...6 Barbecue Island Assembly LTR50001101 Rev A www calflamebbq com Counter top Back piece Note Back piece shown above is for model KD6002 Model KD6016 has an attached shelf...

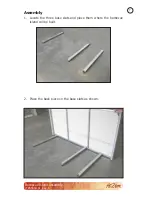
Page 9: ...rbecue Island Assembly LTR50001101 Rev A www calflamebbq com Assembly Locate the three base slats and place them where the barbecue 1 island will be built Place the back piece on the base slats as sho...

Page 10: ...8 Barbecue Island Assembly LTR50001101 Rev A www calflamebbq com Do the same for the front piece 4 Screw the back piece down using the provided screws 3...

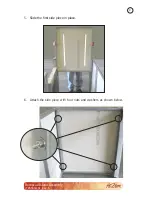
Page 11: ...9 Barbecue Island Assembly LTR50001101 Rev A www calflamebbq com Slide the first side piece in place 5 Attach the side piece with four nuts and washers as shown below 6...

Page 12: ...side piece in place and bolt it to the front and back 7 frame pieces Place the granite counter top on the frame There are five bolts 8 welded to the bottom of the counter top that go through holes in...

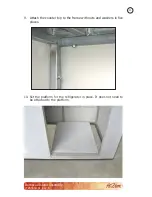
Page 13: ...Assembly LTR50001101 Rev A www calflamebbq com Attach the counter top to the frame with nuts and washers in five 9 places Set the platform for the refrigerator in place It does not need to 10 be attac...

Page 14: ...manufactured as a single unit and is split apart after stucco has been applied After you have assembled all of the pieces you may notice a small seam in the stucco If you wish to eliminate the seam y...

Page 15: ...n has natural fissures in the surface Constant exposure to extreme heat or cold can cause these natural features to expand and eventually crack Although the stone has been properly finished and is sui...

Page 16: ...egar lemon juice or other cleaners containing acids Don t use cleaners that contain acid such as bathroom cleaners grout cleaners or tub tile cleaners Don t use abrasive cleaners such as dry cleansers...

Page 17: ...nally apply a solution of chlorine bleach and water to stand not more than 5 minutes rinse thoroughly and wipe dry General purpose household cleaners may also be used if label says can be used on cera...

Page 18: ...nd Maintenance of Tile Grout Grout may present a special cleaning problem because it is susceptible to many staining agents Apply a silicone sealer to grout joints several times a year for maximum pro...

Page 19: ...periodic cleaning We strongly recommend using a surface protectant to prevent smudg ing and surface rust from accumulating The easiest way to clean the grill is immediately after cooking is com pleted...

Page 20: ...ss steel Mild dish detergent such as Dawn Formula 409 Fantastik Sheila Shine exterior ONLY WD 40 exterior ONLY We have had best success with Sheila Shine but WD 40 works very well too Sheila Shine is...

Page 21: ...surface of the appliance Using a clean terry cloth or paper towel polish the appliance by rubbing with the grain until excess liquid is removed and the surface shines It should not be oily to the touc...

Page 22: ...l hard ware You need to clean and polish your stainless steel frequently apply a protectant and ensure water does not collect and puddle Periodically clean exterior stainless steel surfaces with WD 40...

Page 23: ...ck To reduce the risk of flashback this procedure should be followed at least once a month or when your grill has not been used for an extended period of time IMPORTANT Prior to starting this procedur...

Page 24: ...pan with a solution of warm soapy water Make sure to rinse thoroughly to avoid staining Steam Cleaning Your Grill Steam cleaning the interior of your grill is very effective and will not void your wa...

Page 25: ...er towel storage propane tank drawer LMS warrants the decorative finishes to be free of defects at time of delivery including but not limited to stucco grout brick rock tile granite and foot rest Exte...

Page 26: ...rant is non transferable and may not be extended beyond the above mentioned time frames under any circumstances by any of LMS s representatives Warranty Limitations This warranty is void if the barbec...

Page 27: ...ermanent deck or other cus tom fixtures or the necessity for crane removal Any implied warranty shall have duration equal of the applicable warranty stated above Natural stone Rock travertine marble g...

Page 28: ...LTR50001101 Rev A 2 1 11 LMS Customer Service Department 1462 East Ninth Street Pomona CA 91766 Toll Free 1 800 CAL SPAS Fax 1 909 629 3890 www calspas com...

Reviews: