background image

SONAR LE Quick Start Guide

4  

SONAR LE

4. 

After selecting, click “Apply”. Necessary adjustments will be 
automatically carried out.

5. 

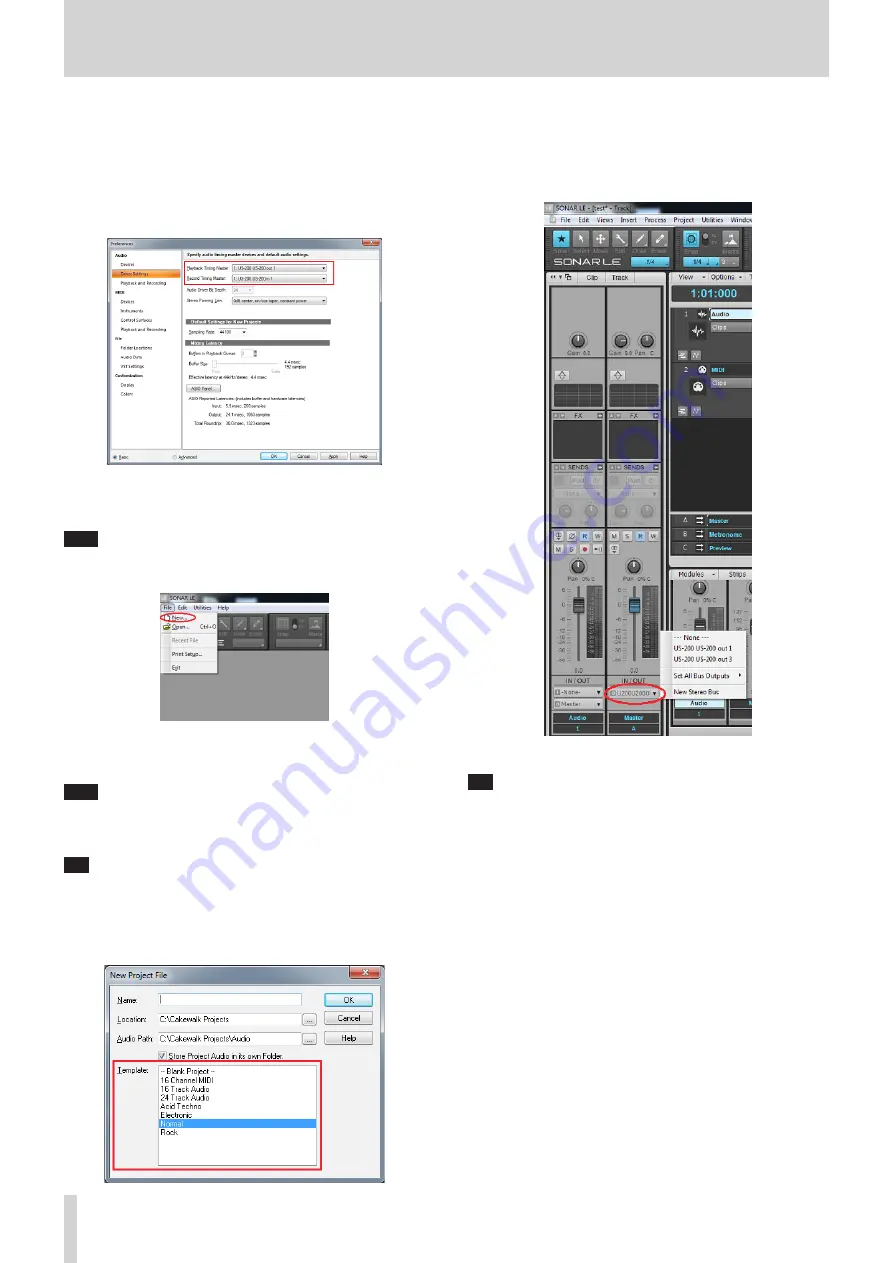
Click “Devices” on the left side of the “Preferences” screen and check 
that “US-200” is selected in the “Playback Timing Master” and “Record 
Timing Master” fields on the right side. Multiple items may be 
selectable depending on the audio interface. In this case, select all 
items having the name of the corresponding audio interface.

6. 

Now the device settings have been completed.
Click “CLOSE” to close the screen.
Next, create a project for recording sounds.

Note

Click “ASIO Panel” to open the driver screen for the audio interface.

7. 

From the “File” menu, select “New”.

8. 

The “New Project File” window is displayed. Enter an arbitrary 
project name in the “Name” field. Select “Normal” in the Template 
field and click “OK”.

Note

It is useful if the name is after the title of the music, etc. If there is 

no appropriate name because the production has not started yet, 

give a name such as “test”.

Tip

If you select “16 Track Audio” in the “Template” field, a project 

which has 16 audio tracks from the start is created. It is useful for 

recording audio.
If you are producing a music using a MIDI keyboard or a plug-in 

synthesizer, “16 Channel MIDI” is useful.

9. 

The project opens. In the “Inspector” section on the left side of the 
screen, the two tracks “Audio” and “Master” are displayed.
“IN/OUT” indicates the input source and output destination of each 
track. Check that the output destination of “Master” track is “US-200 
out 1”. If another item is selected, select “US-200 out 1”.

Now sounds of SONAR LE can be output to the US-200.

Tip

“US-200 out 1” indicates the first output terminal (Output 1). 

Though output sounds are stereo, Output 2 is not displayed. If you 

select “US-200 out 3”, sounds of SONAR LE will be output to 3 and 4 

of the US-200 (Output 3/4).

Summary of Contents for sonar le

Page 1: ... the instruction may cause injury to a person damage to the device or a data loss About trademarks TASCAM is a trademark of TEAC CORPORATION registered in the U S and other countries Microsoft Windows Windows 7 Windows 8 and Windows Media are either registered trademarks or trademarks of Microsoft Corporation in the United States and or other countries Cakewalk is a registered trademark or tradema...

Page 2: ...icense card included in the audio interface 3 Click SONAR LE to download and save an installer A serial number of SONAR LE is displayed at the same time An e mail is sent to the registered address Carefully record the serial number by taking a note or in another way 4 Double click the installer to start up 5 Set the language to English in language selection Check each field and click Next to proce...

Page 3: ...ick Start window is displayed click CLOSE Note Selecting Getting Started will launch a web browser and open an online tutorial We recommend you to refer it Quick Start window 2 From the Edit menu select Preferences 3 Click Devices on the left side of the Preferences screen and select US 200 in the Input Drivers and Output Drivers fields on the right side Select US 200 in each of the Input Drivers ...

Page 4: ...d click OK Note It is useful if the name is after the title of the music etc If there is no appropriate name because the production has not started yet give a name such as test Tip If you select 16 Track Audio in the Template field a project which has 16 audio tracks from the start is created It is useful for recording audio If you are producing a music using a MIDI keyboard or a plug in synthesiz...

Page 5: ...utton for the track to turn on light up in red 3 Click the Record button in the Control bar section on the top side of the screen to start recording 4 After the playing is finished click the Stop button and then click the Arm button to turn off light out Perform other operations such as rewinding as necessary 5 Repeat the above 1 to 4 steps to mix sounds Tip When recording a vocal or acoustic guit...

Page 6: ...ck Set Thru Now of the Transport Bar 2 Move the cursor to the ending point in the same way and click Set Thru Now 3 From the File menu select Export and then Audio 4 Set each field of the Export Audio window and click the Export button On this screen set the name of the file to be exported save location file format sampling rate sampling frequency bit depth bit rate and others 5 When the export is...

Reviews: