10
3. Initial Unit Disassembly
S
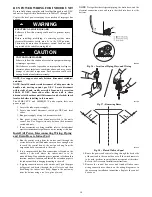
Remove the screws on the front of the unit to open the
grille.
S
After removing the grille, remove the screws in the side
panels.
S
Push the side panels in the direction shown in Fig. 16 to
disassemble them.
Remove the screws to open the grille.
Remove the grill.Then remove the screws of side panel.
Push the side panel as the arrow direction to disassamble them.
Fig. 16 – Initial Unit Disassembly
Ceiling Installation
1. Install Suspension Bolts for Ceiling Installation
S
Mark the spots on the ceiling where you want to install the
indoor unit.
S
Drill holes at the marking spots and then insert bolt anchors.
Use a hole--in--anchor, sunken insert for existing ceilings.
S
Install the suspension bolts (use W3/8 or M10 suspension
bolts, 4 pieces) depending on the ceiling type.
CAUTION
!
It is recommended to install the Y joint before installing the
indoor unit.
When moving the unit during or after unpacking, make sure to
lift by holding its hooks.
Do not exert any pressure on other parts, especially the
refrigerant piping and drain piping.
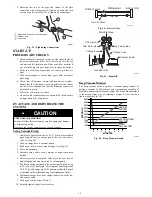
Suspension bolt (3/8” or M10) - field supplied
Hole in anchor
Hole in plug
Insert
A150268
Fig. 17 – Suspension Bolts
2. Hanging the Indoor Unit for Ceiling Installation
S
Screw double nuts to each suspension bolts making
space for hanging the indoor unit.
S
Hang the indoor unit to the suspension bolts between
two nuts (see Fig. 18).
S
Screw the nuts to suspend the unit.
S
Adjust level of the unit by using level vial for all sides.
CAUTION
!
Ensure that the ceiling is strong enough to bear the weight of
the unit.
Before hanging the unit, test the strength of each attached
suspension bolt. It might be necessary to reinforce the ceiling
frame.
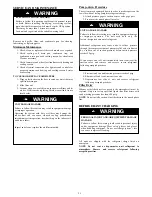
Screw nut
Washer
Hanging
screw bolt
Overhang part
Shockproof cushion
A150269
Fig. 18 – Suspension Bolt Detail
3. Piping and Drainage Outlet for Ceiling Installation
S
The position of drain pipe interface can be selected
according to installation position. During adjustment of
the drain hose, the unused interface should be sealed
with a rubber plug.
20mm
Lean over 1% -2%
Drain hose
Refrigeration pipes
A150271
Fig. 19 – Drainage Outlet for Ceiling Installation
4. Install the Drain Pipe for Ceiling Installation
S
Remove the cover of the drain hose connection port
S
Insert the flexible hose onto the drain hose port. Securely
fix the flexible hose to the indoor unit with a pipe clamp.
S
Install the flexible hose onto the PVC water pipe (field
supplied, I.D. 1”) with PVC adhesive. See Fig. 20.
S
To ensure correct condensate water flow, the pipe should
have a gradient of 2% without obstruction (see Fig. 20).
DO NOT install the drainpipe to an upward position.
Doing so may cause water to flow back to the unit.


