background image

SmartSwitch 6500 Installation and Setup Guide   2-5

Switch Installation

Switch Installation and Assembly  

Note

 If any of these items are missing, contact Cabletron Global Support Center 
immediately.

2.2

SWITCH INSTALLATION AND ASSEMBLY

The following is a list of steps for assembling your SmartSwitch 6500. Refer to Figure 2-7 for proper module 
placement.

2.2.1

Mounting the Chassis

1.

Find someone to assist you. The SmartSwitch 6500 chassis is heavy enough to make this a 
two-person task.

2.

Select a spot on a standard 19 inch equipment rack that provides at least two inches of air space 
above and below the chassis. This is necessary for proper ventilation and heat dissipation.

3.

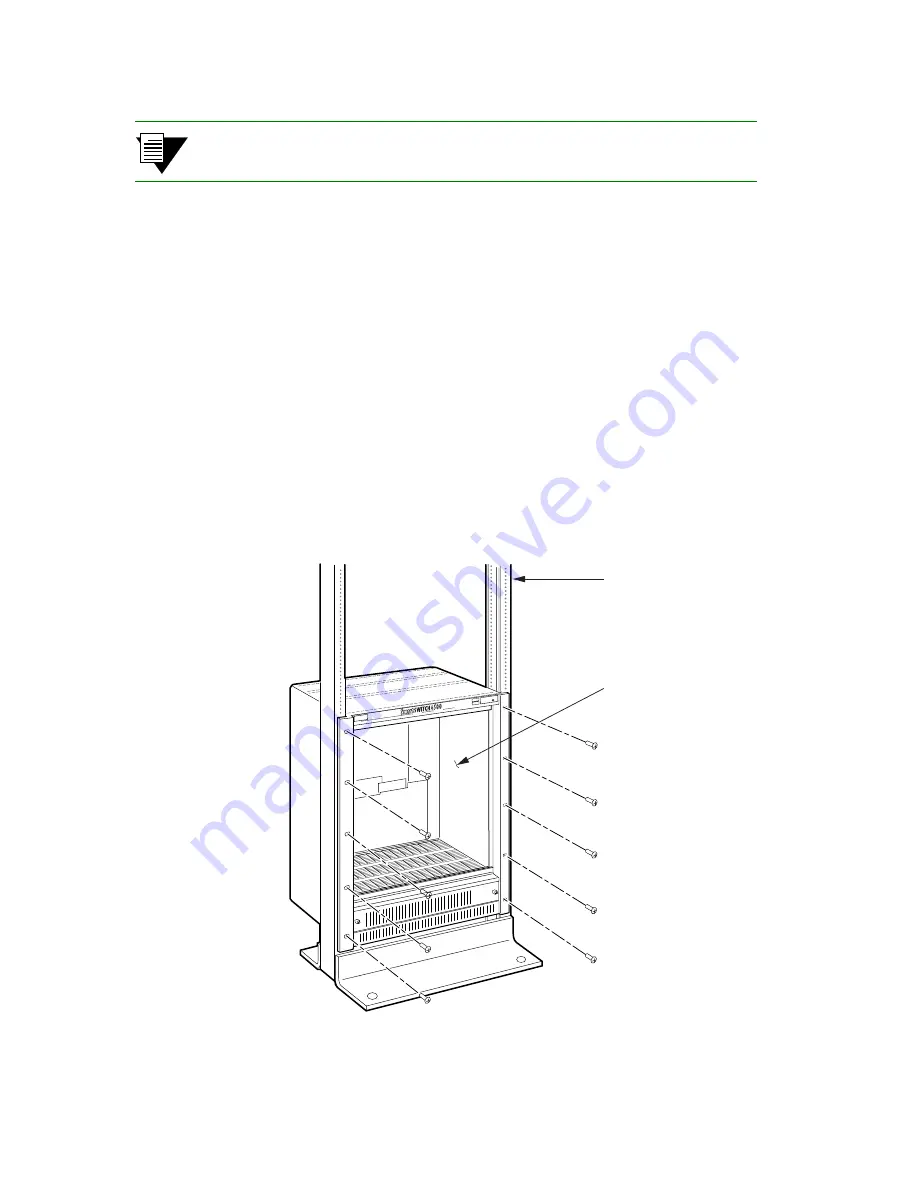
Secure the SmartSwitch 6500 to the equipment rack using the screws provided with the equipment 
rack. The chassis is secured by ten screws, five screws per side (see Figure 2-3).

Figure 2-3 Rack mounting the SmartSwitch 6500 chassis

PS1

PS2

CSM

TSM/CPU

TSM

10

9

8

7

6

5

4

3

2

1

Install
Mounting
Hardware
(10 Places)

Rack Mount

Chassis

Summary of Contents for SmartSwitch 6500

Page 1: ...SmartSwitch 6500 Installation and Setup Guide 35 Industrial Way Rochester NH 03866 USA 603 332 9400 Part Number 04 0058 01 Rev A Order Number 9033007...

Page 2: ...ARISING OUT OF OR RELATED TO THIS MANUAL OR THE INFORMATION CONTAINED IN IT EVEN IF CABLETRON SYSTEMS HAS BEEN ADVISED OF KNOWN OR SHOULD HAVE KNOWN THE POSSIBILITY OF SUCH DAMAGES Copyright 1998 99...

Page 3: ...the SmartSwitch 6500 Installation and Setup Guide may cause harmful interference to radio communications Operation of this equipment in a residential area is likely to cause interference in which case...

Page 4: ...d Newbury Berkshire RG13 2PZ England Conformance to Directive s Product Standards EC Directive 89 336 EEC EC Directive 73 23 EEC EN 55022 EN 50082 1 EN 60950 Equipment Type Environment Networking Equi...

Page 5: ...ssion CENELEC EN 60825 European Committee for Electrotechnical Standardization When operating within their performance limitations laser transceiver output meets the Class 1 accessible emission limit...

Page 6: ...er Chemtronics p n ES1270 or equivalent 2 Using a fiber port cleaning swab Alcoa Fujikura LTS p n ACT 01 or equivalent saturated with optical grade isopropyl alcohol gently wipe the end surface of fer...

Page 7: ...OMPLIANCE SUMMARY SAFETY The SmartSwitch 6500 meets the safety requirements of UL 1950 CSA C22 2 No 950 EN 60950 IEC 950 and 73 23 EEC EMC The SmartSwitch 6500 meets the EMC requirements of FCC Part 1...

Page 8: ...TORY Document Name SmartSwitch 6500 Installation and Setup Guide Document Part Number 04 0058 01 Rev A Document Order Number 9033007 Author Bruce Jordan Editor Ayesha Maqsood Illustrator Michael Forna...

Page 9: ...lies 2 6 2 2 3 Installing CSMs 2 6 2 2 4 Installing the TSM with CPU Daughter Boards 2 8 2 2 5 Installing Additional TSM Modules 2 10 2 2 6 Installing Other Modules in the SmartSwitch 6500 Chassis 2 1...

Page 10: ...ications 5 1 5 1 Front Panel 5 1 5 2 Technical Specifications 5 3 A Technical Support A 1 A 1 Telephone Assistance A 1 A 2 FAX Service A 1 A 3 Electronic Services A 1 A 4 Placing A Support Call A 1 A...

Page 11: ...nd CSMs 2 12 Figure 3 1 SmartSwitch 6500 connections for configuration 3 3 Figure 4 1 ATM Administrator physical topology view 4 2 Figure 4 2 ATM Administrator PNNI topology view 4 3 Figure 4 3 View o...

Page 12: ...xii SmartSwitch 6500 Installation and Setup Guide List of Figures...

Page 13: ...able 4 1 Default accounts and passwords 4 5 Table 5 1 CSM LEDs 5 1 Table 5 2 TSM LEDs 5 1 Table 5 3 Hardware Specifications 5 3 Table 5 4 Physical Specifications 5 3 Table 5 5 ATM Port Specifications...

Page 14: ...xiv SmartSwitch 6500 Installation and Setup Guide List of Tables...

Page 15: ...SmartSwitch 6C110 chassis with other Cabletron networking devices For example the slots of the 6C110 chassis can be populated by a mix of SmartSwitch 6500 modules and SmartSwitch 6000 Ethernet switch...

Page 16: ...10 chassis slots nine 9 or ten 10 1 1 2 Translation and Scheduling Module TSM TSMs are responsible for SmartSwitch 6500 traffic management functions For example TSMs perform header translation for ing...

Page 17: ...put Modules IOMs IOMs provide the physical ATM ports for the SmartSwitch 6500 and are mounted as daughter cards on the TSMs The TSMs of the SmartSwitch 6500 support a number of different I O modules w...

Page 18: ...1 4 SmartSwitch 6500 Installation and Setup Guide SmartSwitch 6500 Modules Introduction...

Page 19: ...nents you order 2 1 1 Inspecting Your Order The following is a general list of cartons and their contents that comprise a SmartSwitch 6500 SmartSwitch 6500 chassis with fan tray installed see Figure 2...

Page 20: ...2 2 SmartSwitch 6500 Installation and Setup Guide Receiving Your SmartSwitch 6500 Switch Installation Figure 2 1 SmartSwitch 6500 chassis PS1 PS2 CSM TSM CPU TSM 10 9 8 7 6 5 4 3 2 1...

Page 21: ...Inspect each component for damage Do not attempt to install damaged components Contact the Cabletron Systems Global Contact Center immediately see Appendix C Technical Support 2 Inspect the TSMs Make...

Page 22: ...eet CDROM containing the following SmartSwitch 6500 operating firmware SmartSwitch ATM switch documentation in Adobe Acrobat format SmartSwitch ATM Administrator software MIB files SmartSwitch 6500 Re...

Page 23: ...you The SmartSwitch 6500 chassis is heavy enough to make this a two person task 2 Select a spot on a standard 19 inch equipment rack that provides at least two inches of air space above and below the...

Page 24: ...lade screwdriver to secure the power supply to the SmartSwitch chassis by tightening the two attached slotted screws 5 Insert the power cord into its receptacle on the front of the power supply Plug t...

Page 25: ...tup Guide 2 7 Switch Installation Switch Installation and Assembly Figure 2 4 Installing CSM in slot 9 Rotate ejector to lock in place COM ENET POWER ACTIVE STANDBY FAIL ENET RDY TX DATA RX DATA Metal...

Page 26: ...he SmartSwitch 6500 chassis 3 Open the ejectors at the top and bottom of the TSM CPU module 4 With the ejector labeled 6A TSM512 at the top align the top and bottom of the TSM CPU module with the trac...

Page 27: ...etup Guide 2 9 Switch Installation Switch Installation and Assembly Figure 2 6 Installing a TSM CPU module in slot 8 Rotate ejector to lock in place Metal Backpanel Card Guides Circuit Card PS1 PS2 CS...

Page 28: ...Installing Additional TSM Modules TSM modules without CPU daughter boards can be installed in slots 1 through 6 See the legend on the top edge of the SmartSwitch 6500 chassis Follow these instruction...

Page 29: ...B FAIL MODE FAIL OK ATM CPU TSM NO SYNC DATA 1 2 3 4 6A IOM 21 4 B FAIL MODE FAIL OK ATM CPU TSM NO SYNC DATA 1 6A IOM 31 1 NO SYNC DATA 2 6A IOM 31 1 B FAIL MODE FAIL OK ATM CPU TSM NO SYNC DATA 1 2...

Page 30: ...IL OK ATM CPU TSM NO SYNC DATA 1 2 3 4 6A IOM 29 4 IR NO SYNC DATA 1 2 3 4 6A IOM 21 4 B FAIL MODE FAIL OK ATM CPU TSM NO SYNC DATA 1 2 3 4 6A IOM 29 4 IR B FAIL MODE FAIL OK ATM CPU TSM NO SYNC DATA...

Page 31: ...on and Setup Guide 2 13 Switch Installation Switch Installation and Assembly Table 2 2 Module combinations in 6500 chassis Number of double wide 6000 modules Installed 0 1 2 3 Number of TSM modules th...

Page 32: ...2 14 SmartSwitch 6500 Installation and Setup Guide Switch Installation and Assembly Switch Installation...

Page 33: ...plete the switch can be reached over your Ethernet network for additional configuration and administration Perform the following steps to configure initial switch parameters Note If you have a redunda...

Page 34: ...s Inc Press any key to exit to Boot Load Prompt 01 Bypassing POST Verifying Checksum of Switch Software SmartSwitch Command Console SmartSwitch Version 02 03 c Cabletron Systems Inc password admin adm...

Page 35: ...tSwitch 6500 to save configuration backup files The backup configuration file contains all configuration changes made to the switch For example the backup file contains ELAN information port configura...

Page 36: ...th public Smart6500 ztr tftpboot backup ztr full path and file name Smart6500 Note Depending upon whether your TFTP server is running in secure or non secure mode you may not need to specify tftpboot...

Page 37: ...abilities For example the following was performed on a SmartSwitch 6500 with redundant TSM CPUs and redundant CSMs Smart6500 show redundancystatus Admin Status Redundancy Enabled Oper Status System Is...

Page 38: ...SING THE CONSOLE Use the SmartSwitch 6500 console interface to configure and manage your switch The following is a description of the console interface and its operation 3 2 1 Port Numbering The Smart...

Page 39: ...switch attribute start Start a process on the switch for example start the LAN Emulation Configuration Server restart Restart a process on the switch for example restart client restore Restore the TSM...

Page 40: ...S 150 00 0 00 down 5B4 private autoConfig down STS 3c MMF S 150 00 0 00 down 7A1 private autoConfig down STS 3c MMF S 150 00 0 00 down 7A2 private autoConfig down STS 3c MMF S 150 00 0 00 down 7A3 pri...

Page 41: ...e console displays a numbered list of possible matching commands For example entering show pnnin is ambiguous because there are several commands that start with pnnin In response the SmartSwitch 6500...

Page 42: ...t6500 add laneclient Create LANE Client ClientNumber Local Client Number 0 127 LanName Name of the ELAN to join ServerType Type of LANE Server LECS LES ServerAddress ATM Address of the LANE Server IPA...

Page 43: ...ntify connections between switches Display physical topology of your ATM network Display PNNI peer group and domain topology of your ATM network Configure switch connections and ELANs using drag and d...

Page 44: ...4 2 SmartSwitch 6500 Installation and Setup Guide Introduction ATM Administrator Figure 4 1 ATM Administrator physical topology view...

Page 45: ...SmartSwitch 6500 Installation and Setup Guide 4 3 ATM Administrator Introduction Figure 4 2 ATM Administrator PNNI topology view...

Page 46: ...4 4 SmartSwitch 6500 Installation and Setup Guide Introduction ATM Administrator Figure 4 3 View of individual switch in network...

Page 47: ...rives with two user accounts set up These accounts are described in Table 4 1 Table 4 1 Default accounts and passwords User Name Default Password Privilege Level admin admin Administrator guest guest...

Page 48: ...NMS workstation must contain an ATM network adapter card Using an ATM adapter to reach your ATM network is the preferred type of connection for ATM Administrator Using ATM to connect to your ATM netwo...

Page 49: ...neric switch icons gray boxes identified by the IP address of their LANE client In this case each of these generic switches are not connected to the Ethernet network but are connected to the other swi...

Page 50: ...ected ATM Administrator This connectivity problem can be fixed by creating routes between the NMS and the non Ethernet connected switches 1 Add a route on the NMS that specifies the gateway to 90 0 0...

Page 51: ...Switch 4 use the add route console command SmartSwitch add route DestNetIP 206 61 237 0 GatewayIP 90 1 1 22 Switch 1 s LANE client SmartSwitch Similarly a route must be added to Switch 5 that specifie...

Page 52: ...w these instructions to access the on line help facility see Figure 4 10 1 From the Help menu select SmartSwitch ATM Administrator Help Topics 2 The Help Topics dialog box appears You have three optio...

Page 53: ...rk Click the Contents tab to show the Table of Contents of the online help Click on the topic you wish to read about Click the Index tab to select from an alphabetical list of help topics Click the Fi...

Page 54: ...4 12 SmartSwitch 6500 Installation and Setup Guide Managing Your ATM Network ATM Administrator...

Page 55: ...1 Table 5 1 CSM LEDs LED Green Amber Red Unlit POWER Power on No power ACTIVE CSM is active CSM not active STANDBY CSM is in standby mode CSM is not in standby mode FAIL CSM is in fail Normally off E...

Page 56: ...ing sync Slave TSM CPU Table 5 2 TSM LEDs Continued LED Green Amber Red Unlit ATM COM ENET POWER ACTIVE STANDBY FAIL ENET RDY TX DATA RX DATA CSM Console Terminal RJ 45 Ethernet Port 10Base T POWER AC...

Page 57: ...ash memory 16 MB Serial port RS 232c compliant RJ 45 connector Ethernet port IEEE 802 3 compliant RJ 45 connector On TSM CPU modules ports 7b4 and 8b4 are reserved for the CPU and can not support conn...

Page 58: ...5 Km MMF 155 Mbps STS 3 or STM 1 SC 14 dBm 19 dBm 14 dBm 31 dBm 2 Km MMF 622 Mbps STS 12c or STM 4 SC 14 dBm 20 dBm 14 dBm 26 dBm 500 m Cat 5 UTP 155 Mbps STS 3c or STM 1 RJ 45 100 m 75 ohm coax 44 7...

Page 59: ...SmartSwitch ATM User Guide for SNMP and MIB details MIB II RFC 1213 Interface Table MIB RFC 1573 AToM MIB RFC 1695 AToM2 MIB LANE MIB ATM Forum ILMI 4 0 MIB ATM Forum IP over ATM MIB PNNI MIB SmartSwi...

Page 60: ...5 6 SmartSwitch 6500 Installation and Setup Guide Technical Specifications Specifications...

Page 61: ...nical Support Center is available Monday through Friday 8am to 8pm Eastern Time by calling 603 332 9400 A 2 FAX SERVICE You can fax support questions to us any time at 603 337 3075 A 3 ELECTRONIC SERV...

Page 62: ...and patches for verified reported software issues A 7 REPAIR SERVICES Cabletron offers an out of warranty repair service for all our products at our Santa Clara Repair Facility Products returned for...

Reviews: