background image

MACH4

Loading Material

Edition 7/06 

Operator’s Manual

21

6.3.2

Reflex sensor

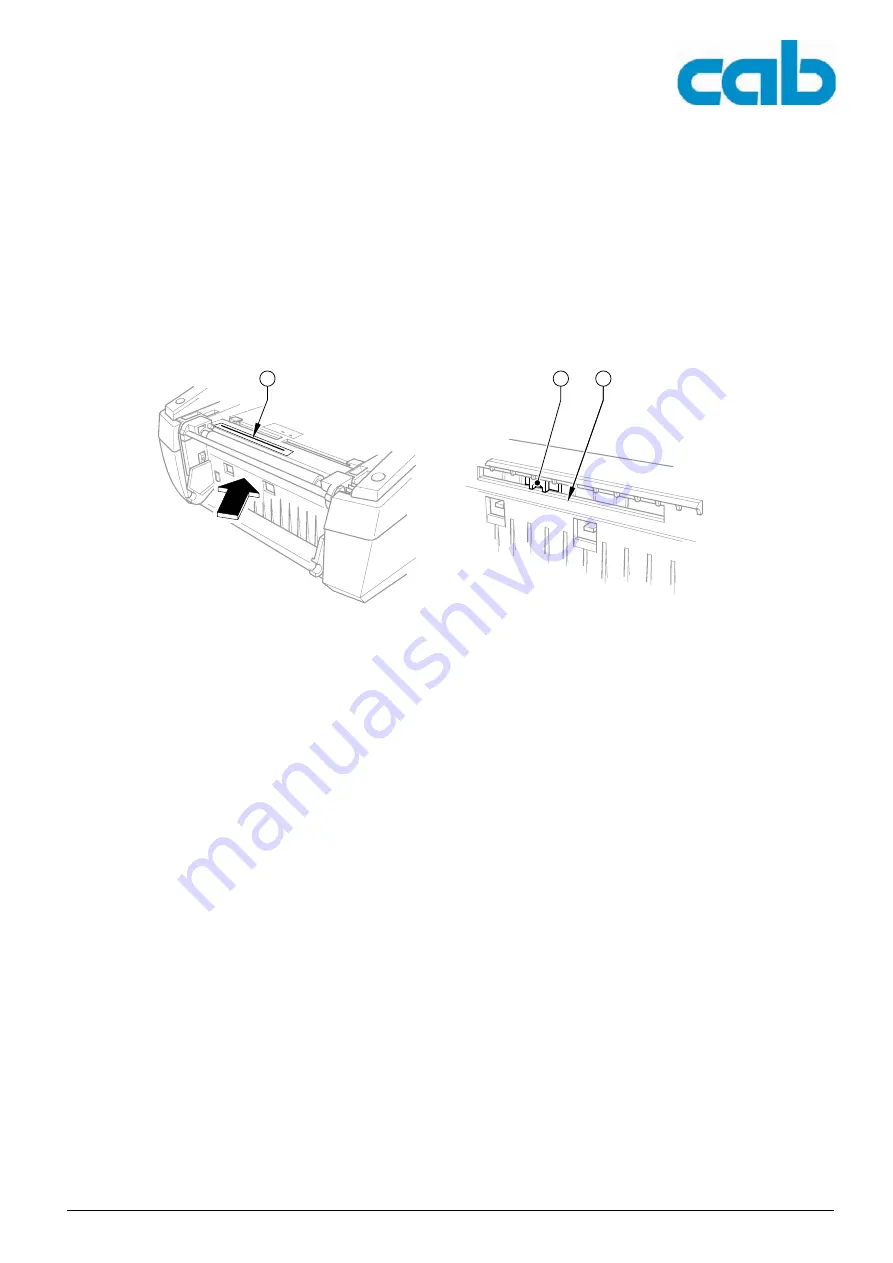
The reflective sensor (1) can detect marks on the back of the label stock. Move the sensor transversely 
to the transport direction with the slide (2) to adapt to the position of the reflective marks:

Determine the distance of the reflective marks from the center of the material.

Move the slide (2) to the desired position with a pointed tool. 
The distance of the sensor from the center is shown on the scale (3)..

Fig. 9:

Adjusting the Reflex Sensor

10

10

0

20

30

40

50

20

10

0

10

30

40

50

2

3

A

1

View A

Summary of Contents for MACH4

Page 1: ...PRODUCT MARKING AND BARCODE IDENTIFICATION Operator s Manual Edition 7 06 Barcode Label printer MACH4 up to Serial No 9999 ...

Page 2: ...ces cab label printers comply with the following safety regulations CE EU Low Voltage Directive 73 23 EEC EU Machinery Directive 98 37 EC EU Electromagnetic Compatibility Directive 89 336 EEC FCC Requirements of the FCC regulations part 15 for class A computers Under disadvantageous circumstances the operation of these devices may cause interference with radio or TV reception which has to be elimi...

Page 3: ...ions 6 1 3 3 References to the other documents 6 2 Safety and the Environment 6 2 1 Intended Use of the Printer 7 2 2 Safety Instructions 7 2 3 Disposal in an Eco friendly Manner 7 3 Installation 8 3 1 Device Overview 8 3 2 Unpacking the Label Printer 9 3 3 Installing the Label Printer 9 3 4 Connecting the Label Printer 9 3 4 1 Connection to the power supply 9 3 4 2 Connection to a computer or com...

Page 4: ...3 Label Sensors 20 6 3 1 Gap sensors 20 6 3 2 Reflex sensor 21 7 Printing Operation 22 7 1 Synchronization of the Paper Feed 22 7 2 Tear off Mode 22 7 3 Peel off Mode 22 7 4 Cutting Mode 22 8 Cleaning and Maintenance 23 8 1 General Cleaning 23 8 2 Cleaning the Media Feed Rollers 23 8 3 Cleaning the Printhead 23 8 4 Cleaning Label Sensors 24 8 5 Changing the Printhead 24 8 6 Replacing the Media Fee...

Page 5: ...ab Internet pages and is intended for trained service personnel who maintain and repair the label printer Each guide has its own page and section numbering The titles of the sections are also shown in the page headers to make navigation easier Follow up documentation Tab 1 Follow up documentation Please let us know if you have any questions or find any mistakes so that we can continue to improve o...

Page 6: ...ection and subsection gives the section number and page number e g see sec tion 5 2 on page 14 1 3 3 References to the other documents A reference to another document has the form See Configuration Manual All documents referred to in this guide are listed in the section Structure of the Documentation and Navigation see section 1 1 on page 5 2 Safety and the Environment Please read this quick opera...

Page 7: ...Connect only to a power outlet with a grounded contact The printer must only be connected to devices which have extra low voltage Switch off all affected devices computer printer accessories before connecting or disconnecting The label printer may only be used in a dry environment do not expose it to moisture sprays of water mists etc If the label printer is operated with the cover open ensure tha...

Page 8: ... USB 2 0 High Speed Slave interface 3 Two USB master interfaces for keyboard and scanner 4 Ethernet 10 10 Base T interface 5 CompactFlash card slot 6 Power supply socket 7 PC card slot type II 8 Power switch 9 Cover 10 Roll hub 11 Bracket grooves 12 Ribbon rewind hub 13 Printhead mounting with printhead 14 Unlocking button of the print module 15 Pressure roller 16 Control panel 17 Graphic display ...

Page 9: ...thout hindrance see section 6 1 4 3 4 Connecting the Label Printer The standard available interfaces and connectors are shown in figure 1 Overview view A 3 4 1 Connection to the power supply The printer is equipped with a wide area network unit The device can be operated with a supply voltage of 230 V 50 Hz or 115 V 60 Hz without adjustment 1 Plug the power cable into the power connection socket 6...

Page 10: ...ff When all connections have been made Switch the printer on at the power switch Fig 1 8 The printer performs a system test and then shows the system status ready in the display Fig 1 17 If an error occurs during the system test the symbol and type of error are displayed see section 9 1 on page 26 Switch the printer off at the power switch Fig 1 8 after finishing work Inadequate or no grounding ca...

Page 11: ...s of the label printer 4 1 Structure of the Control Panel The key functions depend on the current printer status Active functions Labels and symbols on the navigator pad keys Active functions light up white in print mode e g menu or feed Active functions light up orange in the offline menu arrows key Key Functions The pause cancel menu feed keys are explained in section 4 2 4 The up down left and ...

Page 12: ... Press any key on the navigator pad 4 2 3 Printer states Ready state The printer is in the ready state and can receive data The display shows the text ready and configured symbol displays such as date and time of day Printing label state The printer is currently processing an active print job Data can be transmitted for a new print job The new print job will start when the previous one has finishe...

Page 13: ...y Call Service if the fault occurs persistently 4 2 4 Key functions Tab 2 Key functions Button Display State function menu lights Ready Ready to the offline menu feed lights Ready Ready Feeds a blank label pause lights Ready Ready After the end of a print job Reprint the last label Print label Print label Interrupt print job Printer goes into Pause state Pause Pause Continue the print job printer ...

Page 14: ...l is separated from the backing material after printing The label is removed by hand 5 2 Device with Cutting Function The control panel of this version of the label printer is fitted with a cutter The knife cuts material up to 250 g m 6 Loading Material 6 1 Loading Labels 6 1 1 Adapting the roll holder Label rolls are supplied with different diameters The roll holder can hold label rolls with a co...

Page 15: ...he label core 4 and with the lever pressed 3 slide it against the label roll In so doing the label roll is automatically set in the centerline by the edge stops Place both edge stops against the label roll and release the lever 3 6 Place the roll holder back into the holder slots on the printer Ensure that the rounded surfaces of the edge stop are facing forward see fig 1 7 Press the release butto...

Page 16: ...holder see section 6 1 1 on page 14 Place the roll holder back into the holder slots 4 on the printer Ensure that the rounded surfaces of the edge stop are facing forward 5 Press the release button 6 and hinge the print module up 6 Feed the fanfold labels forwards under the deflector fig 4 6 and over the print roller fig 4 9 until it projects about 15 cm out of the printer 7 Move the label guides ...

Page 17: ...f the roller so that the roller is pressed out of the parking position 2 and into the working position 1 by the built in springs 2 Remove the labels 5 from about the first 15 cm of the label stock 3 Feed the ribbon material 4 out between the control panel and the printer 4 Hinge up the control panel fig 1 16 and close the cover fig 1 9 5 Carry out a synchronization run as per section 7 1 Place the...

Page 18: ...Transfer Ribbon Fig 7 Loading the transfer ribbon Do not insert a transfer ribbon for direct thermal printing CAUTION When inserting the transfer ribbon ensure that the coated side faces the labels as otherwise the printhead can become soiled 4 5 2 1 3 2 7 2 6 8 9 7 10 11 8 ...

Page 19: ...gular end 5 of the unwinding unit against the spring in the right hand holder and slide the left hand end into the guide slot 1 as far as it will go 7 Hinge the print module down do not slot in 8 Insert an empty roll onto the ribbon take up hub and set the width of the empty roll similarly to points 3 to 6 9 To insert the transfer ribbon rewinding unit 9 again press the rectangular end 5 of the un...

Page 20: ...els with an odd number of lanes When using multi lane labels with an even number of lanes e g two or four lane one has to switch manually to the gap sensor 1 1 Open the cover fig 1 9 and hinge down the control panel fig 1 16 Press the release button fig 1 14 and hinge the print module up 2 Set the switch 3 as required for gap sensor 1 move switch 3 to left hand position for gap sensor 2 move switc...

Page 21: ...he transport direction with the slide 2 to adapt to the position of the reflective marks Determine the distance of the reflective marks from the center of the material Move the slide 2 to the desired position with a pointed tool The distance of the sensor from the center is shown on the scale 3 Fig 9 Adjusting the Reflex Sensor 10 10 0 20 30 40 50 20 10 0 10 30 40 50 2 3 A 1 View A ...

Page 22: ...ith a tear bar fig 1 18 for this purpose Optionally the strip of la bels can be wound up externally 7 3 Peel off Mode In peel off mode the labels are automatically detached from the ribbon material after printing and pre sented for removal Label stock is loaded as described in section 6 1 7 4 Cutting Mode Use the device variant with an integrated cutter for the cutting function The labels or conti...

Page 23: ...if it is heavily soiled 8 3 Cleaning the Printhead Dirt can collect on the printhead during printing which affects the printed image for example by causing different contrasts or longitudinal stripes 1 Open the cover fig 1 9 and hinge down the control panel fig 1 16 press the release button fig 1 14 and hinge the print module up 2 Remove the transfer ribbon and the label stock see section 6 on pag...

Page 24: ...rinthead holder 5 is held down by two springs 10 3 Pull the printhead holder 5 out of the guide 8 on the print module 4 Disengage the printhead 11 by unscrewing the screws 4 from the printhead holder 5 5 Detach the printhead cables 6 and 7 from the printhead 11 6 After exchanging the printhead 11 attach the printhead cables 6 and 7 to the new printhead 11 7 Attach the printhead 11 to the printhead...

Page 25: ...ng the Media Feed Roller Fig 11 Fitting and removing the print roller 1 Open the cover fig 1 9 and hinge down the control panel fig 1 16 2 Press the release button fig 1 14 and hinge the print module up 3 Release the locking device to remove the print roller unit 1 Insert a pointed tool through the apertures 3 on both sides press on the pressure points of the hold ing lugs 2 and release the print ...

Page 26: ...error has occurred The printer is set into one of the three possible error states according to the type of error Tab 3 Error states Symbol Navigator pad Type of defect pause flashes cancel lights Correctable error see section 4 2 3 on page 12 cancel flashes Irrecoverable error see section 4 2 3 on page 12 Critical fault see section 4 2 3 on page 12 ...

Page 27: ...ode Cancel the ASCII dump mode Printer transports label media but transfer ribbon does not move Transfer ribbon incorrectly inserted Check and if necessary correct the transfer ribbon web and the orientation of the label side Unsuitable combination of labels and transfer ribbon Use different type of ribbon Printer only prints each second label Setting of the size in the soft ware is too large Chan...

Page 28: ... of the card Font not found Error with the selected down load font Cancel current print job change font FPGA malfunction Hardware error Switch the printer off and then on If error recurs call service Head error Hardware error Switch the printer off and then on If error recurs replace printhead see section 8 5 on page 24 Head open Printhead not locked Lock printhead Head too hot Printhead is overhe...

Page 29: ...red for SMTP but there is no SMTP server or the SMTP server is not currently available Switch off SMTP in the configuration Caution Then a warning cannot be sent by e mail EAlert Please contact your network administra tor No Timeserver Timeserver is selected in the configuration but there is no Timeserver or the Time server is not currently availa ble Switch off Timeserver in the configura tion Pl...

Page 30: ...nt type of card USB error Device stalled A USB device has been detected but it is not working Do not use the USB device USB error Too much current The USB device consumes too much current Do not use the USB device USB error Unknown device Failure to detect USB device Do not use the USB device Voltage error Hardware error Switch the printer off and then on If error recurs call service It is shown w...

Page 31: ...as designated below this statement shall thereby be made invalid Device Type Transfer printer MACH4 Applied EU Directives and Standards EC Machinery Directive 98 37 EU Machine Safety EN ISO 12100 1 2003 EN ISO 12100 2 2003 EU Low Voltage Directive 73 23 EEC Data and Office Machine Safety EN 60950 1 2001 EU EMC Directive 89 336 EEC Threshold values for the Interference of Data Machines EN 55022 199...

Page 32: ...print roller 25 Fitting and removing the printhead 24 G General guide to the documentation 5 I Indicator 11 K Key functions 13 L Loading fanfold labels 16 Loading labels 14 Loading material 14 M Maintenance 23 Mounting the adapter 14 O Operational states 12 P Peel off mode 22 Power save mode 12 Printing operation 22 Problem solution 27 S Screen 11 Setting up the peel off function 17 State Correcta...

Reviews: