background image

13

2.8 

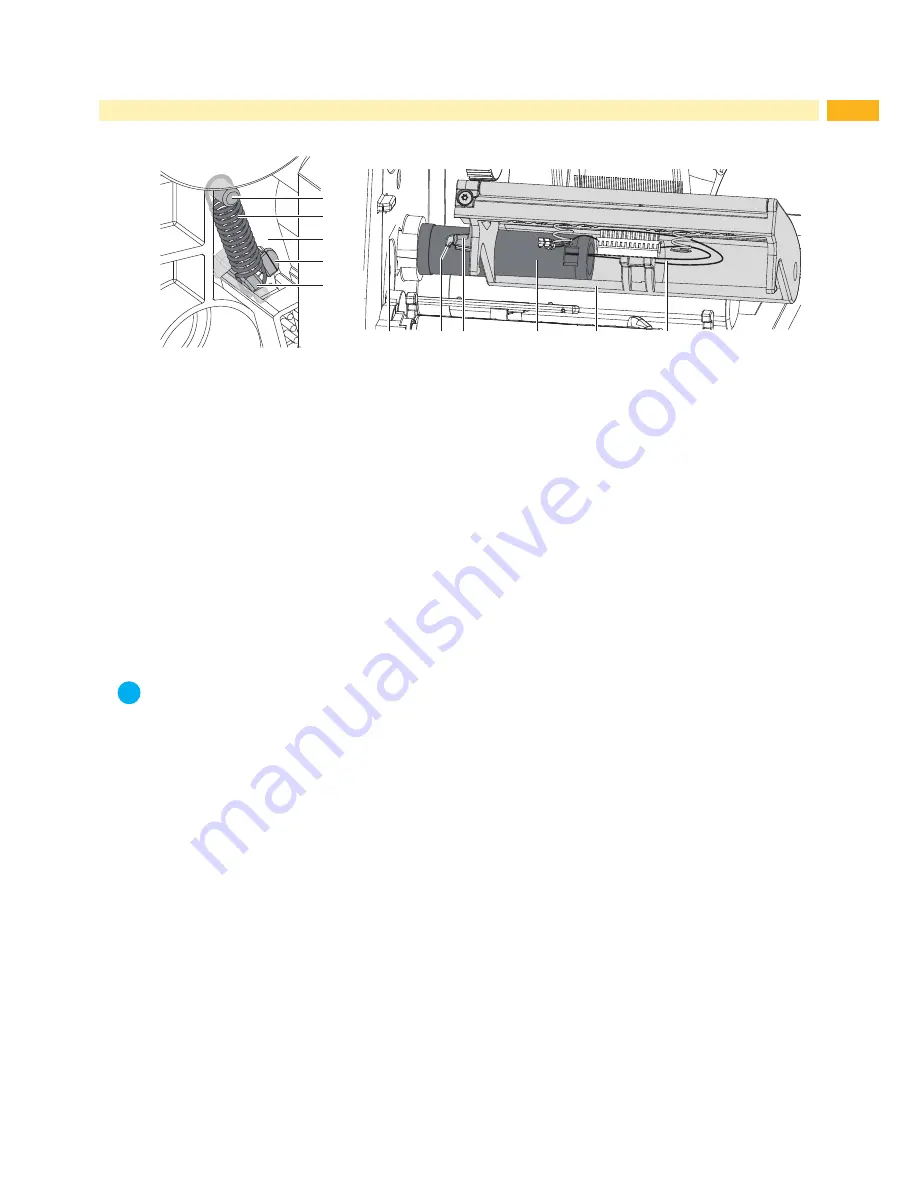
Replacing the Printhead Holder

1

2

4
5

3


6

7

4

5

3

8

Fig. 9 

Removing / mounting printhead holder

Removing


Remove the casing.


Remove the printhead.


Remove the spring (2) from the spring bolt (1).


Lift the printhead holder (7), unlock the latch (4) and push the printhead holder with the spring (2) to the operator’s 
side out of the chassis (3).


Remove the printhead holder (7) with the spring (2) completely from the retainer (6). In doing so remove the 
printhead cable (8) from the printhead holder.


Keep the spring (2).

Mounting


Push the printhead holder (7) onto the retainer (6). In doing so insert the printhead cable (8) into the printhead 
holder.


Push latch (4) and spring hook (5) of the printhead holder through the gap of the chassis (3).

i

Note!

For the following mounting of the spring (2) it is recommended to push the printhead holder in a position, 
where the latch (4) is clamped by the chassis but not completely locked yet.


Mount the spring (2) onto the spring hook (5).


Push the printhead holder (7) further until the latch (4) clicks into place.


Mount the spring (2) onto spring bolt (1).


Mount the printhead.


Mount the casing.

Replacing Assembly Units

Summary of Contents for EOS Series

Page 1: ...Made in Germany Service Manual EOS2 EOS5 Label Printer...

Page 2: ...evelopment of our products discrepancies between documentation and product can occur Please check www cab de for the latest update Terms and conditions Deliveries and performances are effected under t...

Page 3: ...g the Casing 9 2 5 Replacing the Control Panel 10 2 6 Replacing the Transport Module 11 2 7 Replacing the Stepper Motor 12 2 8 Replacing the Printhead Holder 13 2 9 Replacing the PCB CPU 14 2 10 Repla...

Page 4: ...with medium risk which if not avoided may result in death or serious injury Caution Draws attention to a danger with low risk which if not avoided may result in minor or moderate injury Attention Dra...

Page 5: ...tact with the device X X Do not wear clothing with metal parts X X Do not wear jewelry X X Do not wear spectacles with metal frames Warning Items of clothing drawn into the device by moving parts can...

Page 6: ...rcuits in the device Test the zero potential of the device parts Check the working area for possible sources of danger such as wet floors defective extension cables defective protective conductor conn...

Page 7: ...X X Ground your body e g by wearing a grounded wristband X X Do not touch contacts on the plug connections 5 6 X X Do not touch heating line with hard objects or your hands 1 Fold up printhead retaine...

Page 8: ...r 1 Open the printhead 2 Remove material and transfer ribbon from the printer 3 Fold down the cover 3 with the tear off plate 4 Lift the print roller 4 from its retainers 1 5 Push the new roller with...

Page 9: ...necessary to separate the cover from the cover plate Danger Risk of death via electric shock X X Before opening the housing cover disconnect the device from the mains supply and wait at lease one min...

Page 10: ...panel 3 at the latch 5 swing it away from the printer and remove it by lifting X X Unplug the connector of the display cable 4 Mounting X X Re connect the cable 4 X X Hook the slot 2 of the cover into...

Page 11: ...sor as far as possible to the operator s side w Operator s Manual X X Remove screw 3 and 5 screws 4 5 6 8 2 7 Fig 7 Removing mounting transport module 2 X X Remove control panel X X Remove the transpo...

Page 12: ...motor 3 from the CPU 1 X X Remove the gearwheels 5 from the axles 6 i Note The gearwheels 5 are reachable from the inner side of the chassis through the holes 4 with a pointed tool and can be pushed t...

Page 13: ...printhead holder X X Keep the spring 2 Mounting X X Push the printhead holder 7 onto the retainer 6 In doing so insert the printhead cable 8 into the printhead holder X X Push latch 4 and spring hook...

Page 14: ...nplug the printer from the electrical outlet 3 Detach all interface cables from the back of the printer 4 Remove all memory media from the slots 5 Remove the casing 6 Unplug all plug connections 4 10...

Page 15: ...3 3 2 Fig 11 Replacing the power supply unit 1 Unplug the printer from the electrical outlet 2 Remove the casing 3 Dismount the PCB CPU 2 9 on page 14 4 Unplug the cables from the connectors 4 5 5 Lo...

Page 16: ...ly Hub any direction 1 6 2 0 N 1 2 3 Fig 12 Measure braking force on supply hub for ink side out transfer ribbon 1 2 3 Fig 13 Measure braking force on supply hub for ink side in transfer ribbon 1 Remo...

Page 17: ...tion check the validity of the IP address and the subnet mask Check the interface cable and replace it if necessary If all functionality of the interface has been lost replace the PCB CPU A peripheral...

Page 18: ...18 18 4 Block Diagram Fig 14 Block diagram...

Page 19: ...C28 C163 AC D14 R71 CON4 R108 V R136 C187 C307 R166 1 L90 V13 V7 C164 C5 5 R280 F R77 C308 L25 R160 C213 C160 15 C207 2 R253 V21 R139 C42 C204 1 R163 C169 L42 L80 TOP6 C268 CON17 10 C15 R209 R78 C271...

Page 20: ...ity 6 Hardware faults 17 I Important information 4 M Maintenance work 6 P PCB CPU layout diagram 19 PCB CPU replacement 14 Power supply unit replacement 15 Printhead holder replacement 13 Printhead re...

Reviews: