background image

9

2 Installation

2.3 

Connecting

The standard available interfaces and connectors are shown in Figure 4.

2.3.1 

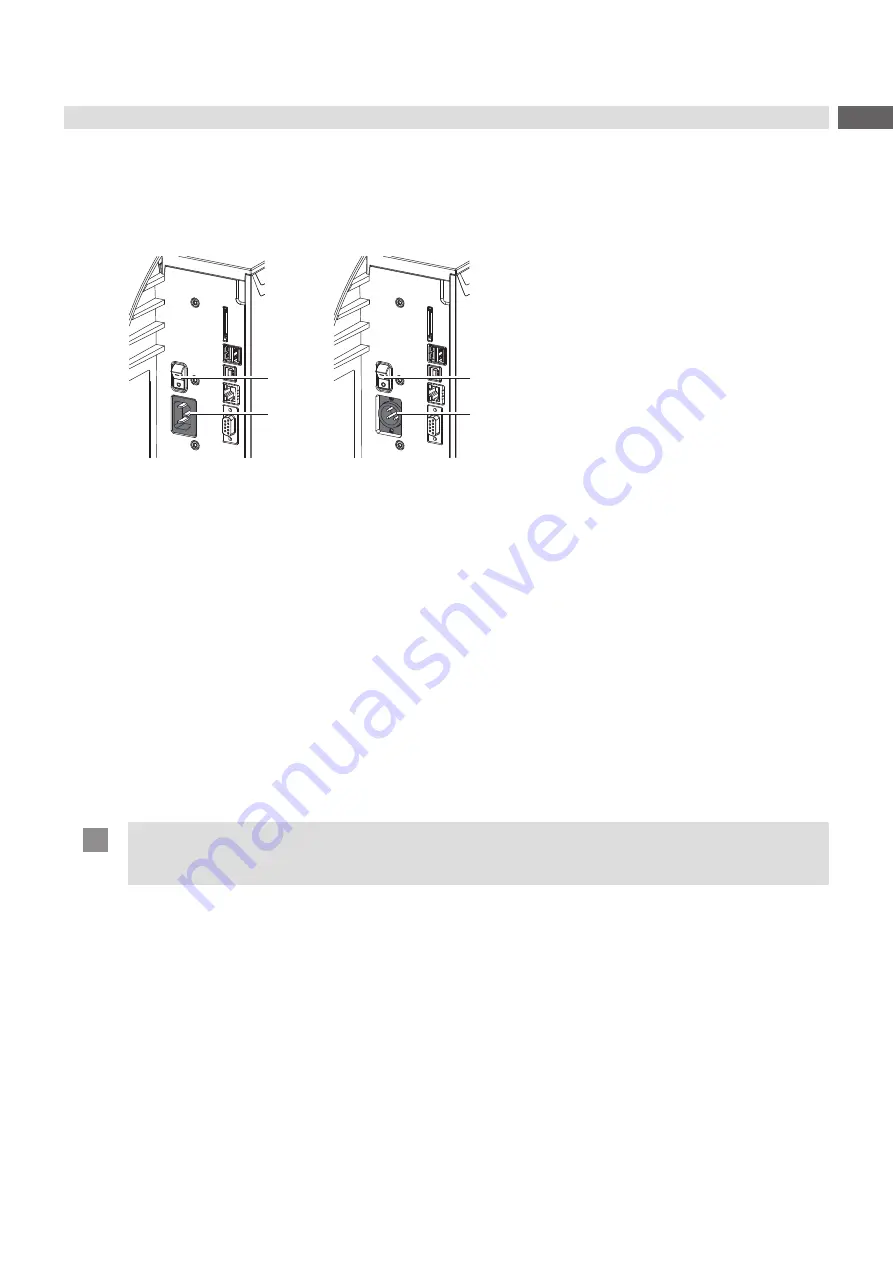
Connecting to Power Supply

2

1

3

1

Figure 6 

Connecting to power supply

Devices for 100-240 V AC

1.  Check that the device is switched off.

2.  Plug the power cable into the power connection socket (2).

3.  Plug the power cable into a grounded socket. 

Devices for 24-60 V DC

1.  Check that the device is switched off.

2.  Connect a suitable cable with XLR3 socket at the connector (3). 

Pin 1: - 
Pin 2: GND 
Pin 3: 24 - 60 V

3.  Connect the cable to a DC power supply.

2.3.2 

Connecting to a Computer or Computer Network

!

Attention!

Inadequate or no grounding can cause malfunctions during operations. 

Ensure that all computers and cables connected to the label labelling system are grounded.


Connect the label labelling system to a computer or network by a suitable cable.

For details of the configuration of the individual interfaces 

 Configuration Manual.

2.4 

Switching on

When all connections have been made:


Switch the labelling system on at the switch (1). 
The labelling system performs a system test, and then shows the system status 

Ready

 in the display (11/Figure 1) . 

The pressure rollers move in to the put-in position.

Summary of Contents for AXON 2

Page 1: ...Original Instructions AXON 2 MADE IN GERMANY Labelling System ...

Page 2: ...roduct can occur Please check www cab de for the latest update Terms and conditions Deliveries and performances are effected under the General conditions of sale of cab Original Instructions for the following products Germany cab Produkttechnik GmbH Co KG Karlsruhe Phone 49 721 6626 0 www cab de USA cab Technology Inc Chelmsford MA Phone 1 978 250 8321 www cab de us Taiwan cab Technology Co Ltd Ta...

Page 3: ...ia Roll on the Roll Retainer 14 4 2 2 Inserting the Media into the Printhead and Fixing the Liner at the Rewinder 15 4 2 3 Removing the Wound Liner Roll 15 4 3 Loading Transfer Ribbon 16 4 4 Setting the Feed Path of the Transfer Ribbon 17 5 Operation 18 5 1 Synchronization of the Paper Feed 18 5 2 Standard Operation 19 6 Configuration 20 7 Cleaning 21 7 1 Cleaning Information 21 7 2 Cleaning the P...

Page 4: ... or document Option accessories peripheral equipment special fittings Time Information in the display 1 2 Intended Use The device is intended exclusively for printing suitable labels that have been approved by the manufacturer and applying the labels onto tubes Any other use or use going beyond this shall be regarded as improper use The manufacturer supplier shall not be liable for damage resultin...

Page 5: ...s described in this operating manual Work going beyond this may only be performed by trained personnel or service technicians Unauthorized interference with electronic modules or their software can cause malfunctions Other unauthorized work on or modifications to the device can also endanger operational safety Always have service work done in a qualified workshop where the personnel have the techn...

Page 6: ...8 Print unit 9 Tube applicator 10 Tray 11 Touchscreen Display 12 LED Power on Figure 1 General overview 13 14 15 17 16 18 19 20 21 22 23 13 Ribbon deflection 14 Printhead retainer with printhead 15 Guides 16 Allen key 17 Printhead locking lever 18 Label sensor 19 Guide adjusting knob 20 Print roller 21 Dispense plate 22 Rewind assist roller 23 Locking system Figure 2 Print unit ...

Page 7: ...9 Power connector devices for 100 240 V AC only 30 Slot for SD card 31 2 USB host interfaces for keyboard barcode scanner Bluetooth adapter or WiFi stick 32 USB Hi speed device interface 33 Ethernet 10 100 Base T 34 Serial RS 232 port 35 Power connector devices for 24 60 V DC only 36 USB host interface for service key or USB memory stick 37 USB host interface for WiFi stick Figure 4 Connections ...

Page 8: ...locations protected from splash water X X Lift the labelling system out of the box X X Check the labelling system for damage which may have occurred during transport X X Remove foam transportation safeguards near the printhead X X Check delivery for completeness Contents of delivery Labelling system consisting of label printer and tube applicator Tray optional Power cable for AC devices only USB c...

Page 9: ...4 60 V 3 Connect the cable to a DC power supply 2 3 2 Connecting to a Computer or Computer Network Attention Inadequate or no grounding can cause malfunctions during operations Ensure that all computers and cables connected to the label labelling system are grounded X X Connect the label labelling system to a computer or network by a suitable cable For details of the configuration of the individua...

Page 10: ...s Programming Manual for details Settings made on the touchscreen display make the basic settings of the label labelling system i Note It is advantageous whenever possible to make adaptations to various print jobs in the software 3 1 Start Screen After switching on During printing After print job Figure 7 Start screen The touchscreen display is operated directly by touch To open a menu or select a...

Page 11: ...d data are stored in a lbl file Warning ribbon end Configuration manual The remaining diameter of the ribbon supply roll undershoots the set value SD card installed USB memory installed gray Bluetooth adapter installed white Bluetooth connection active WiFi connection active The WiFi strength is displayed by the number of white arcs Ethernet connection active USB connection active abc program acti...

Page 12: ...Start a function The will carry out the function possibly after a preparing dialogue or Select a parameter to set The setup possibilities are depending from the parameter type Logical parameters Selection parameters Numerical parameters Date time Figure 10 Samples for parameter setting Scroll bar for rough value setting Decreasing the value step by step Increasing the value step by step Return wit...

Page 13: ...r For loading labels or cleaning the applicator can be folded down from the printer Folding down X X Press down the locking lever 1 to unlock the applicator X X Fold down the applicator Folding up X X Fold up the applicator and press it against the printer The applicator will be locked automatically ...

Page 14: ...4 Remove the margin stop 1 from the roll retainer 4 5 Load label the roll 3 on the roll retainer in such a way that the printing side of the labels is visible from above 6 Re mount the margin stop 1 onto the roll retainer 4 Push the margin stop 1 to the roll 3 until the roll touches both margin stops and a clear resistance is encountered 7 Turn ring 2 clockwise so that the arrow points to the symb...

Page 15: ...der 10 firmly and turn the knob 11 clockwise until it stops 6 Push the liner under a bracket 6 of the rewinder 10 and align the outer edge of the strip to the media roll 7 Turn knob 11 counterclockwise until it stops The rewinder is fully spread thus gripping the liner firmly 8 Turn rewinder 10 counterclockwise to tighten the liner 9 Swing the pinch roller 8 against the rewind assist roller 7 10 T...

Page 16: ... 5 Hold the transfer ribbon roll 1 firmly and turn knob on ribbon supply hub 3 counterclockwise until the transfer ribbon roll is secured 6 Slide a suitable transfer ribbon core 4 onto the transfer ribbon take up hub 5 and secure it in the same way 7 Guide transfer ribbon through the print unit as shown in Figure 15 8 Secure starting end of transfer ribbon to the transfer ribbon core 4 with adhesi...

Page 17: ...es 1 2 3 Figure 16 Setting the feed path of the transfer ribbon i Note The adjustment is best carried out during printing X X Read current setting on the scale 1 and record if necessary X X Turn screw 2 with Allen key and observe the behavior of the ribbon In the direction the inner edge of the ribbon is tightened and the outer edge is tightened in the direction 4 Loading Material ...

Page 18: ...ization of the Paper Feed After the label stock has been inserted a synchronization of the paper feed is required That way the first label which is detected by the label sensor will be transported to the print position and all labels in front will be fed out of the printer So the synchronization avoids that blank labels are peeled off together with the first printed label That can cause useless fi...

Page 19: ...This is done with the P command in the direct programming Programming Manual X X Send a print job X X Insert the first tube X X Press The tube will be pressed against the transport rollers The first label will be printed and applied onto the turning tube After about two turns the locking clamps will be opened Depending on the configuration the tube will be ejected or left in the labelling area X X...

Page 20: ... tube On The tube will be ejected after labelling Off The tube will be left in the labelling area after labelling Off Opening width Setting the distance between the transport rollers and pressure rollers for tube input 1 Check diameter Checking the tube diameter before labelling Off Table 4 Parameters of the Setup Labelling menu Teach in product X X Select Teach in product The display shows Step 1...

Page 21: ...er may impair the media transport and the print quality X X Lift the printhead X X Remove labels and transfer ribbon from the labelling system X X Remove deposits with roller cleaner and a soft cloth X X If the roller appears damaged replace it Service Manual 7 3 Cleaning the Printhead Cleaning intervals direct thermal printing every media roll change thermal transfer printing every ribbon roll ch...

Page 22: ...ter is still transmitting data Use data transmission via protocol preferably RTS CTS Device not conn Programming addresses a non existent device Either connect this device or correct the programming Device not locked The tube applicator is not in operating position Fold up the applicator File not found Requested file is not on the card Check the contents of the card Font not found Error with the s...

Page 23: ... card Remove ribbon Transfer ribbon is loaded although the printer is set to direct thermal printing For direct thermal printing remove ribbon For thermal transfer printing set the printer in the configuration or in the software to transfer printing Ribbon ink side Identified ribbon unwinding direction does not match to the setup setting Ribbon loaded incorrectly Clean the printhead 7 3 on page 21...

Page 24: ...cel the ASCII dump mode Printer transports label media but transfer ribbon does not move Transfer ribbon incorrectly inserted Check and if necessary correct the transfer ribbon web and the orientation of the label side Unsuitable combination of labels and transfer ribbon Use different type of ribbon Printer only prints each second label Setting of the size in the software is too large Change the s...

Page 25: ...er sets Windows 1250 to 1257 DOS 437 737 775 850 852 857 862 864 866 869 EBCDIC 500 ISO 8859 1 to 10 and 13 to 16 WinOEM 720 UTF 8 MacRoman DEC MCS KOI8 R Western European Cyrillic Eastern European Greek Chinese simplified Latin Chinese traditional Hebrew Thai Arabic Bitmap fonts Widths and heights 1 3 mm Zoom factors 2 to 10 Orientations 0 90 180 270 Vector TrueType fonts Widths and heights 0 9 1...

Page 26: ...SO 13857 2008 EN 349 1993 A1 2008 EN 60950 1 2006 A11 2009 A12 2011 A1 2 010 A2 2013 Directive 2014 30 EU relating to electromagnetic compatibility EN 55024 2010 EN 55032 2012 EN 61000 3 2 2014 EN 61000 3 3 2013 EN 61000 6 2 2005 Directive 2011 65 EU on the restriction of the use of certain hazardous substances in electrical and electronic equipment EN 50581 2012 Commission delegated directive EU ...

Page 27: ...ssion delegated directive EU 2015 863 amending Annex II to Directive 2011 65 EU of the European Parliament and of the Council as regards the list of restricted substances Authorized representative for technical documentation Erwin Fascher Am Unterwege 18 20 99610 Sömmerda Signed for and on behalf of the Manufacturer cab Produkttechnik Sömmerda Gesellschaft für Computer und Automationsbausteine mbH...

Page 28: ...2 EU Declaration of Conformity 26 I Important information 4 Intended use 4 L Lithium battery 5 Loading media 14 Loading transfer ribbon 16 O Operation 18 P Peel of position 20 Power supply 5 Printhead cleaning 21 damage 18 Print roller cleaning 21 Problem solution 24 R Removing the liner roll 15 S Safety instructions 5 Service work 5 Switching on 9 Synchronization of the paper feed 18 V Voltage 5 ...

Reviews: