C-TEC CAST XFP Commissioning & Programming Quick Start Manual Download Page 14

CAST XFP ANALOGUE ADDRESSABLE FIRE ALARM PANEL 


Page 14 of 16 

 Commissioning/Programming Quick Start Guide 

 Approved Document No. DFU5020010 Rev 4 


4.7  Edit Group Configuration 
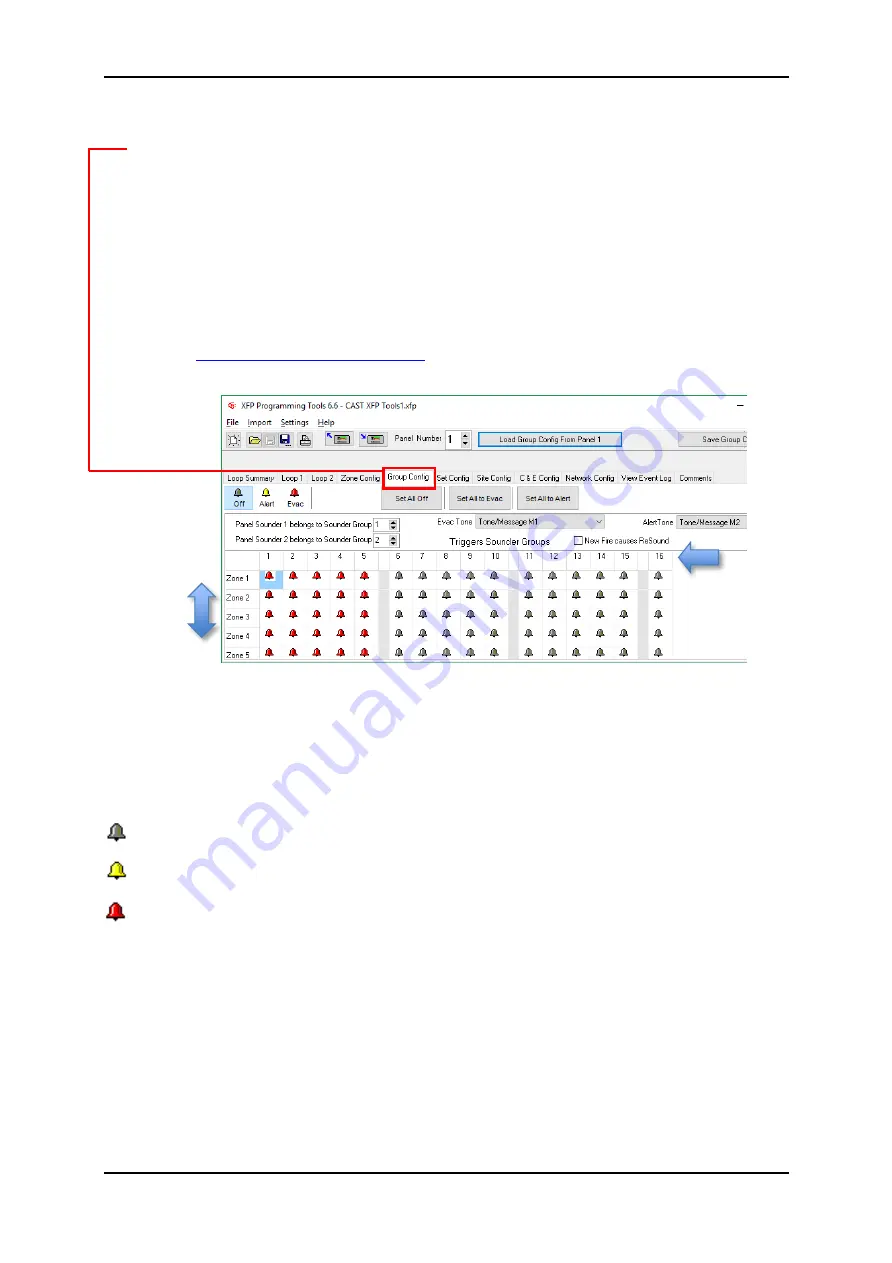
 

Clicking  the 

Group  Config

  tab  displays  the 

Group  Config

  window  which  deals  with  how  loop 

sounder/VADs and the panel’s conventional sounders interact with Zones. The intersection of the 
rows and columns clearly show the settings (see FIG.6). 


There are a maximum of 16 or 32 Zones (dependent on CAST XFP model) and a maximum of 16 Groups. 
By default, Groups 1 to 5 are set to continuous (Evacuation) operation if a fire event occurs in any 
Zone and Groups 6 to 16 are not configured. 
 
There  are  two  conventional  sounders  circuits  in  the  CAST  XFP  panel,  i.e.  Panel  Sounder  1  &  Panel 
Sounder 2. By default, Panel Sounder 1 assigns to Group 1 and Panel Sounder 2 assigns to Group 2. 
 
Combined  loop  sounder/VAD  devices  can  be  assigned  to  different  Groups  in  the 

Loop  Summary 

window, see 

Assign a Sounder/VAD to a Group

.


To change the status of a Group for a specific Zone, simply click on the desired state button (Off, Alert or 
Evac), then click on the individual field to change the status, as shown below. 
 

-  The grey bell indicates the Group is set to OFF for that Zone. 


-  The yellow bell indicates the Group is set to the Alert Tone/Message for that Zone


-  The red bell indicates the Group is set to the Evac Tone/Message for that Zone


Zones 

(max. 16/32) 

Groups 
(max. 16) 

FIG.6 – Group Config Window 


Summary of Contents for CAST XFP

Page 1: ...le Fire Alarm Control Panel 1 Loop 16 Zone Panel Part No XFP501E CA 1 Loop 32 Zone Panel Part No XFP501 CA 2 Loop 32 Zone Panel Part No XFP502 CA Commissioning Programming Quick Start Guide Approved D...

Page 2: ...CAST XFP ANALOGUE ADDRESSABLE FIRE ALARM PANEL Page 2 of 16 Commissioning Programming Quick Start Guide Approved Document No DFU5020010 Rev 4 FIG 1 CAST XFP Menu Structure...

Page 3: ...to Zones Groups Sets 11 4 7 Edit Group Configuration 14 4 8 Enter Site Details 15 4 9 Save Data from the PC Laptop to the Panel 16 E OE No responsibility can be accepted by the manufacturer or distrib...

Page 4: ...mmissioning Checks at the Panel Before commissioning ensure the following checks have been carried out at the panel Check the continuity on the negative ve line of the device loop s to ensure they are...

Page 5: ...t appears press the Accept button to continue Press the scroll button to select Yes then press the Accept button shown below When requested by the panel fit the NVM link shown below You now have two o...

Page 6: ...en press the Accept button shown below The panel will perform an auto address Wait for the process to complete and a brief summary window will appear similar to the one shown below Press the Accept bu...

Page 7: ...evious loop learn or PC upload you will be asked if you want to erase this information before the loop learn begins You now have two options Erase Loop 1 device data first No or Erase Loop 1 device da...

Page 8: ...ress the scroll button to select Yes then press the Accept button shown below The following message will appear Only if you are confident to proceed press the scroll button to select Yes then press th...

Page 9: ...the PC laptop to the RS232 port on the CAST XFP panel Note Application Note 0001 0 details setting up a Serial Comms Port on a PC laptop to connect to C TEC control panels App Note 001 00 is availabl...

Page 10: ...IG 2 shows the typical results after the auto address or loop learn data has been loaded from a CAST XFP panel into the XFP Programming Tools The tools have automatically allocated loop addresses and...

Page 11: ...ses and may also be a fire compartment To make the system understandable to the user you should name all the Zones The following example uses the Zone Config tab option to show the results of editing...

Page 12: ...s fire fault etc to the fire alarm panel e g smoke heat detectors MCPs and the input channels of I O units Click on the Loop Summary tab to open the Loop Summary window For each input device click on...

Page 13: ...sign a device to a Group see FIG 5 Note In order to make any changes to the Zone Group Set data in the Loop Summary window click on the Enable Type Zone Changes box There are a maximum of 16 Groups wh...

Page 14: ...ps 6 to 16 are not configured There are two conventional sounders circuits in the CAST XFP panel i e Panel Sounder 1 Panel Sounder 2 By default Panel Sounder 1 assigns to Group 1 and Panel Sounder 2 a...

Page 15: ...e text shown on the panel s display when the Maintenance Date is reached By default Service Required Call Engineer is entered Typically set the maintenance date to 12 months after the commissioning da...

Page 16: ...fig data file from the PC laptop to the panel by clicking on the toolbar icon shown right When requested by the panel fit the NVM link shown below The following message will appear at the panel Wait f...

Reviews: