


Instruction Booklet
5-Series
Keep in mind these rules
:
•
Fully charge batteries at lease once a month, more if you use the scooter regularly.
Charge after each trip exceeding 3 kilometers.
•
If storing your scooter for some time (1 month or more) make sure that the batteries
are fully charged, and on returning, charge them again before using scooter.
•
Batteries will only give maximum performance after the scooter has been used, and
the batteries have been recharged up to 10 times. A bit like running in a new car.
The time needed to recharge will vary depending on the depletion of the
batteries. Charging for longer than necessary will not harm the batteries.
They can not be overcharged.
12
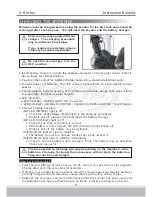
CHARGING THE BATTERIES
Batteries must be charged before using the scooter for the first time and should be
recharged after each day use. You will need the scooter and the battery charger.
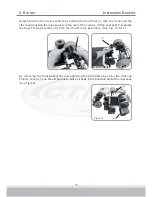
1.Insert battery charger cord into the charger connector on the charger output. Refer to
above figure for correct position
2.Plug the other end of the battery charger cable into a standard electrical outlet.
3.Turn the power on. Normally, The LED (Power) Light will turn on when electric current
passes.
4.Charging starts. During charging, LED (Charge) will indicate orange light, when it turns
to green light, that means well-charged.
5.LED indication
•
LED(POWER) - GREEN LIGHT ON : Power On.
•
LED(CHARGE) - ORANGE LIGHT ON : Charging / GREEN LIGHT ON : Fully Charged
6.Charger Trouble Shooting
(A)If LED (POWER) light is off
•
Check the input voltage (115V/230V) is the same as you adjust.
•
If light is still off, please check and repair the battery charger.
(B)If LED (CHARGE) light is off
•
Check to see clips connection is correct.
•
If the battery is fully charged, the LED (CHARGE) light will be off.
•
If light is still off, the battery may be defective.
(C)If ORANGE light can turn to GREEN
•
The battery can not be charged. Please check and recover it.
(D)If ORANGE light turns to GREEN immediately
•
Check to see the battery is fully charged, if not, The battery may be defective
Check and recover it.
Each country may supply different
charger. The charging procedure
may be different from below.
If you require more details, please
contact your authorized dealer.
Be sure the scooter key is in the
OFF position


