5
With the swivel head firmly attached to the other end of the mounting
bracket, connect the threaded bolt at the end of the swivel head to the
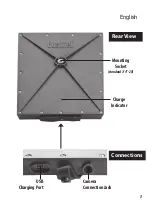
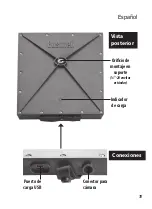
mounting socket on the back of the Solar Panel. Loosen the swivel head
knob, then the Solar Panel so that the solar cells are aimed at the sun.
Tighten the knob on the swivel head to secure the Solar Panel in place.
Finally, use the supplied cable to connect the Solar Panel’s camera jack
to your camera’s external power input jack
(refer to the instruction manual
for your model)
.
FAQ / TROUBLESHOOTING
Q: What does a flashing red charge indicator light mean?
A: Excessive output current (>2A) has been detected, and charging has been shut
off. Disconnect the USB cable until the red light stops flashing, then try again. If the
indicator continues to flash red, discontinue using the USB power source until it can
be checked/repaired, or try a different USB power source.
Q: Will the Solar Panel work in the shade? What happens at night?
A: The Solar Panel’s solar cell array will continue to collect and utilize any available
or reflected sunlight, but it requires unrestricted, full exposure to the sun in order
to ensure that the internal power core remains fully charged. A fully charged power
core is necessary so that the camera can continue to draw supplemental, “booster”
voltage from the Solar Panel during overnight hours.
TECHNICAL SPECIFICATIONS
Power Requirement
5 V @ min 500mA
USB Charging Voltage
4V ~ 6V
Discharging Voltage
7V ~ 8.4V
Max. Discharge Current
2A
Max. Charge Voltage Protection
6V
Recommended Charging Time
12 hours for full charge
Charging Priority
If both USB and solar charging sources are available,
USB charging will have higher priority than solar.
Operating Temperature
-20 - 40°C (Storage temperature: -30 - 70°C)
Operating Humidity
5% - 90%


