background image

Move a TV or Radio Program/s

1. Select the preferred program then press the RED button.  A


move symbol 

will appear
2. Press  UP/DOWN to move the program
3. Press OK to confirm
4. Repeat the above steps to move more channels 

Lock Program/s

You can lock selected programs for restricted view. 
Lock a TV or Radio Program: 
1.Select the preferred program then press the YELLOW button.  A lock-shaped 
symbol is displayed. The program is now marked as locked
2. Repeat the previous step to select more programs 
3. To confirm and exit the menu, press  the EXIT button
4. Press the YELLOW button to disable the locked program 
5. To view the locked program, you will be require to enter either the default  
password '000000' or your  last set password. 

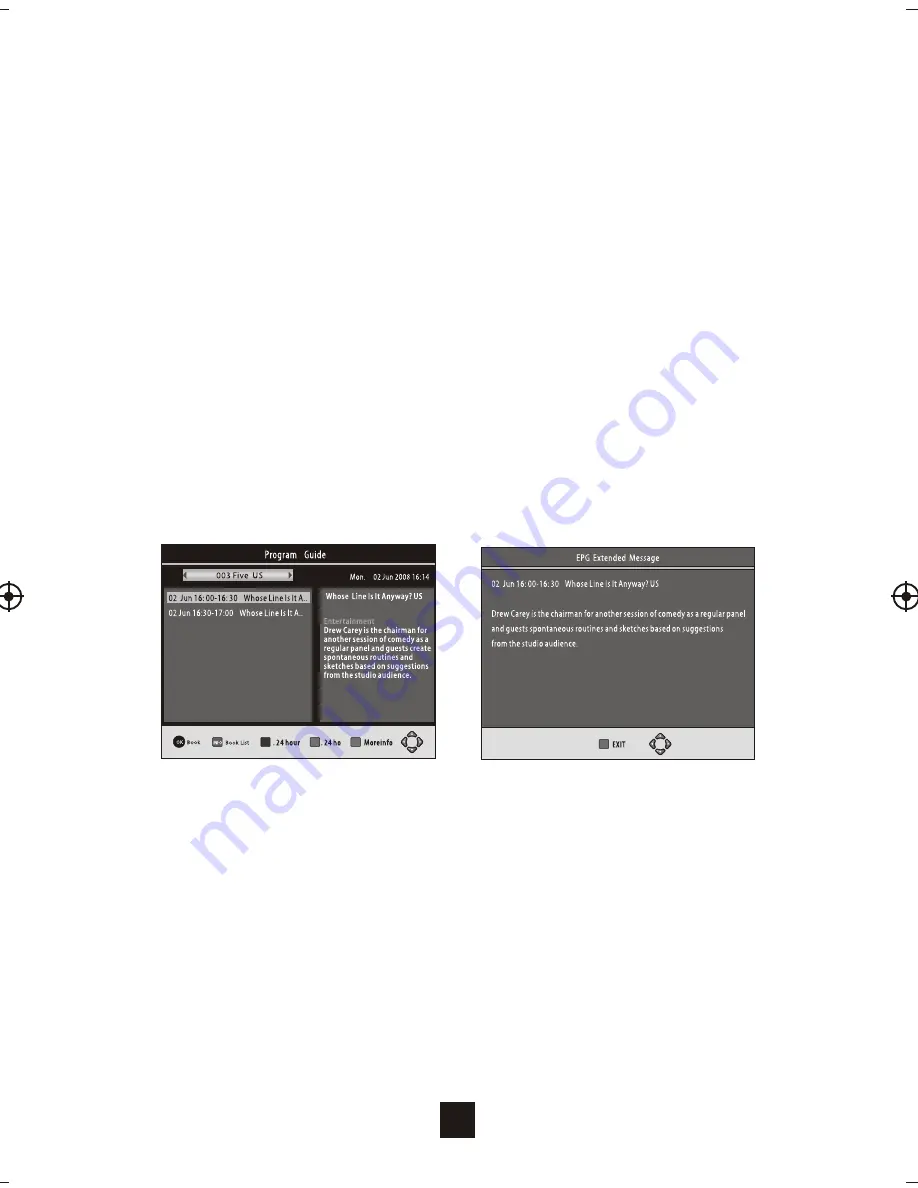
(3) EPG (Electronic program guide)

The EPG is


an on-screen TV guide that


shows scheduled programs seven 

days in advance for every tuned channel. Press the EPG button on the Remote 
Control to access


guide.  

You can use the UP/DOWN key to select the preferred program. Press red 
button on the RCU to get -24 hours’ program list, press green button on 
RCU to get +24hours’ program list. Press the blue button to get the detailed 
information of the selected program in full screen.

(4) Sort

Sort your channels from the following options:
 [LCN] - Sort the channels in


ascending order

[Name] - Sort the channels in alphabetical order
[Service ID] - Sort the channels


according to the station

(5) LCN (Logical channel number) 

Set LCN on or off.

13

Summary of Contents for DFTA45R

Page 1: ...INSTRUCTION MANUAL High Definition Digital Set Top Box With USB Record DFTA45R The Gold Technical Support Line 1902 215 259 Charges will apply at 2 95 per minute ...

Page 2: ......

Page 3: ...ny of the following situation arises get the Set Top Box checked by a service technician It has been exposed to moisture It has been dropped and damaged It has obvious sign of breakage It has not been working well or you cannot get it to work according to the Instruction Manual Warning To prevent the risk of electric shock do not open the cover or the back of the receiver Do not block the ventilat...

Page 4: ...he unit s many features and to ensure you get the very best from your purchase Safety is important Your safety and the safety of others is important Please therefore ensure you read the Safety Instructions before you operate this unit Warranty In the unlikely event that your product fails to work normally please call the below Bush warranty number for support Australia Bush Warranty 1800 509 394 N...

Page 5: ...liant Audio Video Decoding Bandwidth of 7 8MHz Supported COFDM Demodulator Automatic Manual Channel Search Channel Edit Moving and Deletion Parental Lock Control EPG Electronic Program Guide and Teletext Function where available HDMI Output Multiple Language OSD Supports Multi Subtitle Tuner RF In Loop Through Component Video Digital Audio via Coaxial Output Full Function Remote Control Package Co...

Page 6: ...Panel 5 Remote Control 6 7 Connecting to a Television 8 Connecting to an Audio System 9 Connecting to a DVD Recorder or VCR 10 11 19 20 Technical Specifications 21 Warranty 22 First Time Installation 11 Basic Operations Troubleshooting ...

Page 7: ...al Aerial RF LOOP THROUGH This socket will bypass the RF signal to either your TV or another video system COAXIAL This socket connects to a Coaxial cable on your surround sound system These sockets connect to your TV component input terminals HDMI MAINS CABLE This is used to connect to your main power supply VIDEO This socket outputs composite video signal AUDIO L R This socket outputs Analog Audi...

Page 8: ...tton to skip to the previous track in multimedia mode or timeshift in DTV mode 12 NEXT Press the Next Button to skip to the Next track in multimedia mode or timeshift in DTV mode 14 STOP Press the Stop Button to stop play in Multimedia 15 STANDBY Press the Standby Button to turn the unit to standby 16 EPG Electronic Program Guide Press the EPG Button to enter the EPG menu 17 AUDIO Press the Audio ...

Page 9: ... O PEN O PEN 1 Open the cover 2 Install batteries 3 Close the cover Using the Remote Control To use the Remote Control point it towards the front of the Digital Set Top Box The Remote Control has a range of up to 7 metres from the Set Top Box at an angle of up to 60 degrees The Remote Control will not operate if its path is blocked Sunlight or very bright light will decrease the sensitivity of the...

Page 10: ...e 8 For a basic connection from your Set Top Box to the television use the Composite connection outlined below For a higher quality connection use the Component Video connection outlined below combined with the For the highest quality connection use a direct HDMI connection Composite Audio Connection audio and video as outlined below HDMI YELLOW VIDEO IN Audio Video ...

Page 11: ...VIDEO L HDMI OUT 100 240V 50 60Hz Coaxial Digital Audio BASS TREBLE ECHO DOWN UP VOLUME INPUT SELECTOR MUTE KARAOKE CHANNEL TEST MODE 3 STEREO PRO LOGIC BYPASS EXCITE POWER MIC 2 1 1 MIC VOL 2 MIC Amplifier Coaxial Coaxial cable Connecting to an Audio System 5 9 ...

Page 12: ...IN R F LOOP R F THROUGH COMPONENT VIDEO AUDIO OUT Pb Pr Y R CVBS L HDMI OUT 100 240V 50 60Hz Coaxial Digital Audio TV Aerial Connecting to a DVD Recorder or VCR 10 ...

Page 13: ...ll connections have been made properly switch on TV and make sure the receiver is connected to the Main Power Press the Power button to switch receiver on If you are using the receiver for the first time or have restored to Factory Default the will appear on your TV screen Installation Guide Basic Operation 1 Program Manage Settings To access the Menu press the MENU button and select Program The M...

Page 14: ...Menu This Menu requires a password to access Enter the default password 000000 Programme Edit ALL TV Move Skip Lock Delete FAV FAV 001 TV3 003 3 24 004 K3 300 002 33 SKIP Searching 12 Select the program with an Skip symbol press the green button the skip symbol will be taken off then the program can be released from skipping ...

Page 15: ...e locked program you will be require to enter either the default password 000000 or your last set password 3 EPG Electronic program guide The EPG is an on screen TV guide that shows scheduled programs seven days in advance for every tuned channel Press the EPG button on the Remote Control to access guide You can use the UP DOWN key to select the preferred program Press red button on the RCU to get...

Page 16: ...L system TV 720P for NTSC or PAL system TV 1080I for NTSC or PAL system TV If the video does not appear correctly you need to change the settings This should match the most common setting for TVs in your country NTSC for NTSC system TV PAL for PAL system TV 6 Video Setting To access the Menu press MENU then select Picture The Menu provides options to adjust the video settings Press UP DOWN to sele...

Page 17: ...creen will appear 7 Channel Search and M S C s to exit M To access the menu press MENU select Search Channel The enu provides options to adjust the earch hannel settings Select an option and press RIGHT LEFTto adjust the setting Press EXIT the enu Channel Search Auto Search Manual Search Country Antenna Power Return Confirm EXIT OK Australia Off Manual Search Frequency channel Frequency MHz Bandwi...

Page 18: ...FTto adjust the setting Press EXIT to exit the menu 1 Time offset 2 Country Region Select the Country Region when Time Offset is set to Auto To access the enu press MENU select Option The menu provides options to adjust the Select an option and press to adjust the setting Press EXIT the enu Select auto or manual for GMToffset adjustments 3 Time Zone Select the Time Zone Offset when Time Offset is ...

Page 19: ...ose parental guidance input your password and set the level Then icon of the PG level will be shown in the info bar of the program 1 OSD Language 2 AudioLanguage 3 Subtitle Language To access the enu press MENU select System The menu provides options to adjust the system settings elect an option and press RIGHT LEFTto adjust the setting Press EXIT to exit the enu Select an OSD language Select the ...

Page 20: ...options to playback Music and Photo files it can support MP3 WMA JPEG BMP files The unit will only support USB device with FAT and FAT32 file system It will not support NTFS file system 1 Multimedia Once your USB is plugged in you can select the Music or Photo type in the multimedia menu Press OK to enter the file browser and select the file you wish to play Please note If no USB device is plugged...

Page 21: ...ram will be displayed by pressing the INFO Button while in full screen playback 4 To exit the recorded program press the stop button Subtitle Specific Small Displays the subtitle as small mode Normal Displays the subtitle as normal mode Big Displays the subtitle as big mode Subtitle BG White Displays the subtitle in white background Transparent Displays the subtitle in transparent background Grey ...

Page 22: ... that the USB Memory used has a memory capacity of above 2 GB With the Timeshift Function you can pause and continue Live TV at anytime you like without having to miss any action Follow the below steps to activate this function 1 Press the Pause Button to activate Timeshift and pause Live TV You can press play at anytime to resume play 2 You can fast forward the playback at anytime until returning...

Page 23: ...on Adjust the volume Volume is set to low Only sound no image on the screen No or incorrect connection with AV cable Make sure cables are connected correctly The program is a radio program Press TV RADIO key to shift into TV mode Remote Control is not responding The battery is exhausted Change battery Remote Control is not facing or close enough to the Set Top Box Adjust the position of the Remote...

Page 24: ...16 9 Output Port HDMI Audio Decoder Format MPEG 1 layer1 2 Audio output Digital audio S PDIF Power Voltage 230V 50Hz Power Max 8W Item Sub Item Parameter Tuner Input Frequency 170 230MHz 470 860MHz RF Input level 25 78dBm IF Bandwidth 7MHz and 8MHz Modulation QPSK 16QAM 64QAM Technical Specifications ...

Page 25: ...rranty does not cover damage from misuse or neglect accidental damage vermin infestation excessive voltages such as lightning or power surges or any alteration that affectsthe performance or reliability of the product In the unlikely event that your product fails to work normally please contact the Bush Warranty on 1800 509 394 Australia or 0800 450 259 New Zealand and have your receipt of purchas...

Page 26: ......

Page 27: ......

Page 28: ...PO BOX 6287 SILVERWATER NSW 1811 www bushaustralia com au ...

Reviews: