background image

Page 4

General operation

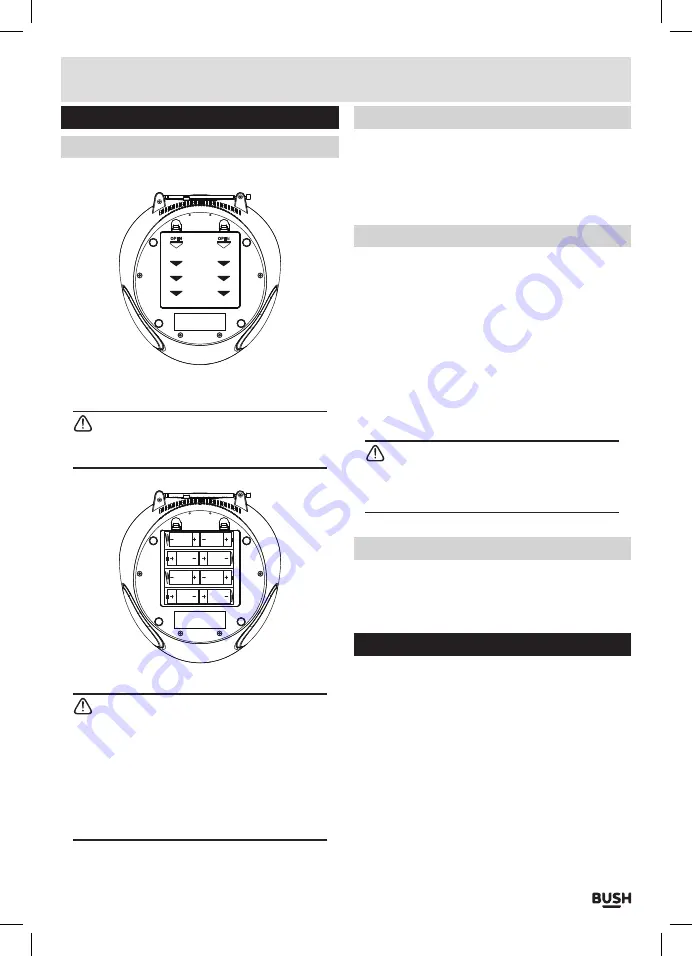
Battery installation

1:

 Remove the battery compartment cover carefully .

2:

 Install 

8

 x 

‘C’

 size batteries 

(UM-2 or equivalent)


while observing the correct polarities .

 NOTE:

 There is an engraved diagram showing 

battery installation directions inside the battery 
compartment .

3:

 Replace the battery compartment cover .

 NOTE:

 The mains cable must be detached 

from the DC mains socket of the player for the 
batteries to power the unit .


Leaking batteries may damage the battery cabinet 
and the player as a whole

,

 so they should be 

removed from the cabinet when becoming flat or 
when the player is not to be used with batteries for 
some time .

DC Mains operation

This unit is supplied with a DC mains adaptor.

1:

 To connect the power insert the mains socket jack 

into the rear of the unit 

(19)

 .

2:

 Insert the 

UK 

plug into a household power socket and 

switch the power 

ON.

Standby mode

Using the standby mode will save power when the unit 

is not in use.

1:

 When the unit is switched 

ON 

for the first time 

STANDBY 

mode will be active .

2:

 To wake the unit from the 

STANDBY 

mode, press the 

POWER/FUNCTION 

button 

(15)

 . The unit will wake 

and the 

POWER 

indicator  next to the display will 

illuminate .

3:

 To enter the 

STANDBY 

mode press and hold the 

POWER/FUNCTION 

button 

(15)

 for at least 

2

 seconds . 

The 

POWER 

indicator will dim .

 NOTE:

 This unit is designed to enter STANDBY 

mode automatically after 20 MINUTES of 
inactivity . Press the STANDBY button to wake the 
unit .

Volume controls

1:

 To increase the volume level press the 

VOL+

 button 

(3)

 repeatedly, or press and hold for rapid advance .

2:

 To decrease the volume level press the 

VOL-

 button 

(3)

 repeatedly, or press and hold for rapid advance .

Radio operation

1:

 Wake the unit from 

STANDBY 

mode if required .

2:

 Press the 

POWER/FUNCTION 

button 

(15)

 repeatedly 

until you see 

‘87.5’

 or another radio frequency on the 

display .

3:

 Extend the antenna fully, and angle for best reception 

(you may need to adjust once tuned to a station)

 .

4:

 Tune to the required station using the 

TUNING 

+ / - 

buttons 

(11)

 . Pressing either button once advances 

the frequency in 

0

 .

05MHz

 increments . Press and hold 

either button to search up or down the frequency 
range, until a station is located . When a station is 
found it will begin playback . You can stop the scan 
at any time, by pressing either 

TUNING 

+ / - button 

again .

User instructions

Summary of Contents for CBB31iBLK

Page 1: ...Instruction Manual CBB31iBLK CBB31iPINK...

Page 2: ...callingradiopresets 5 CD operation 5 LoadaCD 5 PlayingaCD 5 Skip searchtracks 5 Repeat Randomplayback 5 Programmedplayback 6 iPod iPhoneoperation 6 Pod iPhonecontrols 6 Auxiliaryinput 7 Videooutput 7...

Page 3: ...removingcovers mayexpose you to dangerousvoltagesorother hazards Topreventriskoffireorelectric shock avoid overloadingwalloutlets extensioncords or integral conveniencereceptacles Useproperpowersource...

Page 4: ...tons 4 STOPbutton 5 SKIP MEMORY button 6 SPEAKERS 7 REPEAT RANDOMbuttons 8 LCDdisplay 9 CDLIDopenlatch 10 iPod iPhonedock 11 TUNING buttons 12 PLAY PAUSEbutton 13 SKIP MEMORY button 14 MEMORY PROGRAMb...

Page 5: ...heunitfromtheSTANDBYmode pressthe POWER FUNCTIONbutton 15 Theunitwillwake andthePOWERindicator nexttothedisplaywill illuminate 3 ToentertheSTANDBYmodepressandholdthe POWER FUNCTIONbutton 15 foratleast...

Page 6: ...appearontheLED display 8 andplaybackfollowswiththefirsttrack Playing a CD cont 6 PressthePLAY PAUSEbutton 12 oncetoPAUSE themusicplayback theelapsedtracktimeflashes toindicatetheplayerisinPausemode Pr...

Page 7: ...laybackthelastselectedtrack onyourdeviceautomatically Ifyoucanthearany soundafter20seconds remove re seatthedevice 5 Youcannoweitherselectaudiofromyourdeviceto playusingtheiPod iPhone scontrolsorbyusi...

Page 8: ...cont 2 WaketheunitfromSTANDBYmodeifrequired 3 PressthePOWER FUNCTIONbutton 15 repeatedly untilyousee AU onthedisplay 4 PressPLAYontheexternalaudiosourceEG MP3 player NOTE thevolumeoutputiseffectedbyt...

Page 9: ...ower Powercablenotconnectedto wallsocket Powersocketisnotswitchedon Makesuretheplugisconnected Switchthepoweron NoSoundCD AUX RADIO IPOD NoSoundfromAUXinput Volumeistoolow iPod iPhonenotdocked correct...

Page 10: ...ption 20Watts Dimensions Approx 23 5mm L x25 5mm W x12 5mm H AUXIn 3 5mmstereosocket Tuner FM 87 5 108MHz CDPlayer Playbacksystem CompactDiscDigitalAudioSystem DAC 1BitDAconverterwith8xoversampling Fr...

Page 11: ...ntee does not cover accidental damage misuse cabinet parts knobs or consumable items The product must be correctly installed and operated in accordance with the instructions contained in this manual I...

Reviews: