background image

24

For any help concerning set up and use of your TV please call the 

Customer Helpline: 0871 2000 463
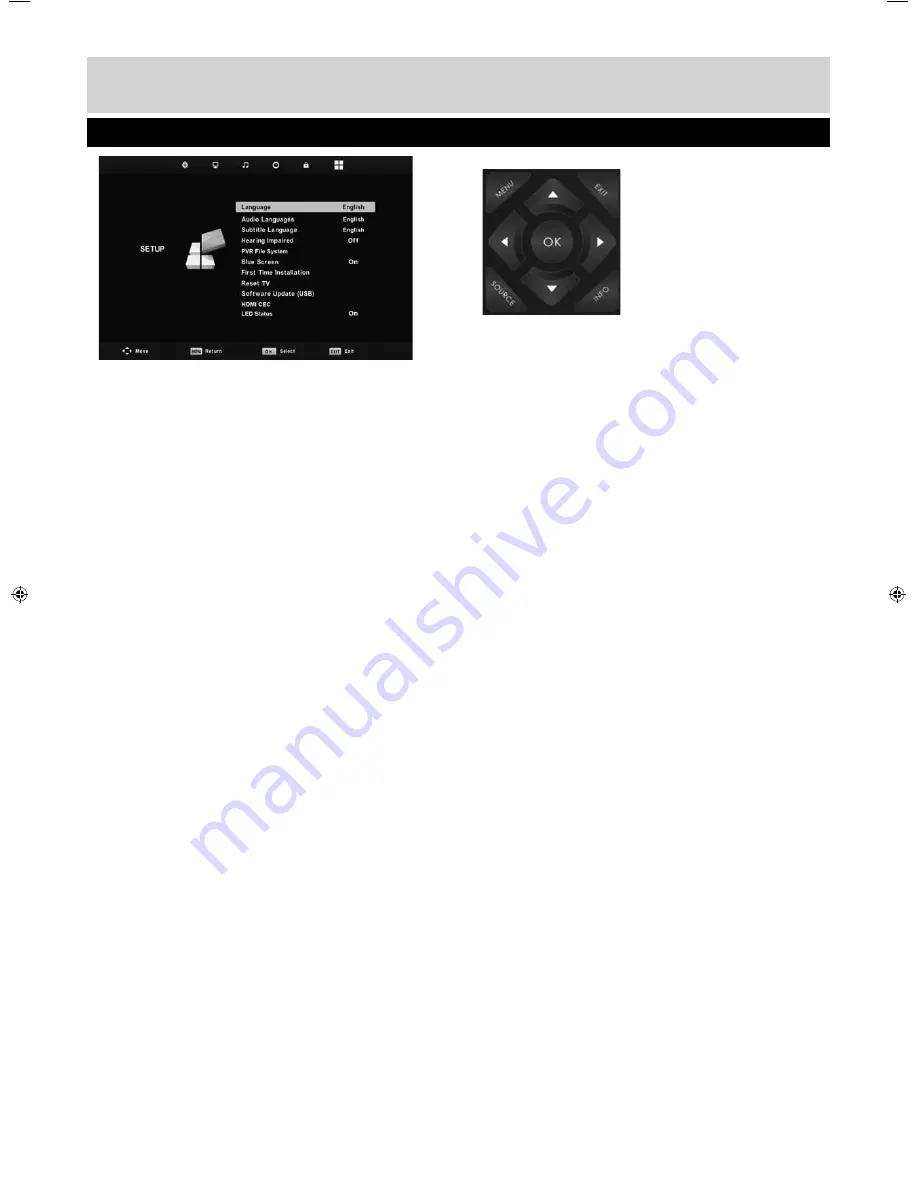
Setup Menu

Language 

Allows you to change the language of the menu

Audio language 

Allows the user to change the audio language

Subtitle Language 

Allows the user to change the subtitle language

Hearing Impaired 

This allows the user to turn on the Hearing Impaired 
function, this produces subtitles on the screen which 
provide a description of what is happening during the 
selected program.

PVR File System

Allows you to view the format and performance of a 
USB key

Blue Screen 

Changes the background when there is no input 
between clear and a blue background (Only available 
on some sources)

First Time Installation 

Allows you to retune the television for all digital 
channels, digital radio stations and analogue 
channels 

Reset TV

This resets the menus to factory settings and will 
erase all TV channels stored on the television

Software Update (USB)


This menu lets you install the new software/fi rmware 
onto the television. Further details of how to do this 
will be issued with the fi rmware. Contact the helpline 
or refer to the ‘product support’ section of the website

HDMI CEC (Consumer Electronic Control) 

Allows HDMI devices to control each other and allows 
the user to operate multiple devices with one remote 
control. (only available with compatible devices)

LED Status

Allows the user to switch the LED Power indicator 
light ON or OFF, when the TV is being operated.
(When this option is set to OFF the LED Power 
indicator light will fl ash when the remote control 
is used)

User Guide - BUSH -  22-207F, 22-207FDVD, 24-207F, 24-207FDVD,W,P,S BUS-MAN-0011.indd   Sec1:24

User Guide - BUSH -  22-207F, 22-207FDVD, 24-207F, 24-207FDVD,W,P,S BUS-MAN-0011.indd   Sec1:24

8/8/2014   11:57:38 AM

8/8/2014   11:57:38 AM

Summary of Contents for 22/207F

Page 1: ...22 207F 24 207F 22 207FDVD 24 207FDVD 24 207FDVDW 24 207FDVDS 24 207FDVDP Full HD Slim LED TV with USB Media Player Model No User Guide ...

Page 2: ...evice which may cause magnetic or radio interference with the television If interference is apparent move the device causing the interference away from the television To disconnect the apparatus from the mains please use the all pole mains switch located on the side underside or rear of the TV The switch shall remain readily operable Batteries battery pack or batteries installed shall not be expos...

Page 3: ...Mode Do not leave the TV in pause mode for long periods of time e g When watching DVDs or videos Important Once shadow image screen burn occurs it will never disappear and is not repairable under warranty UK Waste electrical products should not be disposed of with household waste Separate disposal facilities exist For your nearest facilities please see www recycle more co uk or in store for detail...

Page 4: ... wall 10 Wall mounting 11 Getting Started Initial Set Up 12 TV Buttons and Input Source Menu 13 Remote Control 14 Connections 15 17 TV Menu Operation 18 25 Channel Menu 18 Picture Menu 19 20 Sound Menu 21 Time Menu 22 System Hotel Lock Menu 23 Setup Menu 24 DVD Setup 25 7 Day TV Guide 26 USB Record Digital Freeview 27 USB Mode Media Player 28 General Information 29 32 Using your TV with a Sky digi...

Page 5: ...out warranty service if you are unable to package it correctly The safest way to package your item in the event of warranty service repair is in it s original box packaging 1 x User Guide 1 x Quick Start Guide 2 x AAA Batteries 1 x RF Cable 1 x Remote Control User Guide QSG What Is Included In The Box Accessories Included with this TV are the following accessories 1 x TV 1 x Stand Installation Pac...

Page 6: ...D INSTALLATION When securing the self tapping screws into the base of the stand on first installation the screws will be naturally tight as they are creating a thread in the plastic of the stand neck in order to support a TV of this size a Ensure the cross head screw driver tip fits correctly into the head of the screw and that it is not too big or small b Screw in all screws individually and part...

Page 7: ...ety for the Prevention of Accidents is urging people to take care with flat screen televisions RoSPA stated in 2010 that Toddlers are particularly at risk of pulling flat screen televisions on to themselves They are unsteady on their feet and are attracted by colourful television images The risk is increased as televisions become lighter A Using one or both of the top wall mounting holes and screw...

Page 8: ...ttached to the mounting holes on the rear of the TV These holes are indicated in the picture below For optimum viewing if wall mounting the TV higher than eye level the TV should be tilted downwards so that the TV s screen is face on See fig 1 and 2 below IMPORTANT If wall mounting this TV only use the screws already provided in the wall mounting holes Using other screws which are longer could cau...

Page 9: ...e signal strength you should consider connecting signal booster and re tuning the TV Screen shots images are shown for illustration purposes only and may change dependent on model region Important As part of our ongoing development to reduce power consumption we have added an extra function to this Television called Home Mode you will see this during the first time installation set up Power consum...

Page 10: ... input source to the one selected 1 Volume up and menu right 2 Volume down and menu left 3 Programme Channel up and menu up 4 Programme Channel down and menu down 5 Displays Menu OSD 6 Displays the input source menu 7 Standby Power On Off 1 Stop Eject DVD 2 Play Pause DVD 3 Volume up and menu right 4 Volume down and menu left 5 Programme Channel up and menu up 6 Programme Channel down and menu dow...

Page 11: ...P 22 SUBTITLE 23 AUDIO 24 TEXT 25 TEXT HOLD 26 DISPLAY 27 TEXTZOOM DVD ZOOM 28 DVD Menu Record To restart the current chapter To advance forward to the next chapter To stop eject Disc hold for 4 seconds to eject disc To play in fast rewind mode To play in fast forward mode To play pause 29 REC LIST 30 GOTO 31 A B 32 REPEAT 33 ANGLE 3D Change to 3D mode For Models with Integrated DVD players For Mo...

Page 12: ... input YPbPr RF IN RF TV Aerial Input USB USB Input HDMI 2 HDMI input CI CARD IN Common Interface module EARPHONE Earphone Socket 1 2 3 4 5 6 7 8 9 10 US B C I C AR D IN E AR P HONE VIDE O R L Y P b P r 15 For any help concerning set up and use of your TV please call the Customer Helpline 0871 2000 463 1 2 3 4 5 7 8 9 10 6 ...

Page 13: ...io with minimal loss of quality TVs Source should be set to the corresponding HDMI Port HDMI 1 HDMI 2 etc Connecting a Camcorder Camera or Games Console Connecting a High Definition HD Device Option 1 via HDMI to HDMI cable Note This model TV can not be used as a PC laptop monitor via HDMI input The HDMI Input is provided to view digital content with compatible external devices SCART SCART TVs Sou...

Page 14: ...PR Audio Y PB PR Connections When connecting via the TV s 3 5mm Earphone output this will disable the TV speakers If you are supplied with a cable from the device which has RED GREEN BLUE RED WHITE connectors you must connect via Component for picture and by phono cable for sound TV Source should be set to Component Connecting a High Definition HD Device Option 2 via Component cable Connecting to ...

Page 15: ... tune your digital signal Channel Edit Allows you to delete move skip and add favourite channels Schedule List Lists your programme reminders Signal Information Displays signal strength information CI Information Pay per view services require a smartcard to be inserted into the TV If you subscribe to a pay per view service the provider will issue you with a CAM and a smartcard The CAM can then be ...

Page 16: ...e balance between black and white Brightness Increase or decrease the brightness of the picture Colour Increases the colour from black and white Tint Lets you increase or decrease the level of tint within the picture Sharpness Increase or decrease the sharpness of the picture Colour Temperature Normal Default settings Warm Increases red within the picture Cool Increases blue within the picture Noi...

Page 17: ...orrect proportion As a result side bars are shown on the screen Zoom The picture is the correct proportion but zoomed in to fill the screen Picture Menu Aspect Ratio Within the UK the picture format varies depending on the channel broadcast There are a number of different options to best meet your needs Auto Automatically displays the best picture format So the picture is in the correct position M...

Page 18: ...s high frequency detail and clear dialog Digital Output Off Off Auto Selects the best settings automatically PCM Select this option if you are connecting to a Stereo Hi fi via coax cable Pulse code modulation PCM is a digital representation of an analogue signal Audio Description This allows the user to increase and decrease the AD Audio Description volume level Audio Description is a service avai...

Page 19: ...you set the sleep timer so the television automatically switches off after a set amount of time Off 10min 20min 30min 60min 90min 120min 180min 240min Auto standby Set Auto standby between 3 hours 4 hours and 5 hours to turn off this function you must exit Home Mode in the Picture Menu OSD Timer Lets you adjust the amount of time the On Screen Menu stays on the screen before disappearing Time Menu...

Page 20: ...urce is the source the TV starts on when first switched on Default Channel Allows the user to set a channel as the default channel on the Digital source The default channel is the channel the TV starts on when first switched on Source Lock Allows you to lock the source menu Channel Lock Allows you to lock certain channels manually Max Volume Allows you to adjust and set the maximum volume Change P...

Page 21: ...sources First Time Installation Allows you to retune the television for all digital channels digital radio stations and analogue channels Reset TV This resets the menus to factory settings and will erase all TV channels stored on the television Software Update USB This menu lets you install the new software firmware onto the television Further details of how to do this will be issued with the firm...

Page 22: ...ulti channel sound to Stereo PAL For discs from UK Europe Asia Australia etc Multi For both NTSC and PAL NTSC For discs from North America Japan etc Reset Resets all options in the DVD setup menu back to the default settings Stereo Outputs 2 channels of sound both left and right Mono L Outputs left side sound Mono R Outputs right side sound Mix Mono Outputs a single channel of sound but mix betwee...

Page 23: ...u can view the start and end time of all programmes and on all channels for the next 7 days and set reminders 1 Press TV GUIDE The following 7 Day TV Guide will appear 2 Navigate through the menu using You can now Record a programme by pressing RED USB device must be connected Set a reminder by pressing GREEN View a previous day by pressing YELLOW View the next day by pressing BLUE 3 Press EXIT to...

Page 24: ... Freeview mode when used in conjunction with a compatible USB memory stick or USB hard drive The benefits of this are as follows Pause live TV and then playback fast forward and rewind up to live TV One button record if you decide you want to record the current programme Easy programmable recording from the 7 day TV Guide Record TV and watch listen back on your computer laptop Due to the nature of...

Page 25: ...navigate through the menus using the scroll buttons To confirm the item you wish to play view press OK button 2 Select the drive you require If your drive only has 1 partition you will only see 1 item 3 You can now access the item Press OK to view 4 While viewing you control the item using Fig A or by pressing i and using and OK USB Mode Media Player Fig A 4 3 2 1 Tip If you experience a playback ...

Page 26: ...fer to the website for a full list of codes Please note we only have codes for One for All branded remote controls if you have an alternative brand of Universal remote please refer to the manufacturer for the code Using Your TV With a Sky Digital Set Top Box Please note if you are adding a Magic Eye TV Link to your system so that you can use your Sky remote control to change the Sky channel in the...

Page 27: ...you are in an area that can receive Freeview Visit www freeview co uk 2 Check you are using an aerial that is able to receive a good digital signal In most cases you will need an outdoor digital hi gain wideband aerial In areas that have excellent Freeview coverage you may be able to use a loft type aerial but it is highly likely that you will also need to connect a booster between the back of the...

Page 28: ...ftware programme utility to format larger hard drives Please refer to the web site for more information USB Record TV models only I cannot change the channel access the menu or use the red button During Time Shift you cannot change the channel access the menu or use the red button USB Record TV models only When using the USB to record the picture breaks up or experience loss of sound Check the USB...

Page 29: ...und power watts RMS 2 x 3W Dimensions including stand mm 510W x 359H x 140D 560W x 386H x 140D Net weight 3 5 kgs 4 kgs 4 6 kgs 4 9 kgs Energy Consumption Info Voltage and power consumption 110 240v 50 60Hz 20 40W Ecohome Max EEI A Energy Rating in standby less than 0 5w 0W in OFF mode 110 240v 50 60Hz 20 50W Ecohome Max EEI A Energy Rating in standby less than 0 5w 0W in OFF mode 110 240v 50 60Hz...

Page 30: ...BUS MAN 0011 ...

Reviews: