CAUTION
During operation the surface of the vacuum pump may reach tem-
peratures of more than 100°C.
Risk of burns!
l
Make sure that the vacuum pump is shut down and cannot be ac-
cidentally switched on again
l
Let the vacuum pump cool down before starting any maintenance
work.
l
Prior to disconnecting pipework make sure that the connected pi-
pes/lines are vented to atmospheric pressure
Maintenance Schedule
NOTE
: The maintenance intervals depend very much on the individual
operating conditions. The intervals given below have to be considered
as starting values which should be shortened or extended as appro-
priate. Particularly heavy duty operation, such as high dust loads in the
environment or in the process gas, other contaminations or ingress of
process material, can make it necessary to shorten the maintenance
intervals significantly.
Every 6 Months:
l
Make sure that the vacuum pump is shut down and locked against
inadvertent start up
l
Check the suction lines for contamination or blockages.
l
Check the cooling coils and the fan cover regularly for dirt, clean
when neccessary.
A dirty fan cover or cooling coils prevent the proper intake of coo-
ling air which can lead to overheating of the vacuum pump.
l
The electrical connections must be checked by a specialist.
Every 100 - 500 Operating hours
l
Clean the inlet filter on the suction side at regular intervals. The
cleaning intervals depend on the quantity of dust contained in the
drawn air
u
If the filter is too dirty to be cleaned:
Remove the cover and replace the filter
Every 1000 Operating hours
l
Check the vanes, for the first time after 2000 operating hours (see
“Carbon vanes”)
Every 1000 - 2000 Operating hours
l
Replacing the outlet filter (SD version only). To do this, lift the co-
ver (see “Suction filter and outlet filter”)
The bearings are pre-lubricated for life and will thus not require
main-tenance. Replace by original roller bearings only
Inlet filter and pressure filter (SD)
The inlet filter and the pressure filter must be cleaned at regular inter-
vals, depending on the amount of dust in the air being pumped. Blow
out the filter cartridges with compressed air from the inside out. If the
cartridge is too dirty to be cleaned, it must be replaced.
The cartridges can be taken out after the removal of the filter cover.
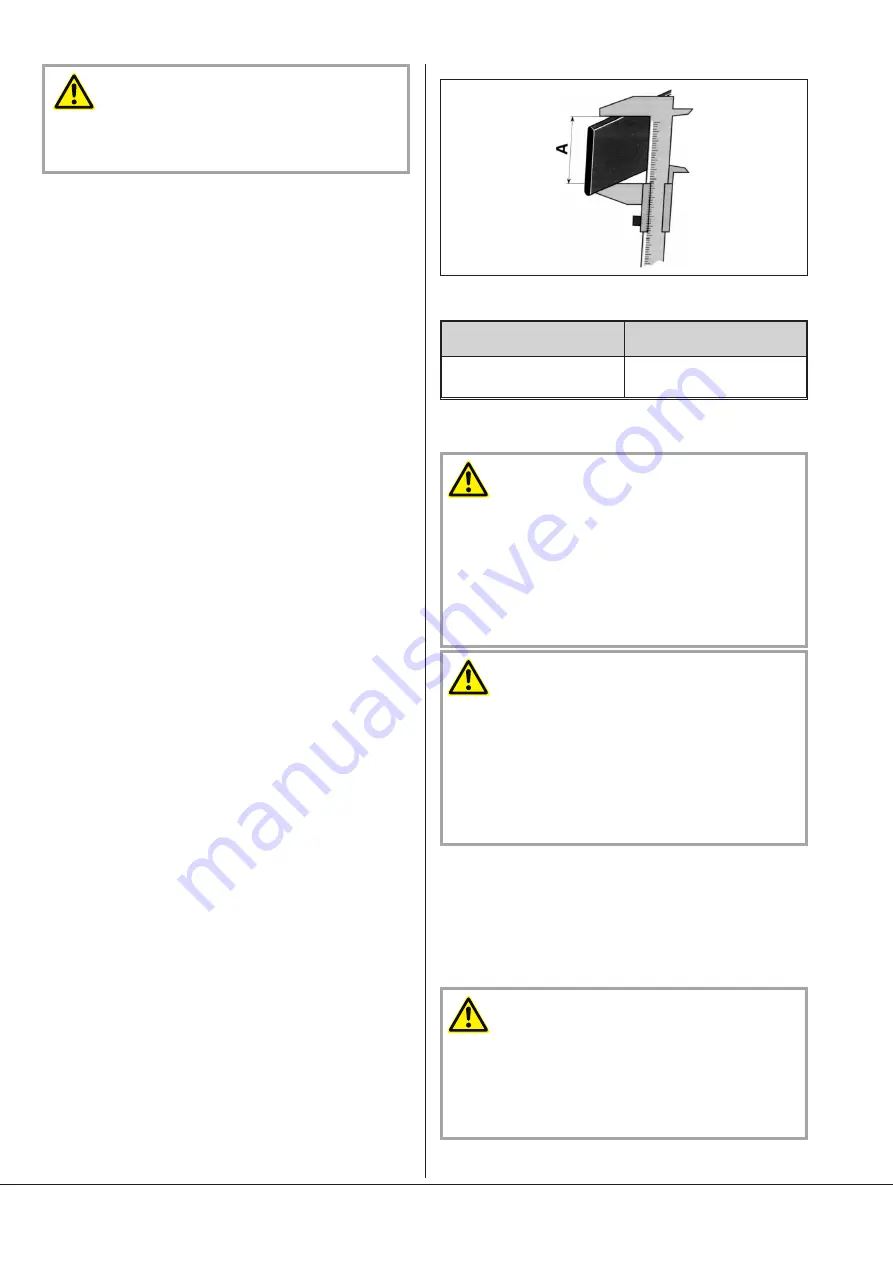
Vanes
The lifetime of the carbon vanes (
VA
) depends on the application of
the
vacuum pump. If the width of the vane reaches the given limit for
re-placement, it is necessary to change the vanes.
Remove the filter cover and the cylinder endplate to change the
vanes.
Blow out the compression chamber with dry compressed air.
Make sure that the vanes are positioned correctly and the right way
round (curved edge facing the cylinder wall).
Pump type
Width of vanes
minimum A
SV/ SD 1100 C
26 mm
Overhaul
CAUTION
In order to achieve best efficiency and a long life of operation, the
vacuum pump has been assembled and adjusted with specifically
defined tolerances.
This adjustment will be lost during dismantling of the vacuum
pump.
It is therefore strictly recommended that any dismantling of the va-
cuum pump that goes beyond of what is described in this manual
must be done by the Busch service.
CAUTION
Improper work on the vacuum pump will put the operating safety at
risk.
Risk of explosion!
Approval for operation of the vacuum pump will be void!
Any dismantling of the vacuum pump that goes beyond of what is
described in this manual must be done by specially trained Busch
service personnel only.
Removal from Service
Temporary Removal from Service
l
Prior to disconnecting pipes/lines, make sure that all pipes/lines are
vented to atmospheric pressure
Recommissioning
CAUTION
Vanes can stick after a long period of standstill.
Risk of vane breakage if the vacuum pump is started with the drive
motor.
After longer periods of standstill, the vacuum pump must be turned
by hand.
After longer periods of standstill:
Overhaul
Page 8
Summary of Contents for SECO DC 0063-0100 B/C
Page 13: ...Exploded view Exploded view Page 13 ...
Page 19: ...Note ...


