background image

B

URK

 Technology

RX-4 User’s Manual -- Version 1.01

5

Summary of Contents for RX-4

Page 1: ...RX 4 USER S MANUAL May 28 1997 Version 1 01 BURK Technology 7 Beaver Brook Road Littleton MA 01460 ...

Page 2: ...RX 4 User s Manual Version 1 01 BURK Technology ...

Page 3: ...lation 8 Connecting The Audio Outputs 9 Making Connections for the Loop Through Hot Standby Feature 10 How the Loop Through Feature Works 10 Connecting the Receivers for Hot Standby 11 Powering Up 11 TUNING AND ADJUSTMENT 14 Selecting the Monitoring Frequencies for the Receivers 14 AM Receiver Tuning 15 FM Receiver Tuning 17 WX Receiver Tuning 19 Adjusting Audio Output Levels 21 Monitor Selection ...

Page 4: ...RX 4 User s Manual Version 1 01 BURK Technology ii ...

Page 5: ...tions see Product Description p 2 In the next section the instructions are provided for installing and configuring the RX 4 including physical installment of the unit rack mounting antenna connections wiring to the EúAúS and the implementation of the loop through feature for hot standby see Installation and Configuration p 8 The final section details the operational adjustments required for puttin...

Page 6: ...gn materials and workmanship the RX 4 is specifically geared toward EAS applications in the professional environment by virtue of the following features Digital tuning which keeps the RX 4 receivers locked on frequency and capable of meeting the strict demands of EAS operations where receiver drift can mean missed alerts Furthermore tuning controls are located inside the unit providing the user wi...

Page 7: ...B Image Rejection 90dB Adjacent Channel Rejection 45dB Spurious Rejection 80dB Overload Level 10dBm Antenna 75 ohm Type F connector THD 3 30 modulation Audio Output 10dBm max into 600 ohms balanced fully adjustable FM Receiver Module Frequency Range Digitally tuned 88 108 MHz in 100 KHz steps Sensitivity 5 microvolts for 12dB SINAD IF Rejection 90dB Image Rejection 60dB Overload Level 20dBm Antenn...

Page 8: ... receiver units and reference them instead by type If you re not certain which receiver type occupies a particular module they can be readily distinguished from one another by the number and arrangement of their tuning switches refer to the Tuning Control illustrations on pp 15 17 and 19 1 2 9 10 11 12 17 18 19 20 3 4 25 26 27 28 33 34 36 35 Receiver Module 1 AM Receiver Module 2 FM Receiver Modul...

Page 9: ...ls 10 position DIP switch accessed by removal of cover plate settings determine tuning frequency of AM receiver tuning chart provided on p 16 16 FM Tuning Controls Two banks of DIP switches 8 position and 4 position accessed by removal of cover plate settings determine tuning frequency of FM receiver tuning chart provided on p 18 24 FM Tuning Controls Two banks of DIP switches 8 position and 4 pos...

Page 10: ...Combicon female connector balanced output grd to EúAúS encoder decoder 7 Antenna Connector Female F type connector to FM antenna via male F type connector Receiver 2 FM 8 Loop Through 2 pins of Combicon 5 pin female connector IN and OUT provides chaining to other receivers for hot standby 9 Audio Output 3 pins of Combicon female connector balanced output grd to EúAúS encoder decoder 10 Antenna Con...

Page 11: ...13 Antenna Connector Female F type connector to ferrite core antenna via male F type connector ...

Page 12: ...k the difference in depth may make access to the RX 4 rear panel difficult once it s mounted If this is the case you may need to pre wire the antenna output and loop through connectors see following sections pp 8 and 10 pass them through the rear of the rack and connect them up while holding the RX 4 in front of the rack If you adopt this approach be sure to make the various leads long enough to a...

Page 13: ...ts For details on the EúAúS audio inputs and their configuration see the Eú úAú úS User s Guide The audio outputs are balanced as are the corresponding audio inputs on the EúAúS unit therefore it is recommended to use two wire twisted pair or shielded cables for the connections Belden 8450 solid or 8451 stranded are appropriate Both the RX 4 outputs and the EúAúS inputs are Phoenix Combicon connec...

Page 14: ...see RX 4 Back Panel p 6 for location of the loop connectors If audio is squelched on the primary receiver then the signal from the standby is automatically routed through the squelched channel The loop will remain in effect until signal is once again detected on the primary receiver then the standby will cease routing its signal through For instance suppose your EAS monitoring assignments consist ...

Page 15: ...e to the Loop IN pin of the primary receiver s mating plug attach the other end of the wire to the Loop OUT pin on the mating plug of the receiver selected for standby Combicon Mating Block Repeat the process for as many primary standby pairs as you require daisy chaining the connectors where you wish a standby unit to be covered by a standby in turn You may freely connect between separate RX 4 un...

Page 16: ...front panel will not activate unless the corresponding receiver is tuned to a receivable frequency and connected to a suitable antenna however you can verify that the unit is powered up by observing the monitor LEDs see RX 4 Front Panel p 4 If there are no LEDs activated it may be because the monitor selection switch is OFF press it once and the Receiver 1 indicator will light up if the unit is po...

Page 17: ...BURK Technology RX 4 User s Manual Version 1 01 13 ...

Page 18: ... Receiver 4 The Receiver designations refer to the standard configuration If you have specified a different configuration for your unit then consider only the module type and refer to the module positions specified on your invoice If you do have a non standard unit and lose track of which component is which you can identify the modules again by removing the cover plates and counting the DIP switch...

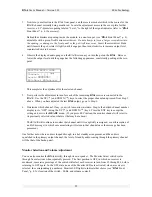
Page 19: ...to the right of that number Starting at the left flip the switches up or down according to the 1s and 0s of the bit pattern in the chart You will probably find manipulation of the switches more manageable with the tip of a small plastic tuning type screwdriver if you use a metal screwdriver or ball point pen tip exercise extreme care the unit is open and powered up and there is the possibility of ...

Page 20: ...0 0011000100 710 0001110101 1110 0010011101 1510 0011000101 720 0001110110 1120 0010011110 1520 0011000110 730 0001110111 1130 0010011111 1530 0011000111 740 0001111000 1140 0010100000 1540 0011001000 750 0001111001 1150 0010100001 1550 0011001001 760 0001111010 1160 0010100010 1560 0011001010 770 0001111011 1170 0010100011 1570 0011001011 780 0001111100 1180 0010100100 1580 0011001100 790 0001111...

Page 21: ...bank switch setting in binary Decimal fraction frequency in tenths of Mhz In the example shown above the switches are set for a tuning of 98 5 Mhz for the left hand bank 98 plus 30 is 128 which is 10000000 in binary for the right hand bank 0101 is the binary representation of 5 the number of tenths It is not necessary however to calculate the switch settings the full set of tunings is listed in th...

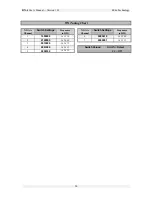
Page 22: ...ver repeat the foregoing procedure with the remaining FM module Continue with the WX tuning procedure in the following section if you are intending to tune that component otherwise go on to Adjusting Audio Output Levels p 21 FM Tuning Chart Frequency Left Bank Switch Right Bank Switch Settings tenths of MHz in MHz Settings MHz 1 3 5 7 9 88 01110110 0001 0011 0101 0111 1001 89 01110111 0001 0011 01...

Page 23: ...nting UP The tuning chart on the opposite page relates the NOAA channel numbers and frequencies to the appropriate switch patterns Flip the switch of the desired channel down and flip the remaining six switches up You will probably find manipulation of the switches more manageable with the tip of a small plastic tuning type screwdriver if you use a metal screwdriver or ball point pen tip exercise ...

Page 24: ...ng Chart NOAA Channel Switch Settings Frequency in MHz NOAA Channel Switch Settings Frequency in MHz 1 1000000 162 550 6 0000010 162 500 2 0100000 162 400 7 0000001 162 525 3 0010000 162 475 4 0001000 162 425 Switch Values DOWN Select 5 0000100 162 450 UP Off ...

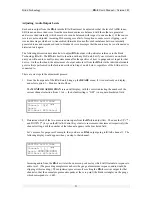
Page 25: ...w regardless of the EAS unit it is connected to There are six steps to the adjustment process 1 From the front panel of the EúAúS unit bring up the READY menu if it is not already on display and select option 5 Monitor Audio Chan The MONITOR AUDIO CHAN screen will display with the cursor indicating the number of the current channel selection from 1 to 6 the default setting is OFF in a square brack...

Page 26: ...the proper channel and proceed from Step 3 above When you have adjusted the last RX 4 output go on to Step 6 6 Determine which channel if any you wish to monitor in studio Step to the desired channel number display or to OFF using the UP 5 and DOWN 6 keys Press the ENT key to accept the setting and exit to the READY menu If you press ESC instead the monitor channel will revert to its previously se...

Page 27: ...ect on the monitored audio level When a receiver is selected for monitoring its audio passes through the RX 4 s own front panel speaker regardless of which output is being monitored by the EúAúS unit It is thus possible to have a different audio source playing simultaneously through either unit If it is necessary to monitor different sources from each unit use the front panel volume control on eit...

Page 28: ...RX 4 User s Manual Version 1 01 BURK Technology 24 APPENDIX RX 4 SCHEMATICS ...

Page 29: ...BURK Technology RX 4 User s Manual Version 1 01 25 ...

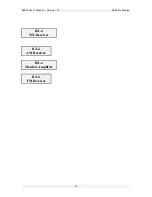
Page 30: ...RX 4 User s Manual Version 1 01 BURK Technology 26 RX 4 WX Receiver RX 4 AM Receiver RX 4 Monitor Amplifier RX 4 FM Receiver ...

Page 31: ......

Page 32: ...RX 4 User s Manual Version 1 01 BURK Technology 4 ...

Page 33: ...BURK Technology RX 4 User s Manual Version 1 01 5 ...

Page 34: ...RX 4 User s Manual Version 1 01 BURK Technology 6 ...

Reviews: