background image

5

PRODUCT AND RECIPE SETUP

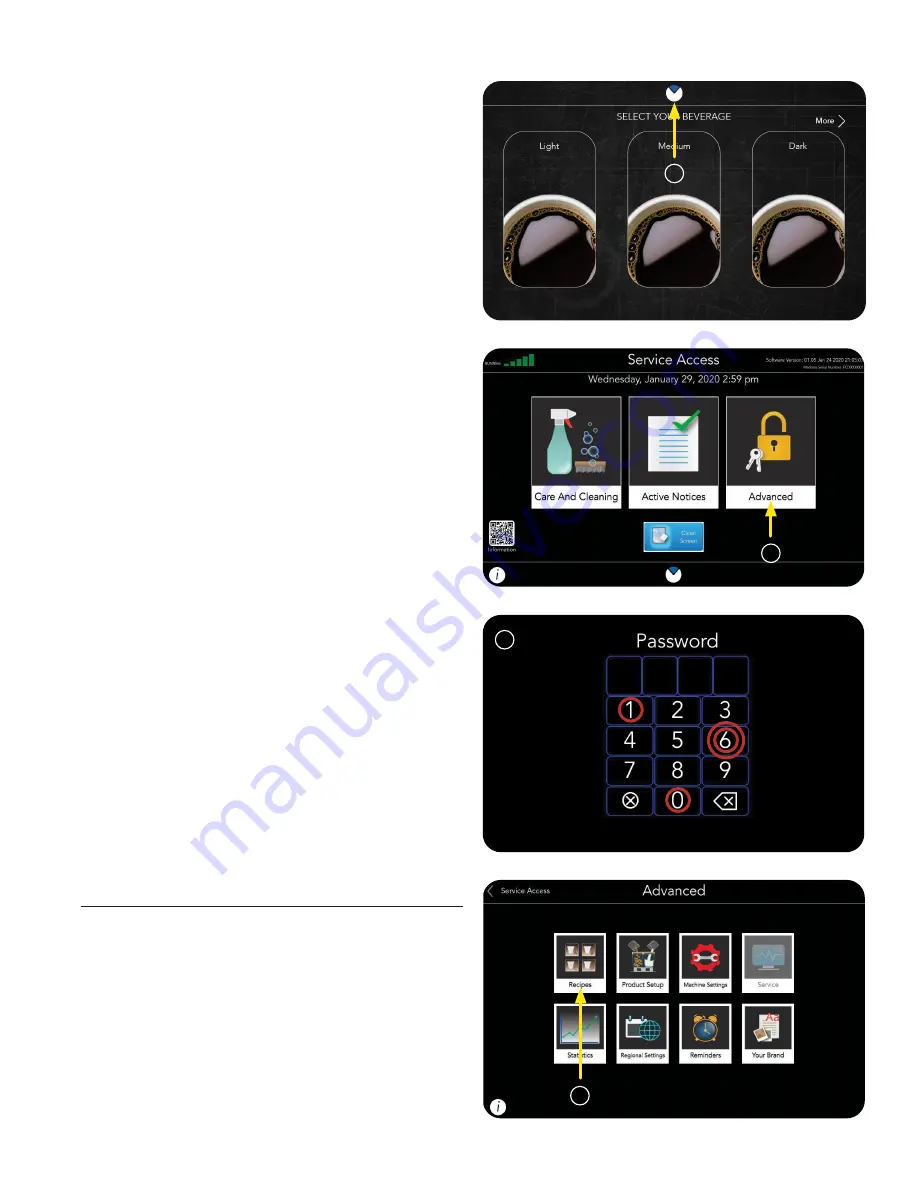
1.  Touch and hold the 

BUNN logo for a few  

seconds until 

SERVICE ACCESS appears  

on the display.

2.  Select the 

ADVANCED icon.

3.  Next, enter the passcode 

6601.

First we will setup a coffee 

Product.

1.  Touch the 

RECIPES icon.

* * * *

Product Setup

1

2

3

1

continued >

Summary of Contents for Fast Cup 55400.0103

Page 1: ...O Matic Corporation at 1 800 286 6070 Fast Cup 57832 0000 A 4 21 2019 Bunn O Matic Corporation Bunn O Matic Corporation Post Office Box 3227 Springfield Illinois 62708 3227 Phone 217 529 6601 Fax 217...

Page 2: ...ures constitutes improper maintenance Failure to have required preventive maintenance performed by a BUNN technician or an authorized BUNN service agent Parts replaced under the terms of this warranty...

Page 3: ...27 Energy Saver 27 Scheduler 27 Service Information 28 Factory Reset 28 Exporting Data Using USB Setup of Multiple Machines 29 Copying Settings from Machine to Machine 31 Importing Data Using USB Addi...

Page 4: ...mpty hopper in opening on top of machine If bean hoppers are already locked in place go to Step 3 2 When placed push gate handle back 3 Remove lid s 4 Pour whole coffee beans in hopper s 5 Once full p...

Page 5: ...nd hold the BUNN logo for a few seconds until SERVICE ACCESS appears on the display 2 Select the ADVANCED icon 3 Next enter the passcode 6601 First we will setup a coffee Product 1 Touch the RECIPES i...

Page 6: ...the Product Name Line 1 field NOTE There is a second field if you need more space to name your product 6 Type the name of your coffee for example Regular 7 Press Return NOTE The Product Name Line 1 an...

Page 7: ...duct Image 10 If a new image is chosen press OK 9 8 12 You can choose to edit or create new Products or move on to creating or editing a coffee Recipe by pressing the RECIPE tab 11 Press OK to complet...

Page 8: ...g calibration is simply telling the machine which grinder to turn on 3 Next press the Start button to prime the grinder with beans 3 5 4 Follow on screen prompts WARNING All three hoppers must be lock...

Page 9: ...cup under the Coffee Chute a b c 4 6 Take the cup or container out 5 The Calibration screen will appear again when finished 6 Option 2 PRODUCT AND RECIPE SETUP 1 First open the machine door 3 Close d...

Page 10: ...the weight of the cup 10 Press Enter After pressing the 1st Field to log the weight of the coffee in the cup the Input Screen will appear for you to input in these numbers 9 10 Empty the cup then repe...

Page 11: ...inder is the default or applied to All If this step is completed and the Apply to Left Center or Right button is selected the recipe will need to be recalibrated if it s moved from the specified grind...

Page 12: ...tion continued 1 Press the New button 2 Or edit an existing Recipe For this example we will select Coffee 1 to edit Recipe Setup 1 3 Now choose the GENERAL tab to edit the recipe for Coffee 1 3 2 NOTE...

Page 13: ...ipe Name Line 1 and Recipe Description Line 1 by pressing on the text field There are two extra fields for each if more space is needed 6 9 Next the Recipe Image can be changed if preferred 9 By press...

Page 14: ...can make changes to Recipes for the sizes enabled 1 Press the COFFEE tab to start 1 Editing Coffee Recipes By Size Example Each size with a green box is enabled Coffee Recipes can be edited from this...

Page 15: ...using 5 less total water volume starting with the bypass A Bold beverage uses 5 more ground coffee above the normal grind weight The option to make a Bold beverage or to Leave Room can be enabled fro...

Page 16: ...phic User Interface will be set up through the Product Setup button Enabling Products 1 2 Next select the BEVERAGES OFFERED tab 2 3 Choose the Enable boxes for the beverages you want available to brew...

Page 17: ...9 6 8 Or to scroll side to side press the arrow in the lower corner NOTE Beverages will be shown in the order displayed on this screen 9 Press OK when finished 1 Select the BEAN HOPPERS tab to assign...

Page 18: ...Hoppers Setup continued 5 Select SERVICE ACCESS to return to HOME screen After the machine updates the HOME screen should appear and the Products and variables you just created should be available Yo...

Page 19: ...re accessed by swiping left or right across the screen or by touching the arrow located at the top right of the screen 2 Next press the desired drink icon The border will change when selected 2 1 User...

Page 20: ...ton to begin NOTE If the beverage selected is an iced beverage the screen will prompt the user to fill the cup with ice prior to placing the beverage container cup on the tray 6 5 The user can stop a...

Page 21: ...e user will then be returned to the original selection screen to choose again 1 To activate the ADA screen interface the user must press the Accessibility symbol wheelchair icon 2 When activated the s...

Page 22: ...e cup with ice prior to placing the beverage container cup on the tray a b 3 c 4 Selections available through the ADA interface on this screen Previous Small Medium Large Extra Large Bold Leave Room a...

Page 23: ...INTERFACE 1 Touch and hold the BUNN logo for a few seconds until the SERVICE ACCESS screen appears 1 2 Select the ADVANCED icon 2 c c Navigate to the START button using the ADA arrows d d Press OK to...

Page 24: ...Altitude Chart button 3 On the chart find your current Altitude then move to the right to find the suggested tank temperature setting The chart will scroll down for more altitude settings Press OK to...

Page 25: ...reen check mark and disable Brew Lockout Coffee brewing can be performed regardless of tank temperature 8 If any changes are made to the Temperature screen press Save to confirm 1 Hoppers have sensors...

Page 26: ...unter grounds disposal In this mode the grounds bin detection must be disabled to allow brewing 1 Press the check box next to Grounds Bin Monitoring Enabled to remove the green check mark and disable...

Page 27: ...temperature setting will drop to 140 F 2 Touching the main screen at any time will exit the Energy Saver feature If any changes to the screen have been made press Save to confirm BUNNlink Energy Save...

Page 28: ...have been made press Save to confirm Service Information 2 1 Pressing the red button will cause stored values to be restored to the default setting the machine had when it shipped from the factory Cau...

Page 29: ...re to be setup the same way 1 Press and hold the BUNN Logo Icon for three 3 seconds to access the SERVICE ACCESS screen 2 At the SERVICE ACCESS screen select the Advanced button 2 1 Setup of Multiple...

Page 30: ...7 7 The USB port is located behind the left side of the touch screen NOTE The BUNN default USB Stick is part number 64165 0000 8 A confirmation screen will appear showing the progress of the import 8...

Page 31: ...wered up Refer back to step 11 for confirmation and details information 2 The user is prompted to insert the USB Stick Copying Settings from Machine to Machine 2 1 If you have a USB Stick with a copy...

Page 32: ...wing the progress of the import 5 6 For more information about the status of the import press the Details button 6 7 When the import is completed the OK button can be selected and the USB stick can be...

Page 33: ...ed settings and recipes should be available for use The Update screen will appear Updating Adding to Your Brand 2 1 1 Press and hold the BUNN Logo Icon for three 3 seconds to access the SERVICE ACCESS...

Page 34: ...4 5 5 Select the ADD tab The YOUR BRAND screen will help you navigate to the customizable areas of the machine Customizable Areas Include Background Images Branding Logos Recipe Images Screensaver Vid...

Page 35: ...Badges 100 x 132 px Background Image 1280 x 800 px Beverage Complete Background 1280 x 800 px Screen Saver Video 1280 x 800 px Beverage Icon 350 x 350 px Logo up to 160 x 80 px NOTE Here is a list of...

Page 36: ...yet Select which language the files should be imported into where applicable by pressing the arrow on the drop down menu 9 10 Select the folder location source 11 Contents in the folder should appear...

Page 37: ...OTE If needed repeat steps 10 thru 14 to add more files 16 When the files are done importing press OK 17 If you are done adding files the USB stick can be safely removed and the Reboot button should b...

Page 38: ...Brand home screen you can customize the look of your layout HOME SCREEN Tab 1 Press Home Screen tab to select the area you want to customize Options Available a Select LOGO field a CHANGE BRANDING LO...

Page 39: ...ect icon to change Theme Color b The Background Images screen will appear By swiping side to side you can see the image library Press the chosen Background Image c If a new image is chosen press OK NO...

Page 40: ...Save if any changes were made e d b Layout screen appears b NOTE Images will conform to the size selected The optimal size for the layout selected is shown in the upper right corner of the screen d T...

Page 41: ...b Check box to show image b The Container Images screen will appear By swiping side to side you can see the image library c Press the chosen Image d If a new image is chosen press OK c d SHOW NAME a a...

Page 42: ...Check box to Show Recipe Image SHOW RECIPE IMAGE b Beverage details can be edited within Recipe Setup See page 12 for steps b c Select Save if any changes were made c 1 Select Ending Sequence tab 2 C...

Page 43: ...R a Select End of Sequence field NOTE End of Sequence Banner size should be 948 x 400 pixels b a 3 4 c 3 4 b Selection Screen will open Scroll side to side to view image library Then click selected im...

Page 44: ...24 x 1280 pixels CHANGING SCREENSAVER IMAGE 2 Check Screen Saver Enable box 1 2 a c Press OK b A selection screen will open If there are more images available than shown scroll side to side to view li...

Page 45: ...ustomer dispenses beverage Setup field edits seconds after machine while in setup mode 4 Change time in Input Field 5 Select Enter 3 4 5 6 Select Save 6 NOTE Brewing video size should be 1024 x 1120 p...

Page 46: ...NOTE The ADD tab should be used by people approved to make changes since your customers will see the changes See Adding to Your Brand for steps to add new content from a USB Stick NOTE This is the 1s...

Page 47: ...ill show progress of file import NOTE Do not remove USB Stick while files are copying 2 Insert USB Stick NOTE The USB port is located behind left side of the touch screen 3 4 2 5 6 When the import is...

Page 48: ...m 8 Once a machine is setup you can Export all of the settings and recipes to a USB Stick and then copy this information to other machines if they are to be setup the same way See page 29 Setup of Mul...

Page 49: ...NN logo for a few seconds until the screen starts to reset After the machine updates the HOME screen should appear and the products and variables you just added should be available You are ready to se...

Page 50: ...intenance and Water Filtration 1 Touch and hold the BUNN logo for a few seconds until the SERVICE ACCESS screen appears 2 Select the ADVANCED icon 3 Enter the passcode 6601 4 Press the REMINDERS icon...

Page 51: ...2 4 3 CLEANING TAB 1 Select PREVENTATIVE MAINTENANCE Tab PREVENTATIVE MAINTENANCE TAB 2 Enable Reminder for PM Alert based on Cycles is checked as a default NOTE The default time is 1 00 am 1 1 2 Use...

Page 52: ...ycles or Days are running out the screen will show countdown s in red 5 The PM alert will also show on the Service Access screen 7 5 6 When PM service is completed press the Reset button 6 7 Press SAV...

Page 53: ...ert will also show on the Service Access screen 5 6 After a new Water Filter is installed press the Reset button 4 2 Enable Reminder for Water Filter Alert based on Cups is checked as a default 2 3 3...

Page 54: ......

Reviews: