background image

49

SERVICE (cont.)

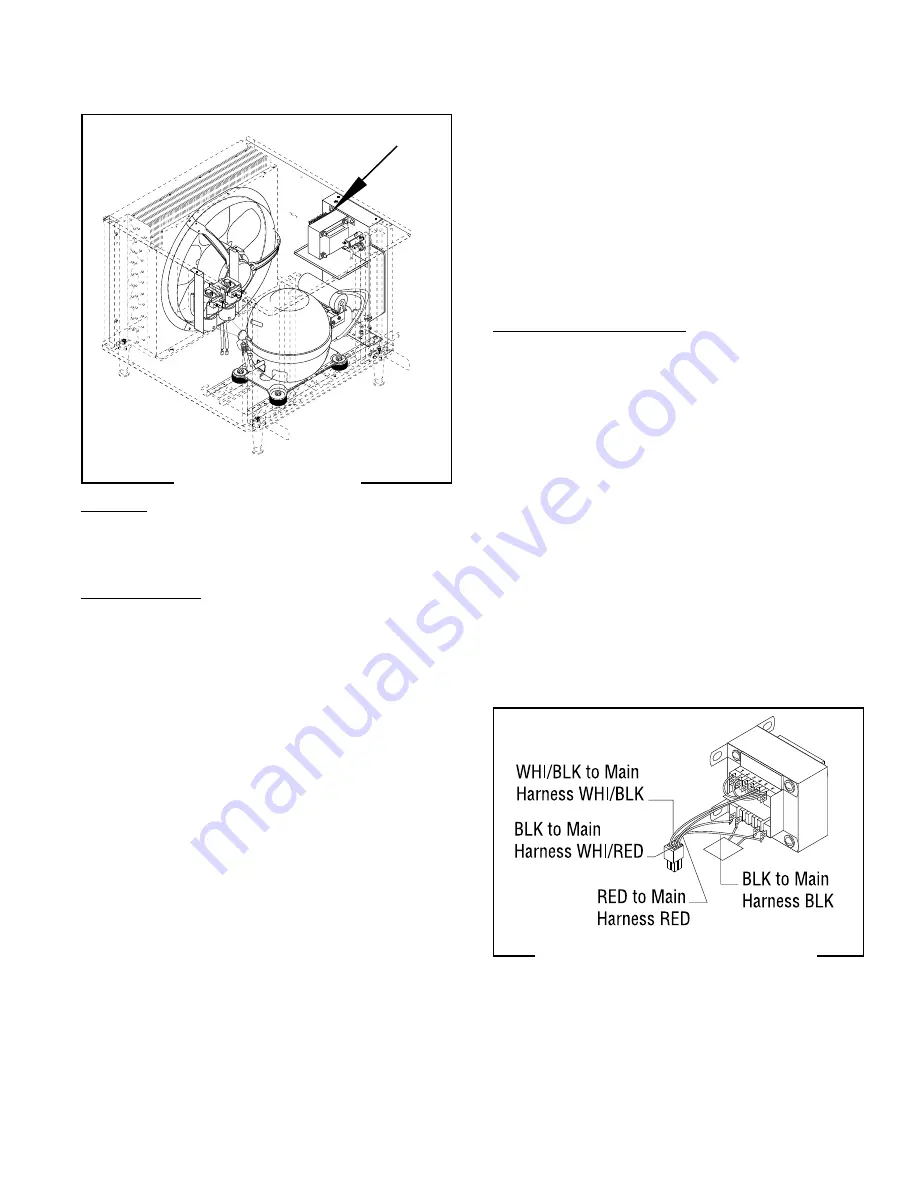
TRANSFORMER

FIG. 51 TRANSFORMER TERMINALS

P1329

R2

2

FIG. 50 TRANSFORMER

P1342

Location:

The transformer is located inside the chassis on

the upper rear side of the component bracket.

Test Procedures:
1. Disconnect the dispenser from the power source.
2. Disconnect the plug from the transformer to the

connector from the dispenser main wiring har-
ness.

3. With a voltmeter, check the voltage across the

white/red wire and the white/black wire in the
dispenser main wiring harness connector. Con-
nect the dispenser to the power source. The indi-
cation must be:
a) 120 volts ac for 120 volt models.
b) 230 volts ac for 230 volt models.

4. Disconnect the dispenser from the power source.
If voltage is present as described, proceed to #5.
If voltage is not present as described, refer to the
Wiring Diagram and check the dispenser main wiring
harness.
5. Reconnect the plug from the transformer to the

connector from the dispenser main wiring har-
ness.

6. Connect the dispenser to the power source.
7. Disconnect the lamp cord from the lamp cord

connector.

8. With a voltmeter, check the voltage across the

inside of lamp cord socket and the outside with the
DAY/NIGHT switch in the “-” down position. The
indication must be approximately 12.6 volts dc.

9. Disconnect the dispenser from the power source.
If voltage is present as described, the transformer is
operating properly.
If voltage is not present as described, replace the trans-
former.

Removal and Replacement:
1. Remove the four #8-32 locking screws securing

the component bracket to the chassis.

2. Pull component bracket from the chassis far

enough to gain access to the transformer.

3. Disconnect the connector from the dispenser main

wiring harness from the plug on the transformer.

4. Remove the four #8-32 locking screws securing

the transformer to the component bracket.

5. Remove transformer and discard,
6. Position new transformer on the component

bracket and secure with four #8-32 locking screws.

7. Reconnect the plug on the transformer to the

connector on the dispenser wiring harness.

8. Refer to Fig. 51 and reconnect the wires.
9. Position component bracket in the chassis and

secure with four #8-32 locking screws.

27646 122200

Summary of Contents for CDS-2

Page 1: ...SERVICE MANUAL BUNN O MATIC CORPORATION POST OFFICE BOX 3227 SPRINGFIELD ILLINOIS 62708 3227 PHONE 217 529 6601 FAX 217 529 6644 www bunnomatic com CDS 2 CDS 3 BUNN 27646 0000L 06 01 1997 Bunn O Matic Corporation ...

Page 2: ...LUSIVE AND IS IN LIEU OF ANY OTHER WARRANTY WRITTEN OR ORAL EXPRESS OR IMPLIED INCLUDING BUT NOT LIMITED TO ANY IMPLIED WARRANTY OF EITHER MERCHANTABILITY OR FITNESS FOR A PARTICULAR PURPOSE The agents dealers or employees of Bunn are not authorized to make modifications to this warranty or to make additional warranties that are binding on Bunn Accordingly statements by such individuals whether or...

Page 3: ...nd in this manual They were written for your protec tion All notices are to be kept in good condition Replace any unreadable or damaged labels 12559 0003 CHARGE Type R22 Amount 8 4 oz Design Pressures High 210 Low 32 27443 0000 28720 0000 27442 0000 00986 0002 27646 022500 ...

Page 4: ... seal or inside bore of hopper 3 Apply lubricant over o rings on faucet spool before inserting into faucet housing Refer to product literature for Bunn approved lubricant 27664 0000 27444 0000 CDS 2 Only 28519 0000 CDS 3 Prior to S N CDS0019500 CHARGE Type R404A Amount 25 oz Design Pressures High 320 Low 44 CHARGE Type R404A Amount 9 5 oz 269g Design Pressures High 215 Low 40 29373 00000 CDSA 2 On...

Page 5: ...cuit rated 120 volts ac 15 amp single phase 60 Hz The mating connector must be a NEMA 5 15R Refer to the dataplate for exact electrical requirements Model CDSA 2 This dispenser has an attached cordset and requires a 2 wire grounded individual branch circuit rated 230 volts ac 10 amp single phase 50 Hz The mating connector must be a NEMA 5 15R Refer to the dataplate for exact electrical requirement...

Page 6: ...oper operation 6 0 MIN 6 0 MIN 6 0 MIN DO NOT REMOVE Vinyl Deflector 6 Press the seals firmly into place 7 Apply a thin film of lubricant to the inside of each auger shaft seal 8 Install the seals on the auger shafts Wipe the cooling drums to remove any lubricant 3 Squeeze some lubricant into hand 4 Apply a thin film of lubricant to each cooling drum seal 5 Install the seal over the flange at the ...

Page 7: ... keep the food zone the cleaner the product you ll serve the cus tomer 11 Set the lids on the hoppers Slide front to back or lift off for filling 12 Plug in the hopper lid lamp cables 13 CDS 2 only Assemble the drip tray 14 CDS 3 only Loosen the two front legs by turning counter clockwise to gain approxi mately 25 clearance Install the slots of the support bracket over threaded studs of the legs a...

Page 8: ...hen in the center OFF position NO ICE Maintains cooling yet allows any ice in the selected hopper to naturally thaw when in the right NO ICE position DAY NIGHT SWITCH DAY This is the normal operating position The hoppers display lights will glow and the electronic controls will maintain ice when the switch is in the left DAY position the indi vidual hoppers ICE OFF NO ICE switches are in the left ...

Page 9: ...r position indicates night time mode 2 Determine the desired times that night time mode is to begin and end 3 Position all actuators between begin and end times in the outer position EXAMPLE Night Time Mode is 11 00 PM 7 00 AM Place the actuator at 11 00 PM to the outside position Continue placing actuators to the outside position counterclock wise around the dial to 7 00 AM All actuators from 7 0...

Page 10: ... and a consistent product is difficult to maintain if left frozen for an extended period of time Place the DAY NIGHT switch in the right NIGHT position for a few hours each night Then return it to the left DAY position when the product has thawed sufficiently You ll know it is in the night position because the hopper lid lights are out USING THE DISPENSER FOR COLD LIQUID PRODUCTS 1 Slide the lid f...

Page 11: ... to dispense Keep the product level in the hoppers higher than the auger Air will become entrapped in the mixture resulting in a clouded foamy consistency You may find it beneficial to turn down the ice controls to keep the ice granules from growing too large Refer to the operating controls on page 1 6 Some products freeze at a lower temperature than others You may notice frost or ice on the hoppe...

Page 12: ...MENDED WEEKLY CLEANING SUGAR ALCOHOL BASED PRODUCTS RECOMMENDED DAILY CLEANING DAIRY PRODUCTS NOTE Close the control drawer before proceeding 1 Empty all product from the hoppers Disconnect the hopper lid cords and remove the lids 2 Lift the hopper up slightly then use a hard plastic utensil to pry it up Pull forward to remove 4 Disassemble the auger for cleaning by spreading apart the latches and...

Page 13: ...he hoppers The cleaner you keep the food zone the cleaner the product you ll serve the cus tomer 9 Set the lids on the hoppers RECOMMENDED WEEKLY CLEANING CONT 11 Wash all components with a wash cloth in mild hot water and detergent solution Do not immerse hopper lids 12 Wash the drums hopper drip trays top covers and outer enclosure using a clean wash cloth that has been dampened in a mild soluti...

Page 14: ...r disassemble them as shown and install them up side down DISASSEMBLY 1 Unscrew the balls from the handle assemblies Turn them in a coun terclockwise direction until they are no longer attached to the handles 2 Remove the metal sleeves from the assemblies 3 Separate the two halves of the handles and remove them from the faucet bodies ASSEMBLY 1 Place the two halves of the handles on the faucet bod...

Page 15: ... Latch Long Auger Latch ASSEMBLY 1 Snap one of the auger sections to the long auger latch 2 Snap another auger section in place 3 Snap the third auger section in place 4 Snap the auger nose onto the last section installed 5 With the long auger latch on top place the short auger latch inside the augers and snap it onto the assembly DISASSEMBLY 1 Firmlypulltheaugersectionconnectionsapartateachslotin...

Page 16: ...y from combustibles WARNING Exercise extreme caution when servicing electrical equipment Unplug the dispenser when servicing except when electrical tests are specified Follow recommended service procedures Replace all protective shields or safety notices PROBLEM Doesn t work Switches do nothing auger not turning no hopper lid lights no fan no compressor sound Hopper Lid Lights not on PROBABLE CAUS...

Page 17: ...sting procedures See page 26 Refer to Service Auger Motor Capacitor s for testing procedures See page 23 RefertoService AugerMotor s for testing procedures See page 22 Refer to Service Fan Motor for testing procedures See page 39 The fan motor will run for approxi mately two minutes after compres sor shuts off PROBABLE CAUSE 3 Circuit Breaker 4 Lamps 5 Transformer 6 Lamp Holder Socket Assy 1 Auger...

Page 18: ...tbeconnected withanextensioncord RefertoElec trical Requirements Refer to Service Fuse and Fuse Holder for testing procedures See page 40 Refer to Service Contactor for test ing procedures See page 34 Refer to Service Electronic Control for testing procedures See page 38 Refer to Service Compressor Start Relay for testing procedures See page 28 CDS 2 or 31 CDS 3 Refer to Service Compressor Ther ma...

Page 19: ...frigerant charge A The DAY NIGHT Switch must be in the DAY position B Refer to Service DAY NIGHT Switch for testing procedures See page 36 Bunn recommends the use of prod ucts with an apparent brix of 12 or higher RefertoService VoltageDividerfor testing procedures See page 50 Turn the Ice control for the desired hopper a small amount clockwise to increasetheicegranulesizeorcoun terclockwisetodecr...

Page 20: ...E 3 Fan Motor 4 Auger Motor s 1 Worn Shaft 2 Worn Seals REMEDY Removetheairfilterattherearofthe dispenser and listen for fan motor noise Replace the motor if exces sively noisy Place the Auger switches in the ON position and the ICE OFF NO ICE switches in the OFF position Lis ten for auger motor noise Replace the motor if excessively noisy Replace Shaft Refer to Service Auger Shaft Assembly See pa...

Page 21: ...s 51 Electrical Schematics 54 SERVICE This section provides procedures for testing and replacing various major components used in this dispenser should service become necessary Refer to Troubleshooting for assistance in determining the cause of any problem WARNING Inspection testing and repair of electrical equipment should be performed only by qualified service personnel The dispenser should be d...

Page 22: ...at the upper rear of the dispenser chassis inside the auger motor covers Test Procedures 1 Disconnect the dispenser from the power source 2 Disconnect the wires from the motor to be tested 3 With a voltmeter check the voltage across the white brown wire for the left motor the white blue wire for the right motor or the grey wire for the center motor and the white black wire Place the appropriate au...

Page 23: ...ispenser from the power source If voltage is present as described proceed to 5 If voltage is not present as described refer to the Wiring Diagram and the dispenser wiring harness 5 Check for continuity across the auger motor ca pacitor terminals If continuity is present as described reconnect the wires to the auger motor capacitor If continuity is not present as described replace the auger motor c...

Page 24: ...them 9 Clean seal and busing surfaces of the cooling drum very thoroughly All old lubricant must be re moved 10 Refer to Fig 6A and slip new blue bushing into cooling drum Lightly lube I D of bushing with M2550 0000 Lubri film provided in Kit 28106 0000 CDS 2 or 28106 0001 CDS 3 Do not use anything such as a cotton swab that might leave lint or unravel DON NOT GET ANY LUBE ON THE SEAL COUNTERBORE ...

Page 25: ...be the bushing I D with M2550 0000 Lubri Film Do NOT get any Lube on this surface P1759 FIG 6B COOLING DRUM SEAL P1760 Open face of seal away from tool Cooling Drum Seal Seal Insertion Tool FIG 6C MOTOR SHAFT ASSEMBLY P1761 Lube about 1 1 2 of shaft and in the groove with 29563 0000 Krytox Lubricant Auger Shaft Assy Lube about 2 0 of shaft with M2550 0000 Lubri film 27646 122200 ...

Page 26: ...P1336 FIG 7 AUGER ON OFF SWITCHES P1343 Location The auger switches are located inside the dispenser drawer Test Procedures 1 Disconnect the dispenser from the power source 2 Disconnect the white green wire from the switch to be tested and white black wire from contactor located on the outside bottom of the component bracket 3 With a voltmeter check the voltage across the white green and the white...

Page 27: ...ircuit breaker Removal and Replacement 1 Remove the four 8 32 locking screws securing the component bracket to the chassis 2 Tip the top of the component bracket forward far enough to allow access to the rear of the circuit breaker 3 Remove the wires from the circuit breaker 4 Compress the clips on the back side of the compo nent bracket and gently push the circuit breaker through the opening in t...

Page 28: ...twoblackwiresfromthecompres sor start capacitor 7 Remove relay from the compressor 8 Check for continuity across the upper left terminal and the right pin socket on the rear of the relay If continuity is present as described the compressor start relay is operating properly If continuity is not present as described replace relay Compressor 1 With the compressor start relay 1 removed disconnect the ...

Page 29: ...ompressor over the four studs in the dispenser chassis with the fill valve to the left side of the dispenser 9 Securecompressortothedispenserchassisusing four 25 20 keps nuts and washers 10 Reconnect the wires to the components on the component bracket and plug the main wiring har ness into the electronic control NOTE When reconnecting wires refer to Fig 10 for circuit breaker Fig 34 for fuse hold...

Page 30: ...racket 7 Refer to Fig 15 and reconnect the thermal over load protector wires 8 Reinstall terminal cover 5 and cover retainer 6 FIG 15 THERMAL OVERLOAD PROTECTOR TERMINALS P1339 FIG 14 COMPRESSOR START RELAY TERMINALS P1338 120V DISPENSERS 230V DISPENSERS 120V DISPENSERS 230V DISPENSERS Compressor Start Relay Refer to FIG 12 1 Remove the terminal cover retainer 6 and the terminal cover 5 WARNING Th...

Page 31: ...om pressor 2 Check for continuity across the terminal on the compressor and the left pin on the compressor If continuity is present as described the electrical part of the compressor is operating properly If continuity is not present as described replace the compressor Thermal Overload Protector 1 Check for continuity across the terminals on the thermal overload protector If continuity is present ...

Page 32: ...wiring harness 10 Remove the three 6 thread cutting screws secur ing the fan to the condenser shroud Remove the fan and set aside for reassembly 11 Slide the compressor out the right side of the dispenser 12 Remove the four grommets and sleeves from the old compressor and install them on the new com pressor 13 Slide new compressor into position on the dis penser chassis with the tube connections t...

Page 33: ...omponent bracket and secure with a 6 32 screw 5 Refer to Fig 19 and reconnect the wires FIG 19 COMPRESSOR RELAY TERMINALS T4 WHI from Compressor and Main Harness T4 BLK from Run Capacitor T5 BLK from Compressor Thermal Overload Protector and Main Harness T1 BLK from Start Capacitor T2 BLK from Run Capacitor T2 Red from Compressor P1820 BLK to Compressor Relay T5 P1821 START RUN BLK to Compressor R...

Page 34: ...Test Procedures 1 Disconnect the dispenser from the power source 2 Disconnectwhite blackwirefromcontactortermi nal 0 terminal 2 on CDS 3 first type contactor and brown black from terminal 1 3 With a voltmeter check the voltage across the white black wire and the brown black wire and the ON OFF switch in the ON position Connect the dispenser to the power source The indication must be a 120 volts ac...

Page 35: ... cooling drum while rotating the support into a vertical position The boss on the very bottom will drop into the hopper drip tray s drain hole Ledge Boss Legs When in its proper position the cooling drum will cause a slight pressure on the hopper drip tray drain hole and the two legs will be equidistant from the hop per drip tray If adjustment is needed remove the support and gen tly force the fre...

Page 36: ...ing screws 9 Reinstall drawer FIG 26 DAY NIGHT SWITCH TERMINALS P1335 FIG 25 DAY NIGHT SWITCH P1343 Location The DAY NIGHT switch is located inside the dis penser drawer on the right front of the control panel Test Procedures 1 Disconnect the dispenser from the power source 2 Disconnect the white green wire from the switch andthewhite blackwirefromcontactorlocatedon the outside bottom of the compo...

Page 37: ...ect the white green wire from the ON OFF switch 6 With the ON OFF switch in the ON down position check for continuity across the switch terminals Continuity must not be present when the switch is o OFF down position If continuity is present as described the ON OFF switch is operating properly If continuity is not present as described replace the ON OFF switch Removal and Replacement 1 Pullthedispe...

Page 38: ...ts ac for 120 volt models b 230 volts ac for 230 volt models 4 Disconnect the dispenser from the power source If voltage is present as described replace the elec tronic control If voltage is not present as described refer to the Wiring Diagram and check the dispenser wiring har ness P1342 SERVICE cont ELECTRONIC CONTROL Removal and Replacement 1 Disconnect the plug from the main harness from the c...

Page 39: ...nd fan assy 1 to the chassis base 3 Remove the condenser shroud and fan assy from the right side of the dispenser 4 Removethethree 6threadcuttingscrewssecuring thefanassytocondensershroud 7 Setcondenser shroud and screws aside for reassembly 5 Remove the three 8 32 thread forming screws securing motor 5 to condenser fan shroud mount 6 Set shroud and screws aside for reassembly FIG 31 FAN COMPONENT...

Page 40: ...fuse Removal and Replacement Fuse 1 Remove the cap from the fuse holder 2 Remove fuse from the fuse holder inspect if blown discard 3 Install new 5 amp fuse in the fuse holder 4 Reinstall fuse holder cap FIG 34 FUSE HOLDER TERMINALS P1331 Fuse Holder 1 Disconnect the wires from the rear of the fuse holder 2 Remove nut securing the fuse holder to the com ponent bracket 3 Push fuse holder through th...

Page 41: ...blue wire from the center ICE OFF NO ICE switch 6 With the switch to be tested pressed down on the right side check for continuity between the center terminal and the left terminal With the switch pressed down to the left check for continuity betweenthecenterterminalandtherightterminal Continuity must not be present when neither side of the switch is pressed down If continuity is present as descri...

Page 42: ...uger motor cover 2 Remove the hopper cover with the lamp cord assembly from the hopper 3 Removehoppercoverlinerfromthehoppercover 4 Cut the closed splice terminals connecting lamp cord assembly to the lamp holder socket assem bly off 5 Remove lamp cord assembly from hopper cover and discard 6 Push new lamp cord wires through the holes on the left outside top of the hopper cover 7 Strip the wires f...

Page 43: ...es FIG 40 LAMP CORD CONNECTOR P1323 FIG 39 LAMP CORD CONNECTOR P1343 Location The lamp cord connectors are located inside the upper left side of the auger covers Test Procedures 1 Disconnect the dispenser from the power source 2 Disconnect the plug on the dispenser main har ness from the connector from the lamp cord connector 3 With a voltmeter check the voltage across the two pin holes on the mai...

Page 44: ... assembly to the lamp cord connector assembly on left top of the auger motor cover 14 Refer to Fig 42 when reconnecting the wires FIG 42 LAMP HOLDER SOCKET ASSEMBLY WIRES P1322 SERVICE cont LAMP HOLDER SOCKET ASSEMBLY FIG 41 LAMP HOLDER SOCKET ASSEMBLY P1343 Location The lamp holder socket assemblies are located inside the hopper covers Test Procedures 1 Disconnectthelampcordassemblyfromthelamp co...

Page 45: ... connector from the dispenser main wiring harness to the pin connector at the rear of new L E D adjustment board 14 Turn board and panel over and position in the dispenser drawer and secure with four 8 32 locking screws FIG 43 L E D ADJUSTMENT BOARD P1343 Location The L E D adjustment board is located in the dispenserdrawerattachedtothebottomofthecontrol panel Test Procedures 1 Disconnect the disp...

Page 46: ... to the ON position After approximately two minutes listen carefully in the vicinity of the solenoid valve for a clicking sound as the coil magnet attracts 7 Disconnect the dispenser from the power source If the sound is heard as described and the refrigerant will not pass through the solenoid valve there may be a blockage in the refrigerant line before the sole noid valve or the solenoid valve ma...

Page 47: ...lash twice every four seconds 4 If flashing is present as described replace the temperature sensor NOTE Auger motor cover must be in place to give a correct reading Removal and Replacement 1 Remove the two 8 32 securing the auger motor cover to cooling drum mount and remove the cover Set aside for reassembly 2 Disconnect the plug on the temperature sensor leads from the connector on the dispenser ...

Page 48: ...r aside with wires attached 4 Disconnecttheaugermotorplugfromtheconnec tor on the main wiring harness 5 Remove the three remaining 8 locking screws securing the auger motor mounting bracket to cooling drum mounting bracket 6 Remove motor with mounting bracket drip tray split pin and torsion spring bearings as an assem bly and set aside for reassembly NOTE When removing or installing the motor be s...

Page 49: ...o the power source 7 Disconnect the lamp cord from the lamp cord connector 8 With a voltmeter check the voltage across the insideoflampcordsocketandtheoutsidewiththe DAY NIGHT switch in the down position The indication must be approximately 12 6 volts dc 9 Disconnect the dispenser from the power source If voltage is present as described the transformer is operating properly If voltage is not prese...

Page 50: ...o DAY position The indication must be a 120 volts ac for 120 volt 2 wire models b 230 volts ac for 230 volt 2 wire models 4 Disconnect the dispenser from the power source If voltage is present as described reconnect the plug and connector and proceed to step 5 If voltage is not present as described refer to the Wiring Diagrams and check the main wiring harness 27646 122200 FIG 52 VOLTAGE DIVIDER P...

Page 51: ...51 COOLANT SCHEMATIC DIAGRAM CDS 2 27646 022500 ...

Page 52: ...TIC DIAGRAM CDS 3 Prior to S N CDS 0019500 LEFT EVAPORATOR CENTER EVAPORATOR CONDENSER SUCTION ACCUMULATOR COMPRESSOR RIGHT EVAPORATOR SPLITTER FILTER DRYER s s s AEV AEV AEV HOT GAS BY PASS VALVE SOLENOID 27646 022500 ...

Page 53: ...EFT EVAPORATOR CENTER EVAPORATOR CONDENSER SUCTION ACCUMULATOR COMPRESSOR RIGHT EVAPORATOR SPLITTER FILTER DRYER s TEV TEV TEV s s SIGHT GLASS COOLANT SCHEMATIC DIAGRAM CDS 3 S N CDS 0019500 Up 27646 022500 ...

Page 54: ...54 27646 022500 ...

Page 55: ...55 27646 022500 ...

Page 56: ...56 27646 022500 ...

Page 57: ...IO WHI YEL WHI VIO 22 YEL BRN BLK VIO ORA WHI BLK WHI GRN RED WHI GRN DAY NIGHT SW WHI GRN 5 AMP WHI BLK WHI BLK BLK 22 RED 22 VIO 22 YEL 22 GRN 22 PNK 22 1 5 9 A D J U S T M E N T B O A R D WHI GRN SOL RIGHT BLK t 1 BLK LEFT RIGHT BLK t 1 BLK WHI BLK WHI GRN 22 WHI VIO 22 BLK 22 WHI BLK WHI BLK ICE OFF NO ICE SWITCHES WHI BLK WHI BLK FAN PNK 22 1 LEFT TORQUE SENSOR BLU 22 BLK 22 PNK 22 1 RIGHT TO...

Page 58: ...58 27646 022500 ...

Page 59: ...59 27646 022500 ...

Page 60: ...60 27646 022500 ...

Reviews: