21
Quick Start Guide
20
BUGERA BVV3000 INFINIUM
bugera-amps.com
bugera-amps.com
(EN)
Step 3: Getting
started
(ES)
Paso 3: Puesta en
marcha
(FR)
Etape 3 : Mise en
oeuvre
(DE)
Schritt 3: Erste
Schritte
(PT)
Passo 3: Primeiros
Passos
BUGERA BVV3000 INFINIUM Getting started
(EN)
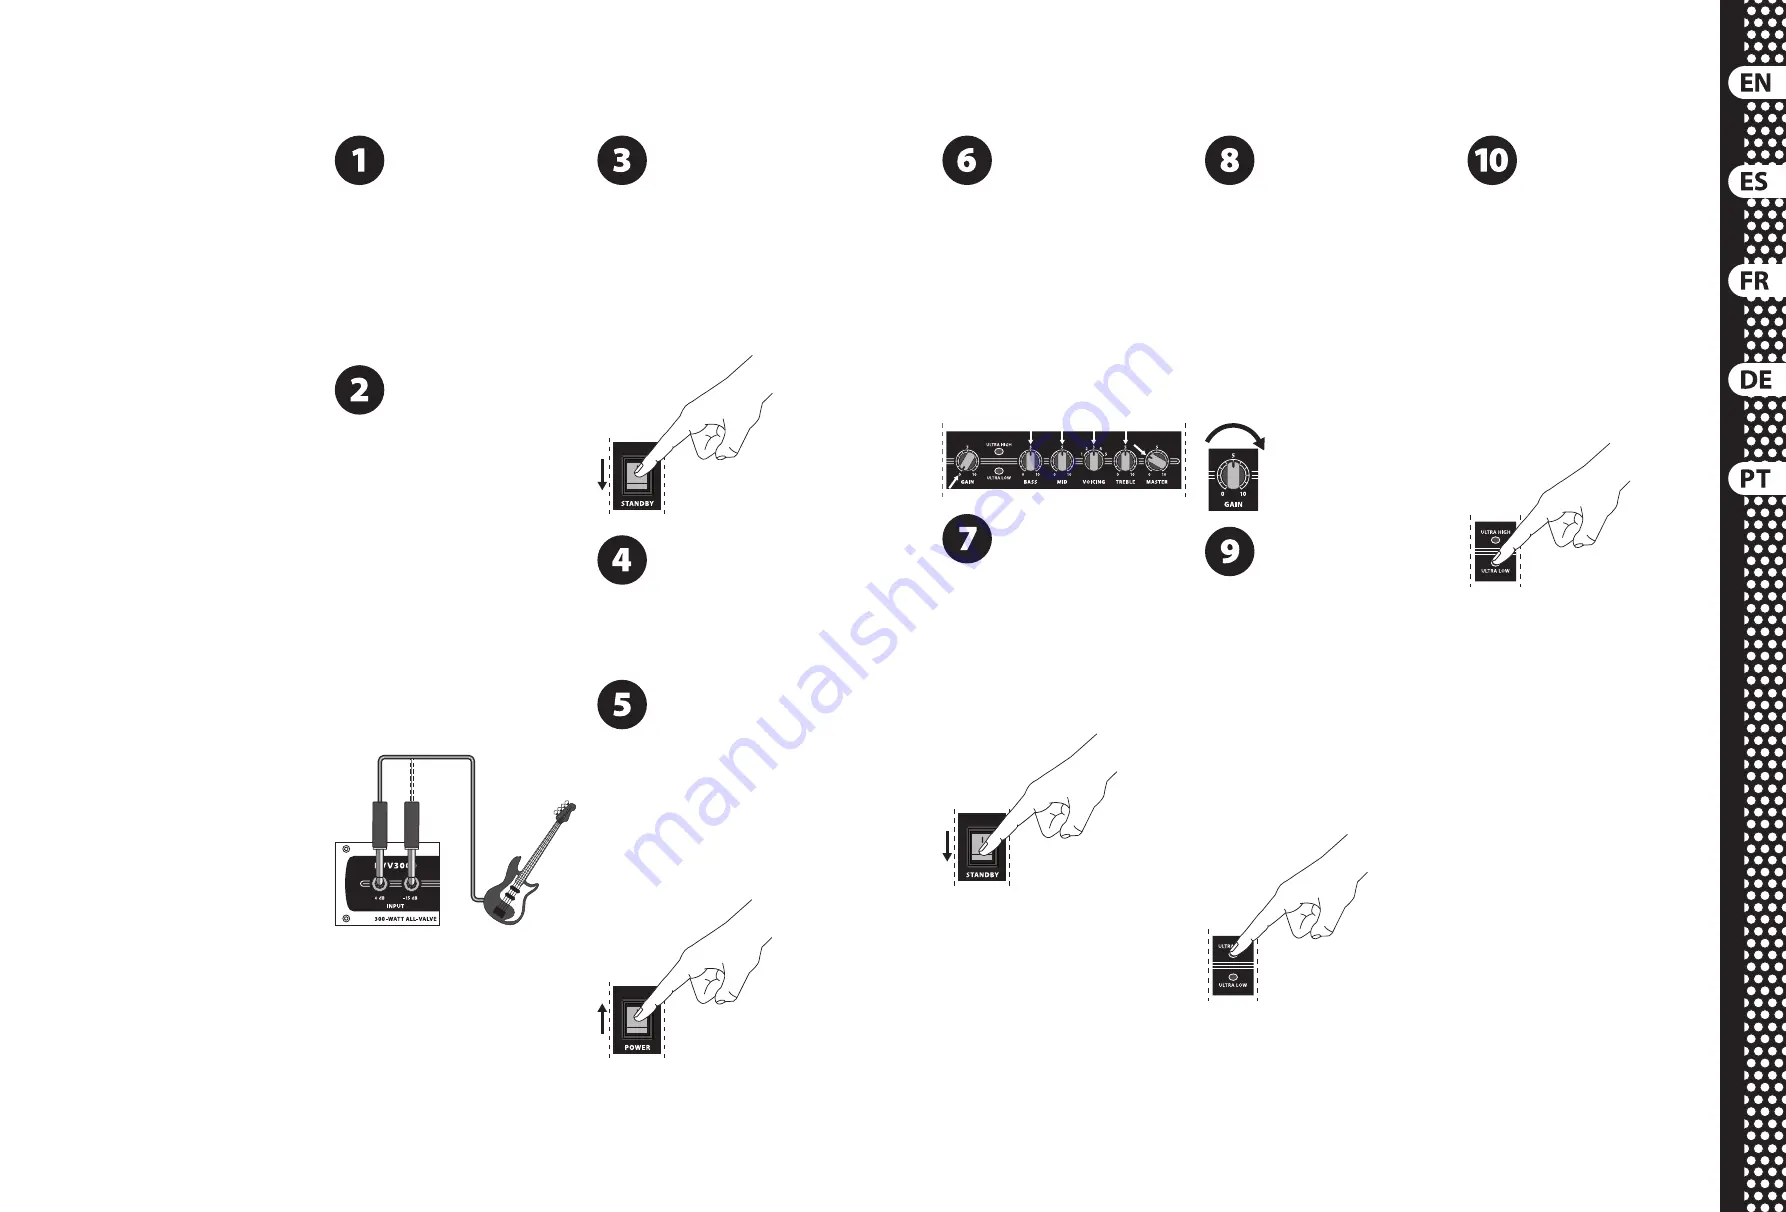
Make sure the amplifier and all
external devices are powered down.
(ES)
Asegúrese de que tanto el
amplificador como el resto de dispositivo exteriores
estén apagados.
(FR)
Veillez à ce que l'amplificateur et les
équipements connectés soient placés hors tension.
(DE)
Stelle sicher, dass der Verstärker und alle
externen Geräte ausgeschaltet sind.
(PT)
Certifique-se de que o amplificador e os
equipamentos externos estejam desligados.
(EN)
Plug your bass guitar into the INPUT
jack using an instrument cable with a
¼" TS plug. For instruments with
high-output pickups, use the -15 dB input.
(ES)
Conecte su bajo a la entrada INPUT por medio
de un cable de instrumento con un conector TS de
6,3 mm. Si su instrumento tiene pastillas de alto
nivel de salida, use la entrada -15 dB.
(FR)
Connectez la basse à l'entrée Jack INPUT avec
un câble instrument et une fiche Jack mono 6,3 mm.
Pour les instruments à niveau de sortie élevé,
utilisez l'entrée -15 dB.
(DE)
Schließe Deine Bassgitarre über ein
Instrumentenkabel mit 6,3 mm Klinkenstecker an die
INPUT Buchse an. Für Bässe mit besonders hohem
Ausgangspegel verwende die -15 dB Buchse.
(PT)
Ligue o seu baixo no INPUT usando um cabo
de instrumento com uma tomada TS de ¼".
Para instrumentos com saída de alto nível utilize a
entrada de 15 dB.
(EN)
Make sure the STANDBY switch is set
to the lower “Standby” position.
(ES)
Asegúrese de que el interruptor
STANDBY esté en la posición inferior o “Standby”.
(FR)
Veillez à ce que l'interrupteur STANDBY soit en
position basse “Standby”.
(DE)
Stelle sicher, dass der STANDBY-Schalter in die
untere „Standby“-Position gesetzt ist.
(PT)
Certifique-se de que o botão STANDBY estaja
posicionado na parte inferior.
(EN)
Power up all external devices.
(ES)
Encienda todos los
dispositivos exteriores.
(FR)
Placez les équipements externes sous tension.
(DE)
Schalte alle externen Geräte ein.
(PT)
Ligue todos os equipamentos externos.
(EN)
Power up the amplifier by pressing
the POWER switch.
(ES)
Encienda después este amplificador
pulsando en su interruptor POWER.
(FR)
Placez l'amplificateur sous tension avec
l'interrupteur POWER.
(DE)
Schalte den Verstärker durch Drücken der
POWER-Taste ein.
(PT)
Ligue o amplificador pressionando o
botão POWER.
(EN)
Set all controls as shown: GAIN all
the way down, MASTER at 25%,
all others centered.
(ES)
Ajuste todos los controles tal como le mostramos
aquí: GAIN al mínimo, MASTER al 25% y el resto en su
posición central.
(FR)
Réglez comme suit : GAIN au minimum,
MASTER à 25%, et tous les autres réglages au centre.
(DE)
Stelle alle Regler wie folgt ein: Gain ganz nach
links, Master auf 25% und alle anderen Regler
in Mittelstellung.
(PT)
Ajuste todos os controles como direcionado:
botão GAIN para baixo, MASTER 25% do caminho e
outros botões centralizados.
(EN)
Move the STANDBY switch from the
“Standby” position to the upper
“On” position.
(ES)
Cambie el interruptor STANDBY desde la posición
“Standby” a la posición superior u “On”.
(FR)
Placez l'interrupteur STANDBY en position haute
pour rétablir le son dans l'amplificateur.
(DE)
Schalte STANDBY nach oben in die „Ein“ Position.
(PT)
Coloque o interruptor STANDBY na posição
superior, em “On”.
(EN)
Rotate the GAIN knob clockwise
while playing until you achieve a
satisfactory basic tone.
(ES)
Mientras toca, gire el mando GAIN hacia
la derecha hasta que consiga un sonido
básico satisfactorio.
(FR)
Tournez le bouton de GAIN vers la droite tout en
jouant, jusqu'à obtenir un bon son de base.
(DE)
Drehe beim Spielen den Gain-Regler langsam
im Uhrzeigersinn bis der gewünschte Grundklang
erreicht ist.
(PT)
Gire o botão GAIN no sentido horário enquanto
estiver tocando até que o tom satisfatório
seja atingido.
(EN)
If your basic tone sounds dull or
muddy, press the ULTRA HIGH button to
improve the treble response.
(ES)
Si ese sonido básico es demasiado opaco o
amortiguado, pulse el botón ULTRA HIGH para
mejorar la respuesta a las altas frecuencias.
(FR)
Si le son est médiocre ou terne, appuyez sur la
touche ULTRA HIGH pour améliorer la réponse dans le
haut du spectre.
(DE)
Wenn der Grundklang zu dumpf oder matt
ist, drücke die ULTRA HIGH-Taste, um die Höhen
zu betonen.
(PT)
Se o tom básico não estiver soando bem,
pressione o botão ULTRA HIGH para melhorar a
resposta do soprano.
(EN)
If your basic tone sounds thin,
press the ULTRA LOW button to
enhance the bass frequencies.
(ES)
Si el sonido básico es demasiado débil
o brillante, pulse el botón ULTRA LOW para
intensificar las frecuencias graves
(FR)
Si le son manque de corps, appuyez sur la
touche ULTRA LOW pour améliorer la réponse
dans le bas du spectre.
(DE)
Wenn der Grundklang zu dünn oder mittig
ist, drücke die ULTRA LOW-Taste, um die Tiefbässe
zu betonen.
(PT)
Se o tom básico estiver soando fraco,
pressione o botão ULTRA LOW para melhorar as
frequências do baixo.
Summary of Contents for BVV3000 INFINIUM
Page 19: ......


