


5) If you want to stop the toasting function before the set browning level is reached, press the Go/Stop
button (11) and the carriage holding the bread slices or the sandwich cages (2) will slowly ascend. The red
light on the Go/Stop button (11) stops blinking (function concluded) but remains ON to warn that the
toaster is plugged into the electric power supply.
6) Do not remove the bread slices or the sandwich cages from the slots (3) until they have completed their
ascent. If the bread is positioned on the bun warmer, three “beep”tones will warn that the operation has
terminated and that it is possible to remove the bread from the bun warmer. WARNING: use handles or
knobs or wear oven gloves when touching any of the surfaces of the toaster, including the bun warmer (1)
and the sandwich cages (2).
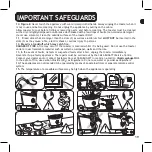
B) REHEAT FUNCTION
1) Insert the bread slices into the slots (3) of the toaster or put the bread slices/sandwiches into the
sandwich cages (2). Insert the sandwich cages (2) into the slots (3). You can also use this function to heat
bread and croissants on the bun warmer (1): when you are using the bun warmer(1) do not use and do not
insert the sandwich cages (2) into the slots (3).
2) Press the reheat button (14) to select the reheat function. A blue light on the reheat button (14) will
light up to indicate that the function has been selected.
3) Press the Go/Stop button(11). You will hear a “beep” tone and the red light on this button will start to
blink to warn that the toaster is operating. The carriage holding the bread slices or the sandwich cages (2)
descends slowly and automatically into the toaster slots (3). The reheat function starts and continues for
a time set by the electronic card.
4) When the reheat function has finished, Volo emits three “beep” tones and the carriage holding the bread
slices or the sandwich cages (2) slowly ascends automatically. The red light on the Go/Stop button (11)
stops blinking (reheat function concluded) but remains ON to warn that the toaster is plugged into the
electric power supply.
5) To stop the reheat function before the set time, just press the Go/Stop button (11): the carriage holding
the bread slices or the sandwich cages (2) slowly ascends automatically. The red light on the Go/Stop
button (11) stops blinking (reheat function concluded) but remains ON to warn that the toaster is plugged
into the electric power supply.
6) Do not remove the bread slices or the sandwich cages from the slots (3) until the bread slices or sandw
ch cages have completed their ascent. If bread is placed on the bun warmer three “beep” tones will be
heard to warn that the bread is ready and can be removed from the bun warmer(1).
WARNING: use handles or knobs or wear oven gloves to handle all hot surfaces of the toaster, including the
bun warmer (1) and the sandwich cages (2).
C) DEFROST FUNCTION
1) Insert the slices of frozen bread into the slots (3) of the toaster or put the frozen sandwiches into the
sandwich cages (2) and insert the sandwich cages (2) into the slots (3).
2) Press the defrost button (12) to select the defrost function. A blue light on the defrost button (12) will
light up to indicate that the function has been selected.
3) Select toast “colour” : Volo gives you the choice of 6 different levels of browning, from 1 to 6. Press the
browning button (15) on the control dial (10). Each time that the button (15) is pressed, Volo emits a “beep”
tone and the red lights on the control dial will light up that correspond to the numbers indicating the chosen
browning level. The higher the number selected, the higher the browning level.
21
22