background image

47

Advanced Settings

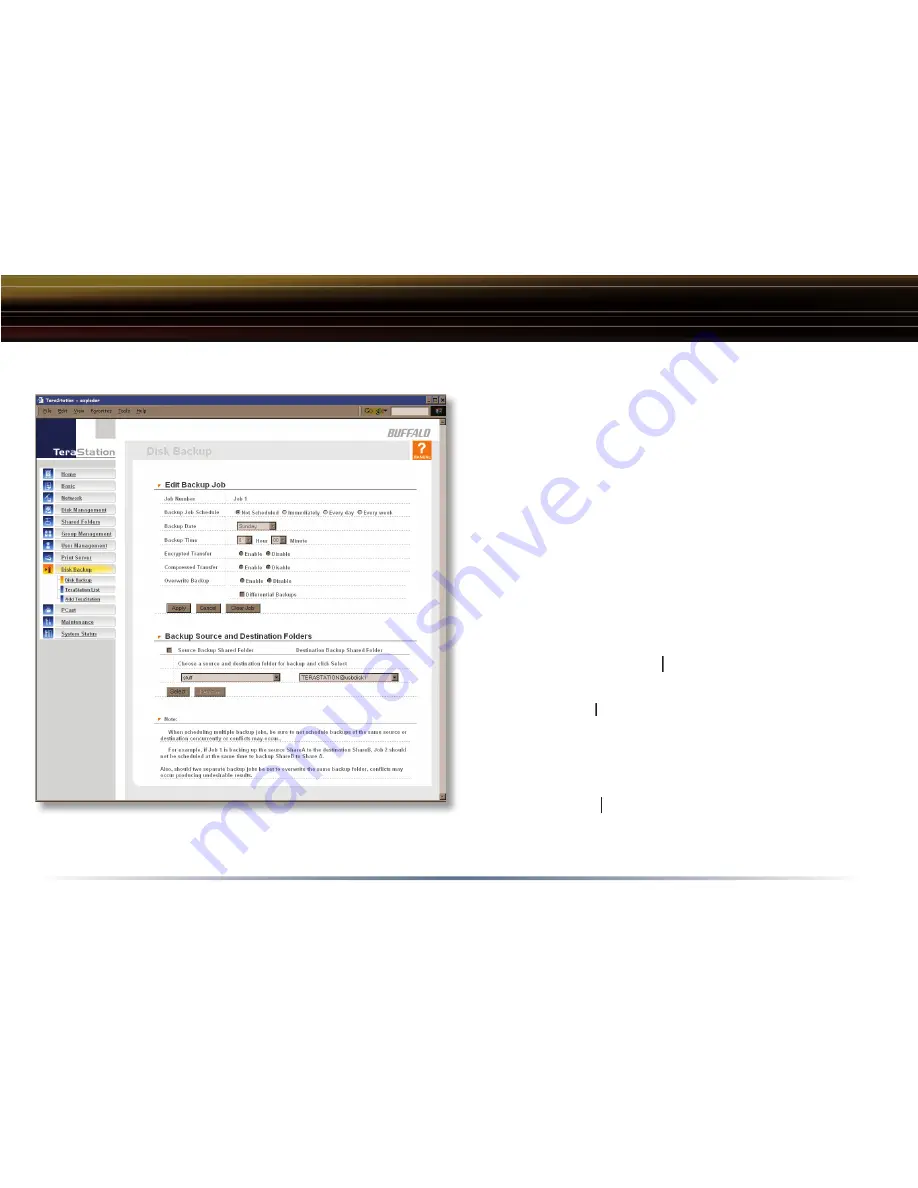
Disk Backup (Edit Backup Job)

Backup Job

 can run regularly on a daily or weekly 

schedule, or immediately by appropriate choices in 
the 

Backup  Job  Schedule

  fi eld.   

Date

  and 

Time

for  the  backup  may  be  entered,  and 

Encryption

and 

Compression

  enabled  or  disabled.    Enable 

Overwrite Backup

 to have each scheduled backup 

write  over  the  previous  backup,  or 

Differential 

Backups

  to  backup  only  fi les  changed  since  the 

previous backup.

Select the folder to be backed up from the 

Source 

Backup Shared Folder

 dropbox, and the destination 

Backup Shared Folder

Backup Shared Folder

for  the  backup  fi les  from  the 

Destination  Backup 

Shared Folder

 dropbox.  The destination folder may 

Shared Folder

Shared Folder

be  on  a  USB  drive  attached  to  the  TeraStation,  or 
another TeraStation on the network.  

Click the 

Apply

 button when your backup job is set 

Apply

Apply

up the way you want it, or 

Clear Job

 to stop a job from running again.

Summary of Contents for TeraStation HD-HTGL

Page 1: ...User Manual TeraStation HD HTGL R5 www buffalotech com wireless Rev B...

Page 2: ...l uses images representative of TeraStation user interfaces and software Because we re constantly updating our product the images and text in this manual may vary slightly from the images and text dis...

Page 3: ...agram 18 Advanced Settings 21 Basic Settings 22 Network Settings 23 Disk Management 25 Adding Extra Hard Drives 31 Shared Folders 35 Groups 39 Users 40 Printers 42 Backups 46 PCast 50 Maintenance Sett...

Page 4: ...4 Begin setting up your TeraStation by plugging your power cable and Ethernet cable into the back of the TeraStation as shown TeraStation Quick Setup Basic Setup...

Page 5: ...he power cord into a 120 volt power cord into a 120 volt power cord wall socket Plug the other end of the Ethernet cable into a hub router or switch in your network TeraStation Quick Setup Connect you...

Page 6: ...ion boots up After your TeraStation has completed booting up and the LED s have ceased to swirl check the LINK ACT LED on the front of the TeraStation If it s lit then your LINK ACT LED on the front o...

Page 7: ...f it s lit go to page 8 to continue setting up TeraStation If the LINK ACT LED is still not lit try the suggestions below to verify that LINK ACT LED is still not lit try the suggestions below to veri...

Page 8: ...If it does not manually launch setup exe by pressing the Start menu and selecting the Start menu and selecting the Start Run option When the Run dialog opens type d setup exe where d is the drive let...

Page 9: ...9 TeraNavigator is now running Please press the Install Client Utility icon and then Start When installation is nished press Launch TeraNavigator Setup...

Page 10: ...lable TeraStations If you have more than one TeraStation on the network click the tab of the one you want to select it While a TeraStation s tab is selected its IP Address is visible and the View Shar...

Page 11: ...password See See page 41 to change your password If you ve forgotten your password see page 51 If this login prompt does not appear your If this login prompt does not appear your DHCP server may not...

Page 12: ...TATION_ NAME into a Web browser where TERASTATION_NAME is the name of your TeraStation that you set on NAME into a Web browser where TERASTATION_NAME is the name of your TeraStation that you set on NA...

Page 13: ...Ashort description of theTeraStation can be entered into the TeraStation Description eld You ll then see this description in Network Neighborhood on Windows machines Make sure that the date and time...

Page 14: ...to Advanced Settings beginning on page 21 To access TeraStation data Press the Start menu select the Start menu select the Start Run option When the Run dialog opens type TeraStation_Name where TeraSt...

Page 15: ...on page 42 Drive letters can also be mapped to shares on your TeraStation see page 16 for more information Note If this page does not appear or if you receive a popup window from your rewall saying th...

Page 16: ...on page 13 and page 13 and page 13 share_name is share if you re mapping to this precon gured folder or the name of another shared folder that you set up on page 22 You may browse for a shared folder...

Page 17: ...USB Hard Drive Information You may plug in additional USB hard drives to any of the four USB ports on your TeraStation See page 31 for setting up your USB hard drive under TeraStation See page 35 for...

Page 18: ...ard This LED will glow green when the corresponding hard 3 Hard Drive Status also 5 8 and 10 This LED will glow green when the corresponding hard 3 Hard Drive Status also 5 8 and 10 drive is detected...

Page 19: ...for a 10Mbps connection 14 Power Socket Plug the power cord into this socket 15 Power Switch This is the TeraStation s master power switch While it is on the power button on the front panel of the Ter...

Page 20: ...Use this port to connect your TeraStation to a switch a router or another computer The port is autosensing so either a conventional Ethernet cable or a crossover Ethernet cable may be used TeraStation...

Page 21: ...ge 12 You are now at Home Notice that Home is lit up in yellow in the screenshot to the left You can return to this page at any time by clicking on Home from the menu at the left of your Browser Manag...

Page 22: ...matically set by an NTP server enable NTP Server and enter an IP address NTP Server and enter an IP address NTP Server for the NTP server Ensure that both the Display Language and the Windows Client L...

Page 23: ...DHCP is disabled and an IP address is not set manually it will default to 192 168 11 150 The TeraStation s IP Address Subnet Mask Default Gateway Address and DNS Server address may all be entered man...

Page 24: ...member of a workgroup or domain enter the appropriate information into the elds on this page and click Apply If the TeraStation is to be part of a Windows Domain the TeraStation should be added befor...

Page 25: ...25 Advanced Settings Disk Management Drive Properties This page shows the current properties of your hard drives and RAID Arrays To change these settings click on RAID Con guration at left...

Page 26: ...f a hard drive fails the mirror continues to supply data so you may work on normally You may replace the damaged or defective drive at any time and normal RAID 1 mirroring will then be automatically r...

Page 27: ...etected Though it is not recommended you may disable that behavior by clicking Disable and then Apply under Apply under Apply RAID Array Error Detection Response Note that your TeraStation has four in...

Page 28: ...es listed under Disk Structure To con gure an uncon gured array put checks To con gure an uncon gured array put checks next to the hard disks you want included in the array under Disk Structure and ch...

Page 29: ...nagement Disk Check When RAID Con guration is done you ll see this screen To con gure a new array click on RAID Array and go back to the bottom of Array and go back to the bottom of Array page 28 To s...

Page 30: ...u ll see this screen when your new RAID Array is You ll see this screen when your new RAID Array is completely con gured Click on Shared Folders and turn to page 35 to begin setting up shares on page...

Page 31: ...Settings Disk Management USB Settings If you ve plugged an external USB hard drive into one of the USB ports on your TeraStation you may set it up from this page Click on its name under USB Disk Setu...

Page 32: ...B hard drive and then restarting your TeraStation Some USB hard drives must be reformatted from within TeraStation before they can be assigned shares Press Format USB Disk or choose Disk Format from t...

Page 33: ...ard drive or array that you want to check from the Target Disk dropbox and click the Target Disk dropbox and click the Target Disk Select Target button A disk check on larger hard drives or arrays may...

Page 34: ...n only be formatted with XFS Note that FAT32 has a 4 gigabyte le size limit If you choose FAT32 for your le system you will not be able to store les larger than 4 gigabytes on the drive Buffalo Techno...

Page 35: ...Advanced Settings Shared Folders To begin setting up shares on your TeraStation select Shared Folders from the left side menu and then click the Add button under Add button under Add Shared Folders Se...

Page 36: ...systems the share will support by putting the appropriate checks next to Shared Folder OS Support and whether the share supports the Recycle Bin by putting a dot next to Enable or Disable Enter a Shar...

Page 37: ...s or users from the All Groups Users column to the Read Only box if you want Read Only box if you want Read Only to give them read access only or all the way to the Writable box if you want to give th...

Page 38: ...be shared by anonymous FTP and choose whether you want the share to be Writable or Read Only Click the Apply button to set up anonymous Apply button to set up anonymous Apply FTP If FTP Server is disa...

Page 39: ...a group to your TeraStation click Add Add a name and a description to the Add New Group elds Put checks next to each Member User that you want to be part of Member User that you want to be part of Me...

Page 40: ...ted To delete any other user put a check next to their name and click Delete To add a new user click Add The Add New User dialog will appear Enter a Add New User dialog will appear Enter a Add New Use...

Page 41: ...assword are used to log into and password are used to log into and password user s windows computer or domain the same user name and password should be used when creating name and password should be u...

Page 42: ...e front or the rear of your TeraStation may be used as a Windows Print Server and or an Windows Print Server and or an Windows Print Server Apple Print Server on your Apple Print Server on your Apple...

Page 43: ...s for each PC that you want to be able to access the printer Access the TeraStation by pressing Start selecting the Run option and entering TeraStation_Name where TeraStation_Name is the name you set...

Page 44: ...documentation for Have Disk button Refer to your printer documentation for Have Disk further information on installing your printer if necessary Press the OK button when nished OK button when nished O...

Page 45: ...printer If there are still problems printing to the printer then check the printer manufacturer s documentation for troubleshooting information Also verify that the USB cable is securely fastened to b...

Page 46: ...nced Settings Disk Backup To create a backup job click on an underlined Job Number The Edit Backup Job dialog will appear If the Disk Sleep function is enabled disable it page 53 before creating a bac...

Page 47: ...ed since the previous backup Select the folder to be backed up from the Source Backup Shared Folder dropbox and the destination Backup Shared Folder dropbox and the destination Backup Shared Folder fo...

Page 48: ...48 Advanced Settings Disk Backup TeraStation List Press Refresh to get a list of TeraStations on your network...

Page 49: ...Settings Disk Backup Add TeraStation To add a TeraStation to your network enter its numerical IP address in the Remote TeraStation IP Address eld and click the Add to List button Add to List button A...

Page 50: ...ion as the media folder for your LinkTheater Choose Enable for PCast Media Server and choose the share where you keep your Server and choose the share where you keep your Server media les as the Media...

Page 51: ...enable Mail Noti cation and enter the IP address of your SMTP server in the SMTP Server Address eld Select a Subject line for Subject line for Subject the emails i e TeraStation report and enter the...

Page 52: ...Shutdown from this page Consult your Uninterruptable power supply s documentation for further information about setting up your UPS system TeraStation s UPS interface is serial USB type UPS interfaces...

Page 53: ...not in use you may want to schedule disk sleeping Enable Disk Sleep select the time that you want to initiate sleep mode and select the time that you want the TeraStation to wake up and resume normal...

Page 54: ...hutdown From the Shutdown page press Apply to shutdown TeraStation This has the same Apply to shutdown TeraStation This has the same Apply function as holding down the power button on the front of Ter...

Page 55: ...u select the Remain option for Admin Password and then Admin Password and then Admin Password click Apply the admin password will no longer be reset when the INIT button on the TeraStation is held dow...

Page 56: ...56 Advanced Settings System Status System Information This page shows you the System Information for your TeraStation...

Page 57: ...57 Advanced Settings System Status USB Details This page shows you details on USB hard drives and printers plugged into your TeraStation...

Page 58: ...58 Advanced Settings System Status Drive Properties This page shows you the properties of all hard drives and RAID arrays in and attached to your TeraStation...

Page 59: ...59 Advanced Settings System Status Network Information This page shows you the System Information for your network connection...

Page 60: ...60 Advanced Settings System Status User Access Status This page shows you the current status of all users on the system...

Page 61: ...d Subnet Mask of the associated TeraStation as well as the version of rmware it s running With a TeraStation s tab selected you can click on the View Shares button to go directly to its root share Cli...

Page 62: ...enter your IP address and Subnet Mask manually or enable your Subnet Mask manually or enable your Subnet Mask TeraStation to acquire them automatically from a DHCP server You ll need the administrator...

Page 63: ...onally if that still does not resolve the problem a Thorough format is recommended Formatting the drive will delete all of the data on it so back up any data you can before formatting Finally if none...

Page 64: ...ing Access Media CSMA CD Media Interface RJ 45 USB Standard USB 2 0 Hi Speed HS Full Speed FS Low Speed LS USB Connector USB A Connector 4 Data Transmission Speed Max 480 Mbps HS Mode Max 12 Mbps FS M...

Page 65: ...omplies with part 15 of the FCC Rules Operation is subject to the following two conditions 1 This device may not cause harmful interference and 2 this device must accept any interference received incl...

Reviews: