background image

c. Determine appropriate length, cut, and connect tube.

d. Clamp tube to prevent any condensate leakage.

3. Relief Port Tube

a. Extend collector box tube (green label) which was

previously connected to the condensate trap by splicing
to small diameter tube (factory-supplied in loose parts
bag).

b. Route extended collector box pressure tube to relief port

connection on the condensate trap.

c. Determine appropriate length, cut, and connect tube.

d. Clamp tube to prevent any condensate leakage.

C.

Condensate Trap Field Drain Attachments

Refer to Condensate Drain section for recommendations and
procedures.

D.

Pressure Switch Tubing

The LOWER collector box pressure tube (pink label) is factory
connected to the pressure switch for use when furnace is installed
in UPFLOW applications. This tube MUST be disconnected,
extended, rerouted, and then reconnected to the pressure switch in
HORIZONTAL LEFT applications.

NOTE:

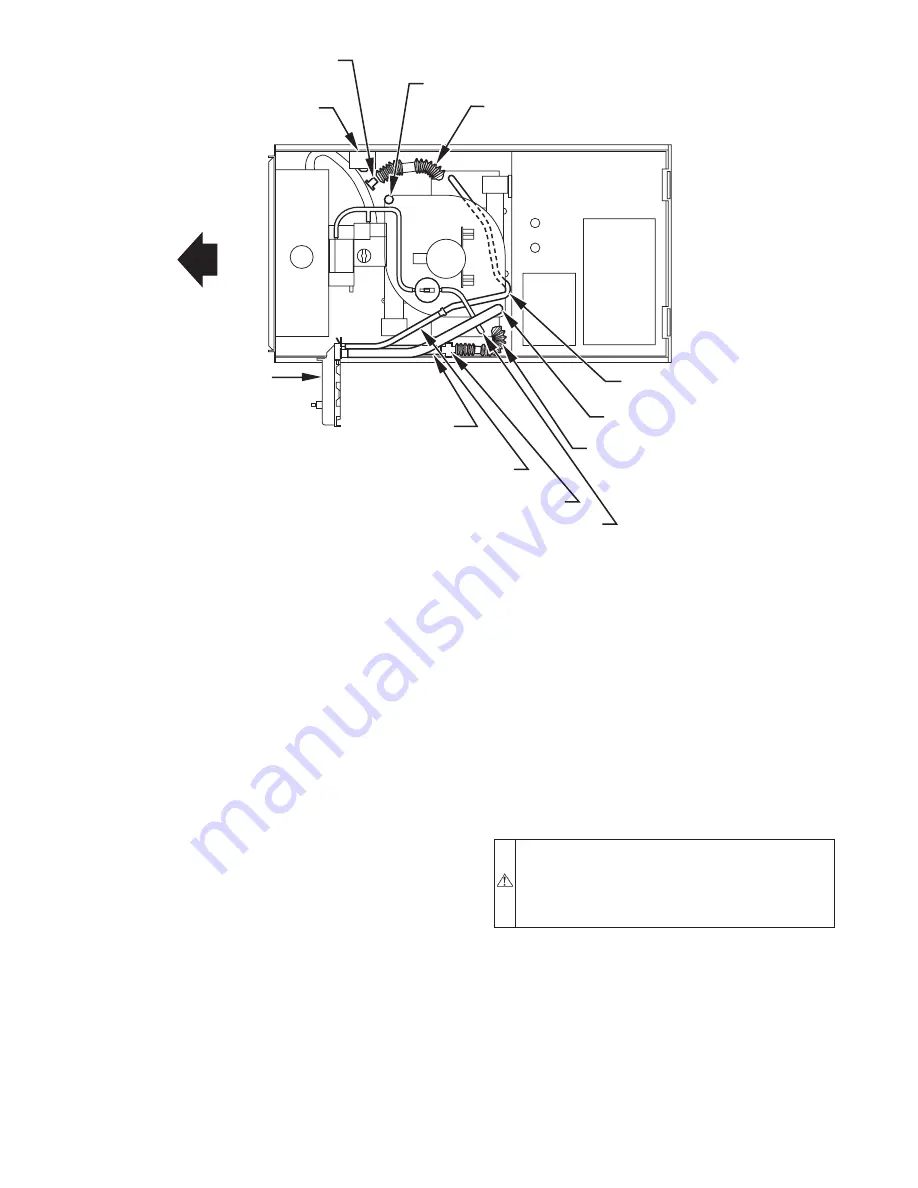
See Fig. 10 or tube routing label on main furnace door to

check for proper connections.

Modify tube as described below.

1. Disconnect collector box pressure tube (pink label) attached

to pressure switch.

2. Use smaller diameter tube (factory-supplied in loose parts

bag) to extend tube disconnected in item 1.

3. Route extended tube:

a. Behind inducer housing.

b. Between blower shelf and inducer housing.

c. Behind inducer motor bracket.

d. Between inducer motor and pressure switch.

4. Determine appropriate length, cut, and reconnect tube to

pressure switch connection labeled COLLECTOR BOX.

E.

Condensate Trap Freeze Protection

Refer to Condensate Drain Protection section for recommenda-
tions and procedures.

F.

Construct a Working Platform

Construct working platform where all required furnace clearances
are met. (See Fig. 3 and 11.)

CAUTION:

The condensate trap MUST be installed

below furnace. See Fig. 5 for dimensions. The drain
connection to condensate trap must also be properly
sloped to an open drain. Failure to follow this caution will
result in intermittent unit operation.

NOTE:

Combustion-air and vent pipes are restricted to a mini-

mum length of 5 ft. (See Table 7.)

NOTE:

A 12-in. minimum offset pipe section is recommended

with short (5 to 8 ft) vent systems. This recommendation is to
reduce excessive condensate droplets from exiting the vent pipe.
(See Fig. 11 or 34.)

V.

HORIZONTAL RIGHT (SUPPLY-AIR DISCHARGE)

APPLICATIONS

A horizontal right furnace application is where furnace blower is
located to the left of combustion and controls section of furnace,
and conditioned air is discharged to the right.

Fig. 10—Horizontal Left Tube Configuration

A00215

CONDENSATE

TRAP

AUXILIARY 

"

J

"

 BOX

PLUG

CAP

INDUCER HOUSING
DRAIN TUBE (VIOLET)

COLLECTOR BOX
DRAIN TUBE (BLUE)

COLLECTOR BOX TUBE (PINK)

RELOCATE TUBE BETWEEN BLOWER SHELF AND INDUCER HOUSING FOR

040, 060, AND 080 HEATING INPUT FURNACES

COLLECTOR BOX

EXTENSION TUBE

COLLECTOR BOX
DRAIN TUBE
(BLUE AND WHITE STRIPED)

DRAIN TUBE COUPLING

COLLECTOR BOX
TUBE (GREEN)

COLLECTOR

BOX EXTENSION

 DRAIN TUBE

—10—

Summary of Contents for CONDENSING GAS FURNACE 350MAV

Page 1: ...nt 12 Pressure Switch Tubing 12 Condensate Trap Freeze Protection 12 Construct a Working Platform 12 LOCATION 12 General 12 Furnace Location Relative to Cooling Equipment 13 Hazardous Locations 14 INSTALLATION 14 Leveling Legs If Desired 14 Installation in Upflow and Downflow Applications 14 Installation in Horizontal Applications 16 Air Ducts 16 General Requirements 16 Ductwork Acoustical Treatme...

Page 2: ...These words are used with the safety alert symbol DANGER identifies the most serious hazards which will result in severe personal injury or death WARNING signifies hazards which could result in personal injury or death CAUTION is used to identify unsafe practices which would result in minor personal injury or product and property damage NOTE is used to highlight suggestions which will result in en...

Page 3: ...01 CANADA NSCNGPIC For a copy contact Standard Sales CSA International 178 Rexdale Boulevard Etobicoke Tor onto Ontario M9W 1R3 Canada III COMBUSTION AND VENTILATION AIR US Section 8 3 of the NFGC Air for Combustion and Ventilation CANADA Part 7 of the NSCNGPIC Venting Systems and Air Supply for Appliances IV DUCT SYSTEMS US and CANADA Air Conditioning Contractors Association ACCA Manual D Sheet M...

Page 4: ...on of 1 side and the bottom or the bottom only will ensure adequate return air openings for airflow requirements above 1800 CFM at 0 5 W C ESP 17 5 16 24 1 2 27 9 16 TYP 27 5 8 29 11 16 TYP 30 13 16 32 5 8 TYP 33 1 4 TYP CONDENSATE DRAIN TRAP LOCATION ALTERNATE UPFLOW 7 8 IN DIA ACCESSORY POWER ENTRY 7 8 IN DIA POWER CONN CONDENSATE DRAIN TRAP LOCATION DOWNFLOW HORIZONTAL LEFT 26 15 16 24 1 2 22 5...

Page 5: ... Minimum Inches Clearance To Combustible Construction as described below This furnace requires a special venting system Refer to the installation instructions for parts list and method of installation This furnace is for use with schedule 40 PVC PVC DWV CPVC or ABS DWV pipe and must not be vented in common with other gas fired appliances Construction through which vent air intake pipes may be inst...

Page 6: ...be cemented together and cemented to condensate trap drain connection NOTE Failure to use CPVC elbows may allow drain to kink and prevent draining f Connect larger diameter drain tube and clamp factory supplied in loose parts bag to condensate trap and clamp securely g Route tube to coupling and cut to appropriate length h Attach tube to coupling and clamp securely C Condensate Trap Location Alter...

Page 7: ...sate trap b Extend this tube if required by splicing to small diameter tube factory supplied in loose parts bag c Determine appropriate length cut and connect tube E Condensate Trap Field Drain Attachment Refer to Condensate Drain section for recommendations and procedures F Pressure Switch Tubing The LOWER collector box pressure tube pink label is factory connected to the pressure switch and shou...

Page 8: ...stall casing hole filler cap into blower shelf hole where trap was removed 5 Install condensate trap into desired casing hole by inserting tube connection stubs through casing hole and rotating until tabs snap into locking position B Condensate Trap Tubing NOTE See Fig 8 or 9 or tube routing label on main furnace door to check for proper connections Relocate tubes as described below 1 Collector Bo...

Page 9: ...onnec tion by splicing to small diameter tube factory supplied in loose parts bag 3 Connect collector box pressure tube green label to pres sure switch connection labeled COLLECTOR BOX 4 Extend collector box pressure tube pink label which was previously connected to pressure switch by splicing to remaining small diameter tube factory supplied in loose parts bag 5 Route this extended tube pink labe...

Page 10: ...switch 4 Determine appropriate length cut and reconnect tube to pressure switch connection labeled COLLECTOR BOX E Condensate Trap Freeze Protection Refer to Condensate Drain Protection section for recommenda tions and procedures F Construct a Working Platform Construct working platform where all required furnace clearances are met See Fig 3 and 11 CAUTION The condensate trap MUST be installed bel...

Page 11: ...lied in loose parts bag B Condensate Trap Tubing NOTE See Fig 12 or tube routing label on main furnace door to check for proper connections 1 Collector Box Drain Tube a Remove factory installed plug from LOWER collector box drain tube blue and white striped label b Install removed clamp and plug into UPPER collector box drain tube blue label which was previously con nected to condensate trap c Con...

Page 12: ...ine appropriate length cut and connect tube 8 Clamp tube to relief port connection E Condensate Trap Freeze Protection Refer to Condensate Drain Protection section for recommenda tions and procedures F Construct a Working Platform Construct working platform where all required furnace clearances are met See Fig 3 and 11 CAUTION The condensate trap MUST be installed below furnace See Fig 5 for dimen...

Page 13: ...ion If the furnace is required for temporary heating of buildings or structures under construction use clean outside air free of chlorine and fluorine compounds for combustion and ventilation These compounds form acids that corrode the heat exchangers These compounds are found in paneling and dry wall adhesives paints thin ners masonry cleaning materials and many other sol vents CAUTION If these f...

Page 14: ...lable from manufacturer Part No KGASB0201ALL is used Special base is not required when this furnace is installed on manufacturer s Coil Assembly Part No CD5 or CK5 or Coil Box Part No KCAKC is used 1 Determine application being installed from Table 1 2 Construct hole in floor per dimensions specified in Table 1 and Fig 18 3 Construct plenum to dimensions specified in Table 1 and Fig 18 4 If downfl...

Page 15: ...ox 18 5 8 19 20 1 4 20 3 8 Downflow Applications on Combustible Flooring NOT Using KGASB Subbase Furnace with or without CD5 or CK5 Coil Assembly or KCAKC Coil Box 19 19 20 20 24 1 2 Upflow Applications 23 24 1 8 23 5 8 24 3 4 Downflow Applications on Non Combustible Flooring 22 7 8 19 23 1 2 19 5 8 Downflow Applications on Combustible Flooring Using KGASB Subbase Furnace with or without CD5 or CK...

Page 16: ...tment Metal duct systems that do not have a 90 degree elbow and 10 ft of main duct to the first branch take off may require internal acoustical lining As an alternative fibrous ductwork may be used if constructed and installed in accordance with the latest edition of SMACNA construction 18 standard on fibrous glass ducts Both acoustical lining and fibrous ductwork shall comply with NFPA 90B as tes...

Page 17: ...e when cutting support rods in filters to protect against flying pieces and sharp rod ends Wear safety glasses gloves and appropriate protective cloth ing Failure to follow this caution could result in minor personal injury CAUTION For airflow requirements above 1800 CFM see Air Delivery table in Product Data literature for specific use of single side inlets The use of both side inlets a combinati...

Page 18: ...with NSCNG PIC and all authorities having jurisdiction Gas supply line should be a separate line running directly from meter to furnace if possible Refer to Table 3 for recommended gas pipe sizing Risers must be used to connect to furnace and to meter Support all gas piping with appropriate straps hangers etc Use a minimum of 1 hanger every 6 ft Joint compound pipe dope should be applied sparingly...

Page 19: ... been connected After all connections have been made purge lines and check for leakage at furnace prior to operating furnace If pressure exceeds 0 5 psig 14 in wc gas supply pipe must be disconnected from furnace and capped before pressure test If test pressure is equal to or less than 0 5 psig 14 in wc turn off electric shutoff switch located on furnace gas control valve and accessible manual shu...

Page 20: ...n Fig 27 The 24 v terminal block is marked for easy connection of field wiring See Fig 30 The 24 v circuit contains a 3 amp automotive type fuse located on furnace control See Fig 31 Any electrical shorts of 24 v wiring during installation service or maintenance may cause fuse to blow If fuse replacement is required use only a fuse of identical size 3 amp and type The control will flash code 24 wh...

Page 21: ...MAX WIRE LENGTH FT MAX FUSE OR CKT BKR AMPS Max Min 024040 115 60 1 127 104 6 1 8 4 14 44 15 036040 115 60 1 127 104 7 3 10 0 14 37 15 024060 115 60 1 127 104 6 1 8 4 14 44 15 036060 115 60 1 127 104 7 1 9 8 14 38 15 048060 115 60 1 127 104 9 5 12 8 14 29 15 036080 115 60 1 127 104 7 6 10 4 14 36 15 048080 115 60 1 127 104 10 0 13 4 14 28 15 060080 115 60 1 127 104 14 1 18 4 12 31 20 048100 115 60...

Page 22: ...UM 24VAC HUMIDIFIER CONNECTION 0 5 AMP MAX IDM INDUCED DRAFT MOTOR PSC IDR INDUCED DRAFT MOTOR RELAY SPST N O ILK BLOWER ACCESS PANEL INTERLOCK SWITCH SPST N O J1 BLOWER OFF DELAY JUMPER SELECTOR JB JUNCTION BOX LED LIGHT EMITTING DIODE FOR STATUS CODES AMBER LGPS LOW GAS PRESSURE SWITCH SPST N O LS LIMIT SWITCH AUTO RESET SPST N C OL AUTO RESET INTERNAL MOTOR OVERLOAD TEMPERATURE SWITCH N C PCB P...

Page 23: ...ructions Place the appliance being inspected into operation Adjust the thermostat so appliance is operating continuously 7 Test for spillage from draft hood equipped appliances at the draft hood relief opening after 5 minutes of main burner operation Use the flame of a match or candle 8 If improper venting is observed during any of the above tests the venting system must be corrected in accordance...

Page 24: ...ed by local code the current edition of the NFGC or NSCNGPIC and the vent or liner manufacturer s Installation Instructions Care must be taken to prevent the exhaust gases from one appliance from contaminating the combustion air of other gas appliances TABLE 5 COMBUSTION AIR AND VENT PIPE TERMINATION CLEARANCES LOCATION CLEARANCE FT U S A Canada Above grade level or above anticipated snow depth 1 ...

Page 25: ...mended as shown in Fig 34 to reduce excessive droplets from exiting vent pipe outlet COMBUSTION AIR AND VENT PIPE DIAMETER Determine combustion air and vent pipe diameter 1 Using Table 7 individually determine the smallest combustion air and vent pipe diameters permitted for each pipe Pick the larger of these 2 pipe diameters and use this diameter for both combustion air and vent pipes 2 When inst...

Page 26: ... a Determine location of combustion air intake pipe con nection to combustion air intake housing as shown in Fig 33 for application b Reposition combustion air intake housing plug fitting in appropriate unused intake housing connection c If required per Table 7 insert perforated disk assembly factory supplied in loose parts bag in intake housing where combustion air intake pipe will be connected I...

Page 27: ...e elastomeric rubber vent coupling with 2 loose clamps onto inducer housing connection Insert the 2 in diameter vent pipe through the elastomeric rubber coupling and fully into inducer housing connection until it bottoms on the internal stop Tighten both clamps to secure the pipe to inducer housing Tighten the clamp screws to 15 in lb of torque e Install casing hole filler cap factory supplied in ...

Page 28: ...70 70 70 70 2 Pipe or 2 in Concentric 1 1 2 17 12 7 NA NA NA 024060 036060 048060 2 70 67 66 61 61 61 036080 048080 060080 2 Pipe or 2 in Concentric 2 49 44 30 25 25 15 2 1 2 70 70 70 70 70 70 048100 060100 2 Pipe or 3 in Concentric 2 1 2 35 26 16 16 6 NA 3 70 70 70 70 66 61 060120 2 Pipe or 3 in Concentric 3 14 9 NA NA NA NA 3 no disk 70 70 63 56 50 43 4 no disk 70 70 70 70 70 70 060140 2 Pipe or...

Page 29: ...ipe or 3 in Concentric 3 no disk 42 35 29 22 15 9 4 no disk 70 70 70 70 70 70 060140 2 Pipe or 3 in Concentric 3 no disk 12 8 NA NA NA NA 4 no disk 42 37 32 27 22 17 ALTITUDE FT UNIT SIZE TERMINATION TYPE PIPE DIA IN NUMBER OF 90 ELBOWS 1 2 3 4 5 6 6001 to 7000 024040 036040 2 Pipe or 2 in Concentric 1 1 2 53 48 43 38 37 32 2 70 70 68 67 66 64 024060 036060 048060 2 Pipe or 2 in Concentric 1 1 2 1...

Page 30: ...or air conditioning equip ment c Termination kit should be positioned so that it will not be affected by wind eddy such as inside building corners or allow recirculation of flue gases airborne leaves or light snow TABLE 7 MAXIMUM ALLOWABLE PIPE LENGTH FT CONTINUED ALTITUDE FT UNIT SIZE TERMINATION TYPE PIPE DIA IN NUMBER OF 90 ELBOWS 1 2 3 4 5 6 8001 to 9000 024040 036040 2 Pipe or 2 in Concentric...

Page 31: ...t snow d Termination kit should be positioned where it will not be damaged by or subjected to foreign objects such as stones balls etc e Termination kit should be positioned where vent vapors are not objectionable 2 Cut one 4 in diameter hole for 2 in kit or one 5 in diameter hole for 3 in kit 3 Loosely assemble concentric vent air termination compo nents together using instructions in kit 4 Slide...

Page 32: ... select a pump with an overflow switch Furnace condensate is mildly acidic typically in the pH range of 3 2 to 4 5 Due to corrosive nature of this condensate a condensate pH neutralizing filter may be desired Check with local authorities to determine if a pH neutralizer is required B Application The furnace A C and humidifier drains may be combined and drained together The A C drain must have an e...

Page 33: ...0 20 1 5 51 70 0 1 5 28 70 20 1 5 16 70 20 2 45 70 0 2 22 70 20 2 10 58 060 20 2 65 70 0 2 35 70 20 2 20 70 080 20 2 55 55 0 2 48 55 20 2 30 55 20 2 5 70 70 0 2 5 47 70 20 2 5 28 70 100 20 2 5 40 40 0 2 5 40 40 20 2 5 38 40 20 3 70 70 0 3 50 70 20 3 28 70 120 20 3 70 70 0 3 61 70 20 3 37 70 20 4 70 70 0 4 48 70 20 4 23 70 140 20 3 60 60 0 3 60 60 20 3 44 60 20 4 70 70 0 4 57 70 20 4 30 70 Pipe len...

Page 34: ...e routed to gas valve and burner box screw Failure to follow this caution will result in intermittent unit operation Using schematic diagram follow sequence of operation through different modes See Fig 30 Read and follow wiring diagram carefully NOTE If a power interruption occurs during a call for heat W the control will start a 90 second blower only ON period two seconds after power is restored ...

Page 35: ...lame is proven the blower motor is energized on HEAT speed 66 seconds 040 through 120 sizes or 45 seconds 140 size after the gas valve GV is energized Simultaneously the electronic air cleaner terminal EAC 1 is energized and remains energized as long as the blower motor BLWM is energized f Blower Off Delay When the thermostat is satisfied the R to W circuit is opened de energizing the gas valve GV...

Page 36: ... Single Speed Air Conditioner Fig 49 Single Stage Furnace with Two Speed Air Conditioner A00269 A00270 Fig 50 Single Stage Furnace with Single Speed Heat Pump Dual Fuel A00271 Fig 51 Single Stage Furnace with Two Speed Heat Pump Dual Fuel 36 ...

Page 37: ...Single Stage Furnace and Single Speed Heat Pump HUMIDFIER 24VAC A02103 Fig 53 Dual Fuel Thermostat with Single Stage Furnace and Two Speed Heat Pump HUMIDFIER 24VAC A02161 Fig 54 Two Stage Thermostat with Single Stage Furnace and Two Speed Air Conditioner 37 ...

Page 38: ...ate at COOL speed When the thermostat is satisfied the blower motor BLWM will operate an additional 90 seconds on COOL speed before reverting back to continuous blower speed When the R to G circuit is opened the blower motor BLWM will continue operating for an additional 5 seconds if no other function requires blower motor BLWM opera tion Continuous Blower Speed Selection from Thermostat To select...

Page 39: ...til the LED goes out Remover jumper from terminals See Fig 31 NOTE If TEST TWIN and COM 24v terminals are jumpered longer than 2 sec LED will flash rapidly and ignore component test request Component test sequence is as follows d LED will display previous status code 4 times e Inducer motor starts and continues to run until Step g of component test sequence f After 7 seconds the hot surface ignite...

Page 40: ...ly be used for model 350MAV furnaces with a heating size of 140 d Find installation altitude in Table 9 or 10 NOTE For Canada altitudes of 2001 to 4500 ft use U S A altitudes of 2001 to 3000 ft in Table 9 or 10 e Find closest natural gas heat value and specific gravity on Table 9 or 10 f Follow heat value and specific gravity lines to point of intersection to find orifice size and manifold pressur...

Page 41: ... 3 7 43 3 4 43 3 5 43 3 6 43 3 7 925 44 3 5 44 3 7 44 3 8 43 3 4 43 3 5 950 44 3 4 44 3 5 44 3 6 44 3 7 44 3 8 975 44 3 2 44 3 3 44 3 4 44 3 5 44 3 6 1000 45 3 7 45 3 8 44 3 2 44 3 4 44 3 5 1025 45 3 5 45 3 6 45 3 7 44 3 2 44 3 3 1050 45 3 3 45 3 4 45 3 6 45 3 7 45 3 8 1075 45 3 2 45 3 3 45 3 4 45 3 5 45 3 6 1100 47 3 6 47 3 7 45 3 2 45 3 4 45 3 5 ALTITUDE RANGE FT AVG GAS HEAT VALUE BTU CU FT SPE...

Page 42: ...Pressure Orifice no Manifold Pressure Orifice no Manifold Pressure Orifice no Manifold Pressure Orifice no Manifold Pressure U S A and Canada 5001 to 6000 11 derate 725 43 3 4 43 3 5 43 3 6 43 3 7 43 3 8 750 44 3 6 44 3 7 43 3 4 43 3 5 43 3 6 775 44 3 4 44 3 5 44 3 6 44 3 7 43 3 4 800 44 3 2 44 3 3 44 3 4 44 3 5 44 3 6 825 45 3 6 45 3 7 44 3 2 44 3 3 44 3 4 850 45 3 4 45 3 5 45 3 6 45 3 8 44 3 2 8...

Page 43: ...TITUDE RANGE FT AVG GAS HEAT VALUE BTU CU FT SPECIFIC GRAVITY OF NATURAL GAS 0 58 0 60 0 62 0 64 0 66 Orifice no Manifold Pressure Orifice no Manifold Pressure Orifice no Manifold Pressure Orifice no Manifold Pressure Orifice no Manifold Pressure U S A Only 7001 to 8000 15 derate 650 43 3 5 43 3 7 43 3 8 42 3 2 42 3 3 675 44 3 8 43 3 4 43 3 5 43 3 6 43 3 7 700 44 3 5 44 3 6 44 3 8 43 3 4 43 3 5 72...

Page 44: ...75 43 3 7 43 3 8 42 3 2 42 3 3 42 3 4 1000 43 3 5 43 3 6 43 3 7 42 3 2 42 3 3 1025 43 3 3 43 3 4 43 3 6 43 3 7 43 3 8 1050 43 3 2 43 3 3 43 3 4 43 3 5 43 3 6 1075 44 3 5 44 3 6 43 3 2 43 3 3 43 3 4 1100 44 3 3 44 3 4 44 3 5 43 3 2 43 3 3 ALTITUDE RANGE FT AVG GAS HEAT VALUE BTU CU FT SPECIFIC GRAVITY OF NATURAL GAS 0 58 0 60 0 62 0 64 0 66 Orifice no Manifold Pressure Orifice no Manifold Pressure ...

Page 45: ...Orifice no Manifold Pressure Orifice no Manifold Pressure Orifice no Manifold Pressure Orifice no Manifold Pressure Orifice no Manifold Pressure U S A and Canada 4001 to 5000 9 derate 725 41 3 6 41 3 7 41 3 8 40 3 6 40 3 8 750 42 3 7 42 3 8 41 3 6 41 3 7 41 3 8 775 42 3 5 42 3 6 42 3 7 42 3 8 41 3 6 800 42 3 3 42 3 4 42 3 5 42 3 6 42 3 7 825 42 3 7 42 3 2 42 3 3 42 3 4 42 3 5 850 43 3 5 43 3 6 43 ...

Page 46: ...s based on midpoint altitude for altitude range TABLE 12 GAS RATE CU FT HR SECONDS FOR 1 REVOLUTION SIZE OF TEST DIAL SECONDS FOR 1 REVOLUTION SIZE OF TEST DIAL 1 Cu Ft 2 Cu Ft 5 Cu Ft 1 Cu Ft 2 Cu Ft 5 Cu Ft 10 360 720 1800 50 72 144 360 11 327 655 1636 51 71 141 355 12 300 600 1500 52 69 138 346 13 277 555 1385 53 68 136 340 14 257 514 1286 54 67 133 333 15 240 480 1200 55 65 131 327 16 225 450 ...

Page 47: ...115 v power to furnace 6 Reconnect inducer motor leads reinstall main furnace door and turn on 115 v power supply VI CHECKLIST 1 Put away tools and instruments Clean up debris 2 Verify flame rollout manual reset switch has continuity 3 Verify that blower and main access doors are properly installed 4 Cycle test furnace with room thermostat 5 Check operation of accessories per manufacturer s instru...

Page 48: ...Pipe Sloped To Furnace Pipe Insulation ________ Over Ceilings ________ Low Ambient Exposed Pipes Condensate Drain ________ Unit Level or Pitched Forward ________ Internal Tubing Connections Free of Kinks and Traps ________ External Drain Connection Leak Tight and Sloped ________ Condensate Trap Primed before Start Up ________ Heat Tape Installed if Required CHECKLIST START UP ________ Gas Input Ra...

Page 49: ...roduct theory and skills programs is available using popular video based formats and materials All include video and or slides plus companion book Classroom ServiceTraining plus hands on the products in our labs can mean increased confidence that really pays dividends in faster troubleshooting fewer callbacks Course descriptions and schedules are in our catalog CALL FOR FREE CATALOG 1 800 644 5544...

Page 50: ... 50 ...

Page 51: ... 51 ...

Page 52: ... 2003 Bryant Heating Cooling Systems 7310 W Morris St Indianapolis IN 46231 52 Printed in U S A 350m4016 Catalog No 5335 016 ...

Reviews: