background image

—6—

II. STEP 2 — LOCATING AND MOUNTING THE UNIT

A. Locating the Unit

Install the unit as centrally as possible in the room. The air-

flow


direction can be controlled by the remote control (where

used) or automatically, according to the unit operating mode

(cooling or heating). Controlling the airflow automatically

will ensure optimum distribution of the air in the room.
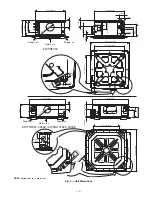
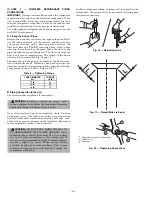
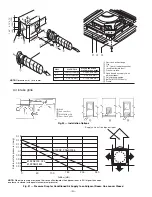
In Cooling mode, the louvers should be positioned so that the

air is directed towards the ceiling. Refer to Fig. 3. In Heating

mode, the louvers should be positioned so that the air is

directed toward the floor to prevent layers of hot air forming

close to the ceiling. Refer to Fig. 3. The louvers will be auto-

matically positioned when the louvers are set to Automatic

mode. Alternatively, the louvers can be placed in intermedi-

ate positions (with infrared remote accessory kit only) or

allowed to move continuously (Swing mode).
In order to allow easy and rapid installation and mainte-

nance, ensure that the unit is mounted in a location that is

easily accessible.
Restricting Air Outlets
A maximum of two air outlets can be restricted at one time.

See Fig. 3. The air supply outlet obstruction accessory kit

can be used to obstruct air outlets. Contact your local dealer

for more information.

B. Mounting the Unit

Use a stacker to lift the unit to the installation location.

Refer to Fig. 4. If the mounting location is in a plaster board

ceiling, the maximum dimensions of the unit housing cutout

must not exceed 2 ft, 2 in. square for  619FNF018 units and

2 ft, 11 in. square for 619FNF024, 03036 and 619FNQ01824,

03036 units.

NOTE:

 In rooms with high humidity, brackets should be

insulated using self-adhesive insulation.
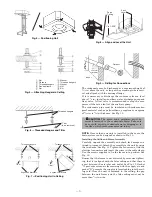
Mark the position of the hangers, refrigerant lines and con-

densate drain pipe, power supply cables and remote control

cable (see Fig. 2 for dimensions). The cardboard template

(supplied with the unit) may be used as a guide. Depending

on the type of ceiling, the hangers can be fixed as shown in

Fig. 5.
Once the threaded hangers have been positioned, do not

tighten the nuts. Insert the washers as shown in Fig. 5. First

position the refrigerant lines, which will be connected in the

Complete Refrigerant Piping Connections section. Remove

the “T” bar in the ceiling to facilitate installation. See Fig. 6.
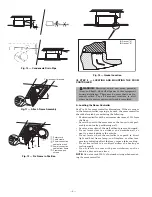
Carefully lift the unit (without the frame) using the four sus-

pension brackets (or the four corners), and insert it into the

false ceiling. If the “T” bar cannot be removed from the ceil-

ing the unit may need to be tilted. See Fig. 7.

NOTE:

 Tilting the unit may only be carried out with false

ceilings with a minimum height of 11 ft-

13

/

16

 inches.

Align and level the unit by adjusting the nuts and locknuts

on the threaded hangers, maintaining a distance of 1 in. to

1

3

/

16

 in. between the sheet metal body and the underside of

the false ceiling. See Fig. 8. Reposition the “T” bar and align

the unit in relation to the bar by tightening the nuts and

locknuts. After connection of the condensate drain line and

the refrigerant lines, carry out a final check to make sure

that the unit is level.
Drilling the Hole for Connection Pipes in the External Wall
After positioning the units and determining the connection

position, drill a 2

3

/

4

 in. hole in the wall. The same hole can be

used as a condensate drain pipe conduit. The hole should

have a 

3

/

16

 in. to 

3

/

8

 in. slope toward the outside. Refer to

Fig. 9. Insert the plastic conduit. Pass the power connection

cables through the conduit. The power connection cables will

be connected in the Make Electrical Connections section.
Running the Condensate Drain Piping
To ensure correct condensate water flow, the drain pipe

should have a gradient of 2% without obstructions. Addition-

ally, a trap of at least 2 in. depth should be made to prevent

unpleasant odors from reaching the room.

Max. 2 louvers closed

Heat pump: louver position for correct airflow.
Cooling: louver position for correct airflow.

Fig. 3 — Louver Positioning

Summary of Contents for 619FNF

Page 1: ...llow all safety codes Wear safety glasses and work gloves Use quenching cloth for brazing operations Have fire extin guisher available Read these instructions thoroughly Con sult local building codes...

Page 2: ...charged or under charged from the factory NAME SPECIFICATIONS Connection Pipe 619FNF018 024 FNQ01824 5 8 in Mixed Phase 3 8 in Liquid 619FNF FNQ03036 3 4 in Mixed Phase 3 8 in Liquid Wall Sleeve Wall...

Page 3: ...4 8 7 3 15 16 100 5 29 32 150 1 10 5 8 575 0 2 1 4 3 4 0 8 2 1 1 5 2 2 4 6 5 5 8 2 0 1 4 3 5 1 6 3 4 6 1 1 1 1 2 13 64 56 2 52 1 10 5 8 575 8 5 1 2 3 7 7 0 3 8 9 0 5 1 2 3 9 2 5 2 3 14 70 8 9 2 4 3 1...

Page 4: ...18 18 18 Circuits 5 6 10 10 FILTERS Cleanable Quantity Size in 1 17 x 16 AIRSWEEP Horizontal Auto Preset OPERATING LIMITS Cooling Min Max 55 F 125 F CONTROLS Integrated Microprocessor Remote Controlle...

Page 5: ...4 6 4 6 No of Rows 2 2 3 3 Fins in 18 18 18 18 Circuits 6 6 10 10 FILTERS Cleanable Quantity Size in 1 24 x 235 16 AIRSWEEP Horizontal Auto Preset OPERATING LIMITS Heating Min Max 15 F 75 F Cooling M...

Page 6: ...ith the unit may be used as a guide Depending on the type of ceiling the hangers can be fixed as shown in Fig 5 Once the threaded hangers have been positioned do not tighten the nuts Insert the washer...

Page 7: ...the frame in to position See Fig 12 Ensure that the frame is not distorted by excessive tighten ing that it is aligned with the false ceiling and that there is a seal between the air inlet and outlet...

Page 8: ...e or other tem perature radiating object that may cause a false reading Do not locate close to or in direct airflow of a heating or cooling supply Do not locate in areas with poor circulation such as...

Page 9: ...extend through the hole in the mounting base Adjust the length and routing of each wire to reach the proper terminal in the connector block on the mounting base with 1 4 in of extra wire strip only 1...

Page 10: ...able 5 Refer to Fig 20 Table 5 Tightening Torque B Piping Connection to the Unit Use two wrenches to tighten all connections Once all connections have been completed check for leaks using soapy water...

Page 11: ...e unit shall be fuse or equipped with a breaker Table 6B 619FNQ Fan Coil Electrical Data LEGEND Permissible limits of the voltage range at which unit will operate satisfactorily NOTE In compliance wit...

Page 12: ...Room Controller Connections Ground Connection Outdoor Unit Connections Low Voltage High Voltage Power Connections Fig 21 619FNF Unit Matched to 538ENF Outdoor Unit Wiring Connection Cooling Only Syst...

Page 13: ...ltage High Voltage Room Controller Connections Outdoor Unit Connections Power Connections Ground Connection Fig 22 619FNQ Unit Matched to 538ENF Outdoor Unit Wiring Connection Cooling with Electric He...

Page 14: ...14 Low Voltage High Voltage Room Controller Connections Ground Connection Outdoor Unit Connections Power Connections Fig 23 619FNQ Unit Matched to 538QNF Outdoor Unit Wiring Connection Heat Pump Syste...

Page 15: ...ch OFM Outdoor Fan Motor OL Overload S Emergency TB Terminal Block TM Sensor TRAN Transformer Terminal Marked Terminal Unmarked Splice Terminal Block Factory Wiring Field Control Wiring Field Power Wi...

Page 16: ...Louver Motor LMS Louver Micro Switch OFM Outdoor Fan Motor OL Overload S Emergency ST Safety Thermostat TB Terminal Block TM Sensor TRAN Transformer Terminal Marked Terminal Unmarked Splice Terminal...

Page 17: ...est Point LLPS Liquid Low Pressure Switch LM Louver Motor LMS Louver Micro Switch OAS Outdoor Air Sensor OFM Outdoor Fan Motor OFR Outdoor Fan Relay OL Overload RVS Reversing Valve Solenoid S Emergenc...

Page 18: ...ctric heater Transformer Holes for fixing panel in position Emergency push button Fan connector LED RECEIVER connector Float connector Pump connector Louver connector CP CG CA CV CLR INTERNAL CONTROL...

Page 19: ...orrugated aluminum externally covered with anti condensate material fiberglass from 1 4 in to 1 in thickness 5 Use Fig 31 to determine the allowable static pres sure loss for the ductwork airflow The...

Page 20: ...m C 2 3 4 70 mm 3 15 16 100 mm 4 14 105 1 93 49 8 50 216 Note Dimensions in are in mm Fig 30 Installation Options NOTE Dimensions in are in mm Supply air duct to adjacent room Airflow cfm e r u s s e...

Page 21: ...C Temperatures will be displayed in degrees Celsius F Temperatures will be displayed in degrees Fahrenheit IV LOUVER MODE SELECTION To enter louver mode selection ensure the room controller is on and...

Page 22: ...unit is configured as a Heat Pump unit the louver will operate according to user selected position If user selected louver is Auto louver operates according to auto heat or cool louver based on operat...

Page 23: ...shes at intervals of 0 5 sec onds The fault code is deduced from the number of times the green LED flashes blocking unit operation Between one flash cycle and the next one a pause of 5 seconds elapses...

Page 24: ...right 2006 Bryant Heating Cooling Systems Printed in U S A CATALOG NO 02 619F0001 II Green LED Red LED Yellow LED Remote control signal receiver Emergency Button Fig 35 Warning Lamps and Emergency But...

Reviews: