background image

N

N

N

P

F2

F2

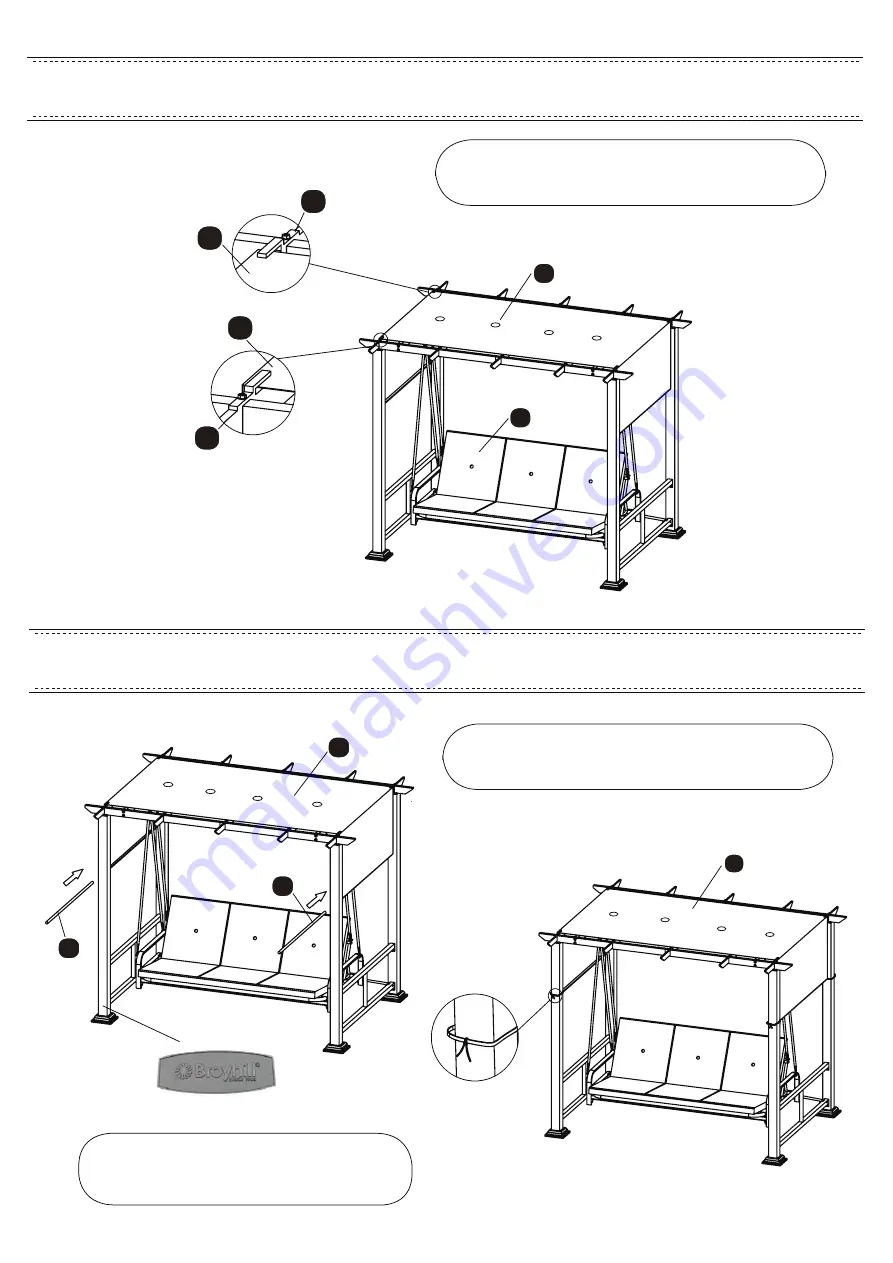
Attach 1 canopy (N) to canopy cross bars. 

Note: the canopy should be placed under the brackets. 


O

O

N


N

Insert 2 canopy side bars (O) into canopy (N) and 

attach cushion (Swing is ready for use). 


11

Note: The Broyhill Logo located on one of the 

leg post should be positioned on the front 

left post as you face the swing.


STEP 13

STEP 14

Summary of Contents for 810547502

Page 1: ...SKU 810547502 Need help We are here for you Please contact 1 800 457 4652 or contact us at www numarkcustomerservice com for assistance Broyhill LLC P O Box 236 Summit Station OH 43073 Made In China P...

Page 2: ...parts and fittings Retain the assembly instructions for future reference The manufacturer will not accept responsibility for unauthorized repairs or modifications to this product Annually Check all nu...

Page 3: ...x 1 Left Arm x 1 Right Arm x 2 Rear and Front Connector Bar x 4 Long Hanging Bar x 2 Short Hanging Bar x 2 Canopy Side Bar x 1 Cushion Left Right x 2 Outside Canopy Crossbar Short Long A B C D E F1 F2...

Page 4: ...L Bolt x 2 Nut x 42 Large Metal Washer x 8 1 spare M8 x 45L Bolt x 14 x 1 Hex Wrench x 1 Open Hex Wrench x 1 Allen Wrench Small Metal Washer x 2 M8 x 77L Bolt x 16 Lawn Stake x 14 Small Locker Washer...

Page 5: ...ll bolts Repeat procedure for the other remaining three leg posts x 16 Se Attach 1 side panel B to the leg posts A with 8 bolts Se 8 large locker washers Ss and 8 large metal washers Si A A B Se Ss Si...

Page 6: ...mpletely Repeat procedure for the other pair of top crossbars x 8 Sh x 8 Sr C C C D D D Sb Sb Sr Sr Sh Sh x 16 Sd Attach 2 pairs of assembled top crossbars C D to leg posts A with 16 bolts Sd 16 large...

Page 7: ...rs Ss and 8 large metal washers Si Do not tighten completely C C D D E E Si Ss Sf x 8 Sf x 8 Si x 8 Ss C C C C D D F1 F1 F1 F1 F1 Insert 3 inside canopy crossbars F1 into top crossbars C D Insert both...

Page 8: ...Sh Sr Sc G B B B Attach 1 leg support bar G to side panels B with 2 bolts Sc 2 small locker washers Sr and 2 small metal washers Sh Note The side with inside label and U shaped bracket should be towar...

Page 9: ...ets on the arms Make sure they are securely seated FRONT x 2 Sg Sk x 2 Si FRONT I K H H K Sj Si Sk Sg x 2 Sj x 2 Attach 1 seat and back K to left and right arms H I with 2 bolts Sg 2 plastic washers S...

Page 10: ...Attach 4 hanging bars L and 2 hanging bars M to the arms I H and top crossbars E with hooks Sl Note Hanging bars with top sticker should be on top E Sl Sl K K H I Sm A Q R x 16 Sm Attach 16 lawn stak...

Page 11: ...should be placed under the brackets O O N N Insert 2 canopy side bars O into canopy N and attach cushion Swing is ready for use 11 Note The Broyhill Logo located on one of the leg post should be posi...

Page 12: ...pin bolt on the seat back K M K K G G L K K G G The support bar on the back of seat and back K should be inserted into the U shaped brackets at the same time by 2 people and firmly pressed into place...

Reviews: