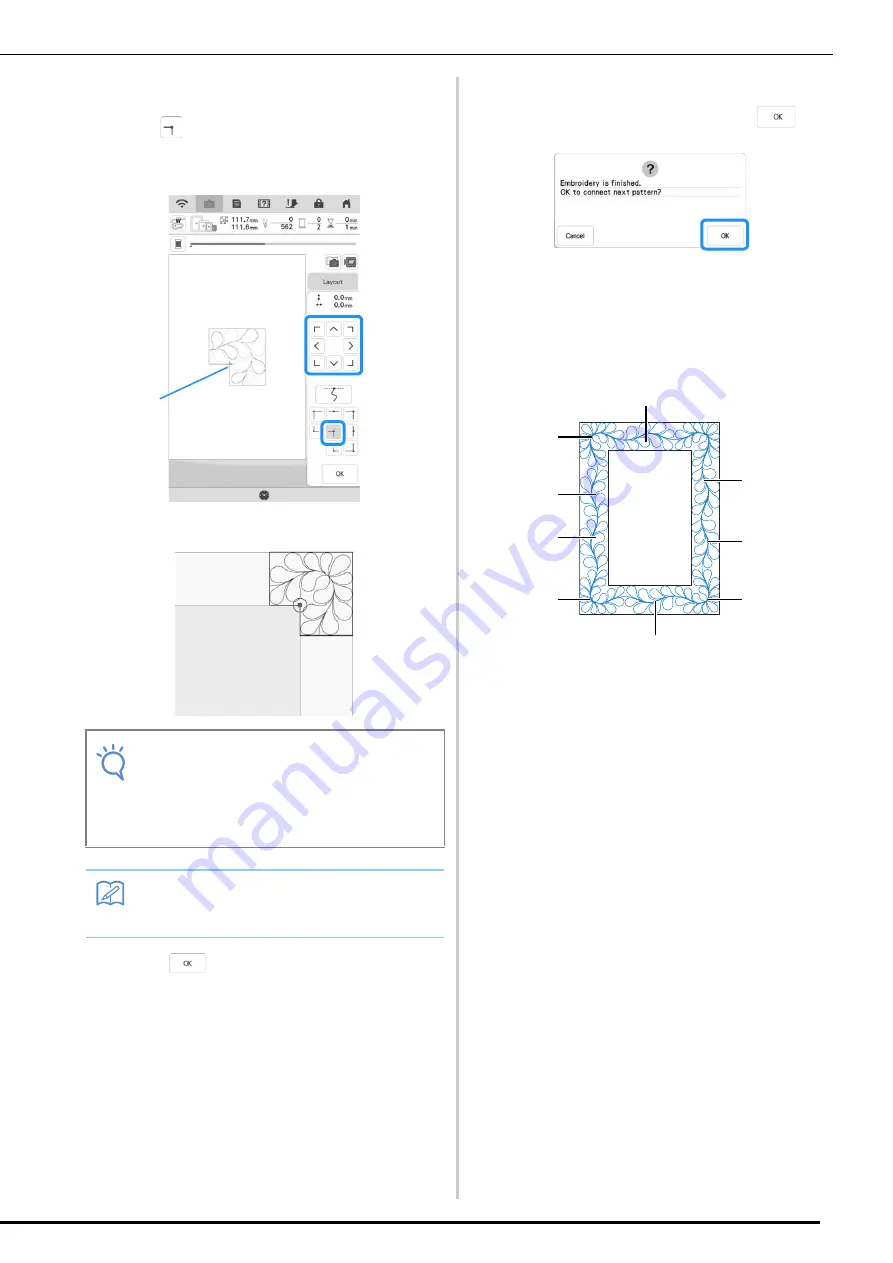
background image

Embroidery

8

d

Align the position for the part in the upper-
right corner.

With 

 selected, use the move pattern keys to align 

the inside upper-right corner of the reference lines 
previously drawn on the quilt with the inner corner of 
the part projected by the projector.

a

Inner corner

e

Press 

 to display the embroidering 

screen.

f

Press the “Start/Stop” button to embroider 
the first part.

g

When embroidering is finished and the 

following message appears, press 

.

The next part to be embroidered appears.

h

Position each part and embroider it 
according to the on-screen instructions.

You will be prompted to align the starting point, rotate 
the design, and to rehoop the quilt when necessary.

Note

• The needle drop point projected by the 

projector can be corrected on the settings 
screen. For the procedure, refer to "Needle 
Calibration Using the Built-in Camera" in the 
machine's Operation Manual (Sewing).

Memo

• If necessary, rotate the pattern so that it is 

aligned between the chalk reference lines.

a

b

a

b

d

b

c

c

a

c

Summary of Contents for Upgrade KIT II

Page 1: ...Machine Be sure to read this document before using the machine We recommend that you keep this document nearby for future reference Be sure to read this document before using the machine We recommend that you keep this document nearby for future reference ...

Page 2: ... Quilting Borders 10 Creating Quilting Border Data 10 Embroidering a Quilting Border 11 Adjusting the Density of Scanned Images 14 Changing the Embroidering Order of Combined Patterns 15 Magnifying Patterns 16 Creating Decorative Fill Patterns Automatically 16 Extracting an Inner Outline for Adding Decorative Stitching 17 My Design Center 17 Additional Patterns 17 Random Shift Function for Decorat...

Page 3: ...according to the selected pattern And then press d Press e Press f Press to select whether or not sewing is ended with a complete pattern If necessary press after making your selection Utility Stitches and Character Decorative Stitches Note Using the same material and stitch pattern as your project sew trial stitches to check the result The machine s sewing end point may become misaligned in the f...

Page 4: ...tern is not complete Memo If End Point Setting is set to ON the pattern cannot be projected by the projector To cancel End Point Setting set End Point Setting to OFF and then press Memo If the end point sticker can be affixed to either left or right of the sewing position we recommend affixing it to the left side We recommend affixing the end point sticker as close as possible to the sewing positi...

Page 5: ...pecifying the Sewing End Point on page 2 When the needle approaches the mark the machine stops and the following message appears f Peel off the end point sticker and then press g Press the Start Stop button again When the foot controller is plugged in press down on the foot controller The machine finishes sewing the pattern then stops New Embroidery Patterns 50 built in embroidery patterns have be...

Page 6: ...of the quilting border to be embroidered Measure the size of the quilting border a Inner outline used for positioning b Width included the width of borders c Height included the height of borders d Width of quilting border b Press c Select a sub category For this example select two color rectangular quilting border patterns a Single color rectangular quilting border patterns b Two color rectangula...

Page 7: ... the fabric to embroider connecting patterns a quilting border of up to 3 m 3 m approx 118 inches 118 inches can be created The pattern is positioned manually f Specify the size of embroidery frame to be used and the size of the quilting border and then press a Press or to select the embroidery frame size b Specify the width 1 height 2 and quilting border width 3 and then press Note Patterns 011 0...

Page 8: ...e entire quilting border And then press a Press this key to embroider the quilting border according to the on screen instructions The number in the lower left corner indicates the total number of segments for the quilt border b To embroider by visually aligning the pattern sections press each pattern section to be embroidered You can check where and how many times the part will be embroidered with...

Page 9: ...ing is finished and the following message appears press The next part to be embroidered appears h Position each part and embroider it according to the on screen instructions You will be prompted to align the starting point rotate the design and to rehoop the quilt when necessary Note The needle drop point projected by the projector can be corrected on the settings screen For the procedure refer to...

Page 10: ...duce the pattern so that the lower left point of the segment is at the lower left corner of the reference lines on the quilt After making adjustments press a Inner corner of next pattern to be embroidered c When embroidering the corner part Rotate the quilt 90 degrees counterclockwise rehoop it and then attach the embroidery frame to the machine Use the move pattern keys to align the start point p...

Page 11: ...r a Inner outline used for positioning b Longest diagonal c Width of quilting border b Press c Press d Select the pattern that you want to embroider and then press Memo If you need to restitch a segment or skip a segment you can press in the embroidering screen to continue to the next pattern or return to the previous pattern Select the desired pattern in the embroidering order and then press a Re...

Page 12: ...hen press to save it a The thread colors can be changed b Select single stitching or triple stitching g After the following message appears press A screen appears so that a pattern from the machine s memory can be selected Embroidering a Quilting Border a In the screen for selecting a pattern from the machine s memory select the saved data A thumbnail of the entire quilting border and thumbnails o...

Page 13: ...g border is in the embroidering area and then attach the embroidery frame d Align the position for the part in the corner Use the move pattern keys to align the inside corner of the reference lines previously drawn on the quilt with the inner corner of the part projected by the projector a Inner corner e Press to display the embroidering screen f Press the Start Stop button to embroider the first ...

Page 14: ...s If the pattern is not angled correctly rotate it If the length of the pattern does not match enlarge or reduce the pattern so that the lower left point of the segment is at the lower left corner of the reference lines on the quilt After making adjustments press a Inner corner of next pattern to be embroidered c When embroidering the corner part Rotate the quilt counterclockwise rehoop it and the...

Page 15: ...displayed when scanning the fabric hooped in the embroidery frame can be adjusted a Press and then press to scan the fabric Note The width of the corner segment can be adjusted to best fit the inner corner However make adjustments so that the shape is not deformed Memo If you need to restitch a segment or skip a segment you can press in the embroidering screen to continue to the next pattern or re...

Page 16: ... to change its position in the embroidering order a Selected pattern b Move the selected pattern ahead one position in the embroidery order c Move the selected pattern back one position in the embroidery order d Move the selected pattern to the beginning of the embroidery order e Move the selected pattern to the end of the embroidery order f Revert to the original embroidering order Memo The embro...

Page 17: ...fter specifying the settings for the decorative fill pattern press a Select decorative fill pattern b The decorative fill pattern is added within the area of the selected frame size If the pattern is larger than the selected frame size the area indicating the frame size will appear in gray and decorative fill pattern will not be added c Specify the distance from the outline of the pattern to the d...

Page 18: ...ress Additional Patterns Six decorative fill patterns have been added Random Shift Function for Decorative Fill Patterns Random shift can be set to one of six levels Type settings have been added to the Random shift settings for decorative fill patterns increasing the variations for changing the pattern a Create a decorative fill pattern and then press Memo To complete the procedure refer to Decor...

Page 19: ...art device can be transferred to the machine so that an embroidery pattern can be created in My Design Center Installing the My Design Snap App a Use your smart device to scan the appropriate QR code below to visit Google Play for Android devices or the App Store for Apple devices Android http s brother cmdsgxpi iOS http s brother cmdsaxpi Android and Google Play are trademarks of Google LLC App S...

Page 20: ...e machine s Operation Manual Embroidery b This icon is not available for your machine It is for machines that are not equipped with a camera Your machine will use the built in camera to create embroidery patterns in My Design Center For details refer to MY DESIGN CENTER WITH SCAN in the machine s Operation Manual Embroidery c This icon allows you to transfer an image from the smart device to the m...

Page 21: ...ails refer to LINE SCAN in the machine s Operation Manual Embroidery c Press this key to convert an illustration to embroidery data For details refer to ILLUSTRATION SCAN in the machine s Operation Manual Embroidery i Press j Select the data and then press k Proceed through the appropriate steps in My Design Center to finish creating the embroidery pattern Six additional tutorial videos are availa...

Page 22: ...English Version 0 Please visit us at http s brother cpdab where you can get product support and answers to frequently asked questions FAQs ...

Reviews: