background image

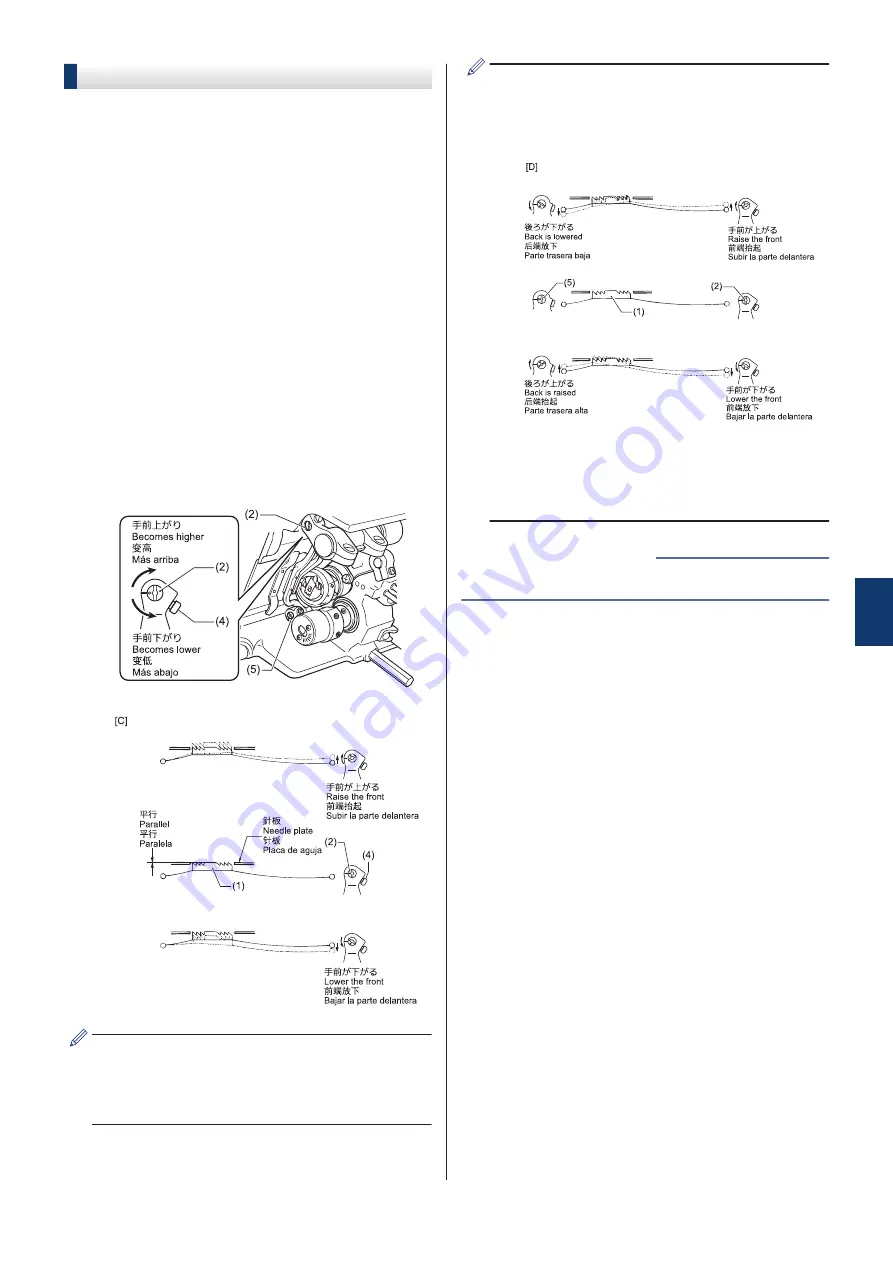
Adjusting the feed dog angle

The standard angle is for the feed dog (1) to be parallel
to the needle plate when the machine pulley is turned
forward to raise the feed dog (1) from its lowest
position until it is flush with the top of the needle plate.

1

Turn the machine pulley forward to raise the feed
dog (1) from its lowest position until it is flush with
the top of the needle plate, and stop turning the
machine pulley at that point.

2

Tilt back the machine head.

3

Loosen the two set screws (4).

4

Turn the feed base shaft (2) in the direction of the
arrow within a range of 90º with respect to the
standard position. (Figure [C])

• In order to prevent puckering, lower the front of

the feed dog (1).

• In order to prevent the material from slipping,

raise the front of the feed dog (1).

5

Securely tighten the two set screws (4).

• If you would like to tilt the feed dog (1) further,

turn the feed lifting rocker shaft (5) while
carrying out the above adjustment. (Figure [D])
To learn more, see 

Related Information

.

• The height of the feed dog (1) will change after

the angle has been adjusted. It will be
necessary to re-adjust the height of the feed
dog (1).

• Adjusting the height of the feed dog on page 58

Related Information

7

Adjusting the sewing machine (Standard adjustments)

59

Summary of Contents for S-7220D

Page 1: ...GLE NEEDLE DIRECT DRIVE NEEDLE FEED LOCK STITCHER WITH THREAD TRIMMER S 7220D 403 S 7220D 405 S 7220D 433 S 7220D Please read this manual before using the machine Please keep this manual within easy reach for quick reference ...

Page 2: ... and injury to yourself or other people The meanings of these indications and symbols are given below Indications DANGER The instructions which follow this term indicate situations where failure to follow the instructions will result in death or serious injury WARNING The instructions which follow this term indicate situations where failure to follow the instructions could result in death or serio...

Page 3: ... requirements for the sewing machine s power consumption Insufficient power supply capacity may cause problems with correct operation The ambient temperature should be within the range of 5 C to 35 C during use Temperatures which are lower or higher than this may cause problems with correct operation The relative humidity should be within the range of 45 to 85 during use and no dew formation shoul...

Page 4: ... of the moving parts or press any objects against the sewing machine while sewing Otherwise it may result in injury or damage to the sewing machine Secure the table so that it will not move when tilting back the machine head If the table moves it may crush your feet or cause other injuries Use both hands to hold the machine head when tilting it back or returning it to its original position If only...

Page 5: ...eft on when carrying out some adjustment be extremely careful to observe all safety precautions Secure the table so that it will not move when tilting back the machine head If the table moves it may crush your feet or cause other injuries Use both hands to hold the machine head when tilting it back or returning it to its original position If only one hand is used the weight of the machine head may...

Page 6: ...g warning labels appear on the sewing machine Please follow the instructions on the labels at all times when using the machine If the labels have been removed or are difficult to read please contact your nearest Brother dealer v ...

Page 7: ... to get your hands caught when returning the machine head to its original position after it has been tilted 4 Be careful to avoid injury from the moving thread take up 5 Be sure to connect the ground If the ground connection is not secure you run a high risk of receiving a serious electric shock and problems with correct operation may also occur 6 Direction of operation 7 1 Safety devices A Finger...

Page 8: ...Feed dog height 1 0mm 1 2mm Needle DBx1 DPx5 11 to 18 19 to 22 Motor AC servo motor Power supply Single phase 200V 230V 3 phase 200V 230V Power consumption 500 VA 4 Control circuit Microprocessor Hook 403 433 405 Lubricated for medium materials Lubricated for heavy materials Lubricating oil 403 405 433 Rotary hook High speed spindle High speed spindle Needle bar Special Brother grease 2 When sewin...

Page 9: ... 27 Setting the home screen mode 28 Adjusting the needle up stop position 29 3 Using the operation panel Advanced operations 30 Adding and deleting steps 30 Editing steps 31 Setting main sewing parameters when several steps exist 31 Setting the sewing start step 32 Copying programs 32 Initializing the currently selected program 33 Setting the working pace 33 Setting memory switches standard 34 Lis...

Page 10: ...machine Standard adjustments 55 Points to note when making adjustments 55 Adjusting the safety switch position 55 Adjusting the height of the needle bar 56 Adjusting the needle and rotary hook timing 57 Adjusting the height of the feed dog 58 Adjusting the feed dog angle 59 Adjusting the needle and feed timing 60 Adjust the position of arm thread guide R 60 Adjusting the height of the presser foot...

Page 11: ...r a qualified electrician for any electrical work that may need to be done The sewing machine weighs approximately 45 kg 99 lb The installation should be carried out by two or more people The installation should be carried out by two or more people About the machine set up location Do not set up this sewing machine near other equipment such as televisions radios or cordless telephones Such equipme...

Page 12: ...e near the table holes 2 While holding the face plate with your left hand gently return the machine head to the upright position with your right hand Do not hold the operation panel Table processing diagram The top of the table should be 40 mm in thickness and should be strong enough to hold the weight and with stand the vibration of the sewing machine Drill holes as indicated in the illustration ...

Page 13: ... the control box and the connecting rod 1 Control box 2 Bolt 4 pcs 3 Nut 8 pcs 4 Spring washer 4 pcs 5 Washer 4 pcs 6 Connecting rod 7 Nut 2 Install the oil pan 1 Head cushion left 2 pcs 2 Head cushion right 2 pcs 3 Oil pan 1 Installation 3 ...

Page 14: ... 2 pcs 2 Machine head 3 Head rest CAUTION Tap the head rest securely into the table as far as it will go If the head rest is not tapped in as far as it will go there is the danger that the machine head will not be sufficiently stable when it is tilted back 5 Install the operation panel 1 Operation panel 2 Screw 2 pcs Use for tightening rear cover 4 ...

Page 15: ...y so that the feed dog is below the top of the needle plate 9 Lower the presser foot 2 by using the lifting lever 1 10 Loosen the nut 3 11 Turn the screw 5 to adjust so that the amount of movement play in the knee lifter 4 is approximately 2 mm when the knee lifter plate is gently pressed After adjustment is completed securely tighten the nut 3 12 Loosen the nut 6 13 Turn the screw 7 until the dis...

Page 16: ...crew 7 to adjust so that the presser foot 2 is at the desired position within a distance of 16mm from the needle plate when the knee lifter plate is fully pressed 15 After adjustment is completed securely tighten the nut 6 6 ...

Page 17: ...ct the power cord plug until adding lubricating oil is complete The machine may operate if the treadle is depressed by mistake which could result in injury Be sure to wear protective goggles and gloves when handling the lubricating oil and grease so that they do not get into your eyes or onto your skin Otherwise inflammation can result Furthermore do not drink the oil or eat the grease under any c...

Page 18: ... 3 as a guide when pouring NOTE 7 Replace the rubber cap 1 8 Return the machine head to its original position 9 Check that the oil gauge 5 comes to the upper reference line in the oil gauge window 4 If the oil gauge drops below the lower reference line or if the oil level drops below the lower reference line 6 on the oil tank be sure to replenish the oil NOTE 8 ...

Page 19: ...e cords excessively or fasten them too hard with staples Otherwise fire or electric shocks may occur Contact your Brother dealer or a qualified electrician for any electrical work that may need to be done Be sure to connect the ground If the ground connection is not secure you run a high risk of receiving a serious electric shock and problems with correct operation may also occur Opening the contr...

Page 20: ...box 3 Head detector unit connector 6 pin P3 HEAD 1 4 Solenoid connector 14 pin CN8 SOL 1 5 Encoder connector 10 pin CN16 ENC 1 6 Operation panel connector 8 pin CN6 PANEL 1 Bind the cords in such a way that the connector does not get pulled out NOTE If an open circuit occurs in the cords due to vibration of the sewing machine damage to the control box may result 10 ...

Page 21: ...ect cords that match the voltage specifications EU specifications 1 Filter box 2 Screws 4 pcs 3 Staples 3 pcs 4 Power cord 1 Attach an appropriate switch and cable to the power cord 4 The green and yellow wire is the ground wire 2 Insert the power plug into a properly grounded electrical outlet Take care when tapping in the five staples 3 to make sure that they do not pierce the cords Do not use e...

Page 22: ... yellow cord 5 Power supply connector 3 pin 6 Staple 5 pcs Secure the power cord in a suitable place depending on the position of the wall outlet CAUTION Take care when tapping in the staples to make sure that they do not pierce the cords Do not use extension cords They may cause problems with correct operation of the sewing machine Closing the cover 10 Tighten the screws with washer 1 1 Screw wit...

Page 23: ...Ground wire 11 Connect the ground wires 1 Ground wire 2 Screw with washer 2 pcs 3 Ground symbol 2 places 4 Oil pan 1 Installation 13 ...

Page 24: ...ome screen is displayed when the power is turned on Sewing operations are normally carried out while the home screen is displayed The home screen can be switched between the detailed home screen the basic home screen and the quick home screen At the time of shipment from the factory the detailed home screen is set to be displayed If you keep pressing while the home screen is displayed you can swit...

Page 25: ...y Press this key to switch the start backtack sewing operation off on If you keep pressing this key the display switches to the start backtack setting screen 6 Main sewing key If you keep pressing this key the display switches to the main sewing method setting screen 7 End backtack key Press this key to switch the end backtack sewing operation off on If you keep pressing this key the display switc...

Page 26: ...ter each time the icon is pressed You can change the value which is displayed by pressing it If you keep pressing this key while the production counter is displayed the display switches to the production counter setting screen If you keep pressing this key while the production counter is displayed the display switches to the production counter setting screen 6 Start backtack key Press this key to ...

Page 27: ... previous screen key Increases a value OK key Confirm the value Type C Touch keys which change their setting status symbol each time they are pressed Example Lock key Unlocked Locked Thread wiper key Thread wiping enabled Thread wiping disabled Start backtack key Start backtack enabled Start backtack disabled Menu screen Press at any screen to return to the menu screen Press or at a menu screen to...

Page 28: ...rmal sewing programs registered and P9 has a 4 step fixed stitch sewing name label sewing program registered Program structure A single program consists of start backtack parameters main sewing parameters end backtack parameters and individual functions for that program Stitch type overall view Programs P1 to P9 Start backtack Main sewing End backtack Start backtack sewing parameters Main sewing p...

Page 29: ...Setting value End backtack sewing pattern Sewing speed 220 to 3000 sti min No of stitches C 1 to 19 stitches No of stitches D 1 to 19 stitches Program individual functions Setting value Needle up down Needle stops in the down position Needle stops in the up position Thread trimming lock Thread trimming operation is carried out when the treadle is depressed backward Thread trimming operation by dep...

Page 30: ...ewing with thread trimming Slow start Slow start disabled at the sewing start Slow start enabled at the sewing start 1 Slow start enabled at the sewing start 2 Slow start enabled at the sewing start 3 Slow start enabled at the sewing start 4 20 ...

Page 31: ... No of stitches B 1 to 19 stitches 1 stitch 1 stitch Main sewing settings 1 Press Main portion setting 2 Set the start backtack sewing parameters 1 Press or to select the sewing pattern Press or to change the value 2 Press to select the start backtack sewing speed Press or to change the value 3 Press or to select the number of stitches Press or to change the value 3 Press Press this to return to t...

Page 32: ...s or to select the sewing pattern Press or to change the value 2 Press to select the start backtack sewing speed Press or to change the value 3 Press Press this to return to the Home screen The settings which are made here are applied to End backtack key in the home screen End backtack sewing parameter settings Setting value Setting unit Default value End backtac k sewing pattern Sewing speed 220 ...

Page 33: ...to P9 are called program common functions Each of the 6 types of functions can be set to be used as either a program individual function or a program common function Memory switch No 301 to No 306 At the time of shipment from the factory the settings are as follows Program individual functions Program common functions Needle up down Thread trimming lock Thread wiper Correction sewing AUTO Slow sta...

Page 34: ...wing being carried out The operation mode can be changed to a different mode from correction sewing For more detailed information Hand switch Correction sewing operation using the hand switch is enabled If the sewing machine is stopped sewing will be carried out at slow speed while the hand switch is being pressed The operation mode can be changed to correction sewing For more detailed information...

Page 35: ...he number of stitches which have been set start and end backtacking fixed stitch sewing thread trimming simply by depressing the treadle once After sewing is complete thread trimming is carried out automatically 2 Using the operation panel Basic operations 25 ...

Page 36: ...ording to slow start pattern 2 1st stitch 400 sti min 2nd stitch 400 sti min 3rd stitch 4000 sti min 4th stitch 4000 sti min Sewing is carried out according to slow start pattern 3 1st stitch 700 sti min 2nd stitch 700 sti min 3rd stitch 4000 sti min 4th stitch 4000 sti min Sewing is carried out according to slow start pattern 4 original pattern 1st stitch Speed set by memory switch No 403 1st sti...

Page 37: ...emaining The lower thread counter should be used as a guide only The value displayed by the lower thread counter display is reduced by 1 from the initial setting value each time the sewing machine sews 10 stitches and a warning is given when the counter reaches 1 1 Press Bobbin thread counter setting 2 Press or to change the lower thread counter value When the value is changed the production count...

Page 38: ...cing the bobbin 4 Press The lower thread counter value will remain unchanged The display will return to the screen which was being displayed before the lower thread counter out warning appeared and sewing will be possible Lower thread out warning when sewing is complete after thread trimming If the lower thread counter has dropped to below 1 after sewing is finished the warning buzzer sounds 5 tim...

Page 39: ...ome higher The default setting value is 0 If the value that is displayed is different from the value that is currently set the value in the display will flash If you would like to return the setting to the initial value press is only displayed when the setting value the value being displayed is different from the initial value 4 Press 5 The setting for the needle up stop position will be stored Th...

Page 40: ...the currently selected program are displayed 2 Press or to change the cursor position When adding a step 3 Press A step will be added after the cursor position The sewing pattern for the added step will be the fixed stitch sewing pattern If the number of steps has already reached 20 no further steps can be added When deleting a step 4 Press The step at the cursor position will be deleted However i...

Page 41: ...4 Set the start backtack sewing parameters 1 Press to select the start backtack sewing speed Press or to change the value 2 Press Press the key to switch linking between enabled and disabled No linking with next step Linking with next step 5 Press The display will return to the previous screen Setting main sewing parameters when several steps exist Setting value Setting unit Default value Main sew...

Page 42: ... is turned off and back on the sewing start step number 1 will be cleared even if sewing is not carried out Copying programs To create a program with parameters that are almost exactly the same as those of another program you can copy the original program and change just the parts which need to be changed 1 Press Program setting Program copy After switching to program copy mode the program number ...

Page 43: ...he working pace has elapsed However counting is not carried out during the period from when the power is turned on until sewing starts 1 Press Production counter editing 2 Press The sewing machine will switch to working pace setting mode If the operating status 1 for the target counter is set to OFF the target counter function will not operate It will not be possible to set the working pace at thi...

Page 44: ...s with current values that are different from their initial values 3 Press or to change the memory switch value 2 If the value that is displayed is different from the value that is currently set the value in the display will flash If you would like to return the setting to the initial value press is only displayed when the setting value the value being displayed is different from the initial value...

Page 45: ...tions are enabled However if thread trimming operation is locked needle up operations will be carried out without thread trimming OFF Thread trimming and end backtack sewing operations are disabled presser foot lifts when the treadle is depressed backward 010 ON OFF OFF After standing operation pedal is used treadle operation is possible Alternating operation is possible Does not include operation...

Page 46: ...ng ON Presser foot can be raised and lowered If memory switch No 051 is set to ON thread trimming pedal operation is disabled after the presser foot lifter pedal has been operated during standing operation Refer to the Service Manual for details of memory switch No 051 OFF No operation only possible using presser foot lifter pedal Sewing machine motor settings 100 to 199 No Setting range Default v...

Page 47: ...function program individual function settings Thread wiper 0 Program common functions 1 Program individual functions 304 0 1 0 1 Program common function program individual function settings Correction sewing 0 Program common functions 1 Program individual functions 305 0 1 1 1 Program common function program individual function settings AUTO auto thread trimming 0 Program common functions 1 Progra...

Page 48: ...motor stops after start backtacking is complete If memory switch No 400 is set to OFF operation occurs when the treadle is depressed slightly ON After start backtack sewing the feed moves forward then the sewing machine motor stops 402 1 to 2 1 1 Fixed stitch sewing load function when main unit is sewing pleat stitches 1 Reverse stitch sewing operation when hand switch is pressed 2 Fixed stitch se...

Page 49: ...ction using hand switch 0 Counter can be incremented at any time 1 Counter can only be incremented after sewing stops and thread has been trimmed Standard device settings 500 to 599 No Setting range Default value Setting unit Setting details 500 OFF 1 1 1 Presser foot lifter switch function OFF Disabled 1 Presser foot lifter switch 3 Using the operation panel Advanced operations 39 ...

Page 50: ... sewing icon is illuminated Settings for other than correction sewing switch Settings Initial setting is 4 Operation when hand switch is pressed OFF Disabled 1 Reverse Feed moves in reverse while the switch is being pressed 2 Thread trimming When the switch is pressed thread trimming is carried out When this function is selected the hand switch operates as a thread trimming switch even if the corr...

Page 51: ... program When cycle sewing is selected sewing moves to the next program each time the switch is pressed Refer to the Service Manual for details on cycle sewing These settings are enabled when the correction sewing icon is turned off 3 Using the operation panel Advanced operations 41 ...

Page 52: ...h setting 2 Select the desired menu Example Setting the hand switch so that it functions as a correction sewing switch 1 Press Correction sewing function 3 Press or to select the desired setting item 4 Press Press this to return to the Home screen 42 ...

Page 53: ...re The data writing items which can be selected in USB media read write mode and the structure of the media folders are as described below Read write items that can be selected Cod e Setting item Read write direction 1 Read all programs USB media Panel Sewing machine 2 Write all programs USB media Panel Sewing machine 3 Read all memory switches USB media Panel Sewing machine 4 Write all memory swi...

Page 54: ...Data type Filename Folder name Error log E LDT M LDT BROTHER ISM ISMLDT Production data P LDT Same as above 44 ...

Page 55: ...ore normal operation by initializing the stored data 1 While pressing turn on the power switch The display will switch to the initialization menu screen 2 Select the item to be initialized 3 Select Initialization will then be carried out When initialization is complete the display will return to the initialization menu screen 4 Press Press this to return to the Home screen 3 Using the operation pa...

Page 56: ...tilting it back or returning it to its original position If only one hand is used the weight of the machine head may cause your hand to slip and your hand may get caught Adjusting the presser foot floating amount minute lifting amount When sewing stretch materials and materials with long pile you can make minute adjustments to the floating amount for the presser foot 1 in accordance with the mater...

Page 57: ...d then turn the bolt 6 until its head is touching the solenoid lever 7 5 Tighten the nut 5 to secure the bolt 6 6 Return the machine head to its original position Sewing condensed stitches 7 Return the stitch length dial 4 to the stitch length for normal sewing 8 Push down the dial lock lever 3 to engage the lock 9 Start sewing 10 At the position where you would like to start sewing condensed stit...

Page 58: ...ng it back or returning it to its original position If only one hand is used the weight of the machine head may cause your hand to slip and your hand may get caught Be sure to wear protective goggles and gloves when handling the lubricating oil and grease so that they do not get into your eyes or onto your skin Otherwise inflammation can result Furthermore do not drink the oil or eat the grease un...

Page 59: ...above the center reference line in the oil window 1 70 ml of lubricating oil is added to the gearbox at the time of shipment from the factory 1 Look at the oil window 1 from directly in front 2 If the oil level is below the normal level add more lubricating oil Lubrication 1 Remove the rubber cap 3 2 Add lubricating oil until the oil level is approximately 2mm above the center reference line in th...

Page 60: ...Checking the condition of the needle and upper thread 1 Replace the needle if it is bent or if the tip is broken 2 Check that the upper thread has been threaded correctly 3 Carry out a test sewing 50 ...

Page 61: ...ewing machine will be forcibly prevented from operating for safety reasons If this happens apply grease and carry out the reset procedure If you continue to use the sewing machine after carrying out the reset procedure but without applying grease problems with the sewing machine may result Applying grease Use Brother specified Grease unit SB6659 101 NOTE Using the tube 1 Make a hole in the tube an...

Page 62: ...e When using the grease again remove any old grease from inside the nozzle first Store the tube away carefully once the tube has been opened otherwise the grease remaining inside the tube may deteriorate and this may affect its lubricating performance NOTE Clearing the cumulative time between grease applications 1 While pressing 1 turn on the power switch 2 2 Select Grease up 3 Press 4 Press The d...

Page 63: ...ment parts as specified by Brother Replacing the fixed knife and movable knife Replacing the fixed knife 1 Tilt back the machine head 2 Remove the screw 1 and then remove the hook stopper 2 3 Remove the flat screw 3 and then remove the fixed knife 4 4 Install the new fixed knife by following the removal procedure in reverse Sharpening the fixed knife If the thread is not being cut cleanly use a wh...

Page 64: ...10 Remove the two flat screws 9 and then remove the movable knife 10 11 Install the new movable knife by following the removal procedure in reverse 54 ...

Page 65: ...alified electrician to carry out any maintenance and inspection of the electrical system If any safety devices have been removed be absolutely sure to re install them to their original positions and check that they operate correctly before using the machine Always be sure to turn off the power switch and then wait one minute before opening the motor cover If you touch the surface of the motor it m...

Page 66: ...y timing gauge 2 when the needle bar 1 is at its lowest position as shown in the illustration 1 Remove the presser foot 3 needle plate 4 and feed dog 5 2 Turn the machine pulley to set the needle bar 1 to its lowest position 3 Remove the rubber cap 6 from the face plate 4 Loosen the screw 7 5 Move the needle bar 1 up or down to adjust so that the distance from needle plate mounting surface A to th...

Page 67: ...Loosen two of the three set screws 9 which are securing the rotary hook 8 4 Turn the machine pulley to raise the needle bar 1 from its lowest position until the distance from needle plate mounting surface A to the bottom edge of the needle bar 1 is the same as the height of surface C on the 2 side of the accessory timing gauge 2 5 Loosen the remaining set screw 9 and align the rotary hook tip 3 wi...

Page 68: ... position above the needle plate 2 Tilt back the machine head 3 Loosen the set screw 2 4 Turn the feed lifting rocker shaft 3 within a range of 90 from the reference line 4 to adjust the vertical height of the feed bar 5 Figure A 5 Tighten the set screw 2 If you are worried about the angle of the feed dog 1 turn the feed bar shaft 6 while carrying out the above adjustment Figure B To learn more se...

Page 69: ...2 in the direction of the arrow within a range of 90º with respect to the standard position Figure C In order to prevent puckering lower the front of the feed dog 1 In order to prevent the material from slipping raise the front of the feed dog 1 5 Securely tighten the two set screws 4 If you would like to tilt the feed dog 1 further turn the feed lifting rocker shaft 5 while carrying out the above...

Page 70: ...n the stitch length dial to the maximum setting 2 Tilt back the machine head 3 Loosen the two set screws 5 and then turn the feed lifting eccentric cam 3 slightly to adjust the timing CAUTION Use the standard needle and feed mechanism timing If the timing is changed broken needles may occur 4 After adjusting securely tighten the set screw 5 Adjust the position of arm thread guide R The standard po...

Page 71: ...y using the lifting lever 2 3 Remove the rubber cap 5 from the face plate 4 Loosen the bolt 6 and then move the presser bar 7 up or down until the presser foot 1 is at the standard height of 6 mm 5 Tighten the bolt 6 6 Install the rubber cap 5 7 Adjust the presser foot pressure using the presser adjustment screw 4 and then tighten the nut 3 After adjusting check that the needle moves down into the...

Page 72: ...2 and hold it there Then run the sewing machine at the normal sewing speed for 8 seconds Any type of paper can be used as the lubrication amount check sheet 1 5 Check the amount of oil which has spattered onto the sheet If adjustment is necessary adjust the lubrication amount Adjusting the lubrication amount If the lubrication amount does not match the correct amount shown in the illustration if t...

Page 73: ...9 Check the lubrication amount again after the sewing machine has been used for approximately two hours 7 Adjusting the sewing machine Standard adjustments 63 ...

Page 74: ...Or is the lower thread tension too strong Adjust the upper thread tension or lower thread tension Lower thread is not tight Is the upper thread tension too strong Or is the lower thread tension too weak Adjust the upper thread tension or lower thread tension Loops appear in seam Is the thread path not smooth enough Use a file with a fine grain or sandpaper to polish smooth the thread path Is the b...

Page 75: ...per thread too short after thread trimming Adjust the pretension 1 Are the threads not being trimmed cleanly Sharpen the fixed knives or replace the fixed and movable knives if necessary 1 Replace the movable knife 1 See Replacing the fixed knife and movable knife on page 53 Is the needle up stop position too high Adjust the needle up stop position 1 See Adjusting the needle up stop position on pa...

Page 76: ...e Is the sewing speed too fast Use the sewing speed key to gradually reduce the sewing speed See Using the operation panel Basic operations on page 14 Is the angle of the feed dog correct Tilt the front of the feed dog down slightly See Adjusting the feed dog angle on page 59 Lower thread is tangled at the sewing start Bobbin is spinning during thread trimming Is the bobbin spinning direction corr...

Page 77: ...aged part 1 Incorrect thread trimming Is the fixed knife or movable knife damaged or worn Replace the fixed knife or the movable knife 1 See Replacing the fixed knife and movable knife on page 53 Incorrect thread trimming Upper thread is not being trimmed Lower thread is not being trimmed Is the needle properly installed If it is incorrect install the needle correctly See Replacing the fixed knife...

Page 78: ...set to a screen other than a screen where sewing is possible Switch the operation panel to a screen where sewing is possible such as the home screen Machine does not operate at high speed Is the sewing speed setting or backtack stitch speed setting too slow Use the sewing speed key to set the high speed See Using the operation panel Basic operations on page 14 Machine stops during sewing Has the s...

Page 79: ... 9 The panel display switches to the grease up warning screen when the power switch is turned on This display is to notify you that it is time to apply grease Apply grease 1 See Adding grease when the grease up warning screen is displayed on page 51 The illumination becomes momentarily darker or flickers The illumination may become momentarily darker or flicker when the sewing machine starts or st...

Page 80: ...List of error codes List of error codes If an error code appears on the touch panel display Connector layout diagram 70 ...

Page 81: ...on Turn off the power and then return the machine head to its original position Turn off the power and check the connection of connector CN8 E064 A touch key was being pressed when the power was turned on Turn the power off and then back on again Do not press the touch keys when turning on the power E065 A disabled hardware key was being pressed when the power was turned on Turn the power off and ...

Page 82: ...ewing machine motor is stiff or not Turn off the power and check the connections of the 4 pin sewing machine motor connector and connector CN16 E131 Sewing machine motor encoder connection was not detected when power was turned on Turn off the power and check the connection of connector CN16 E132 Abnormal sewing speed of sewing machine motor was detected during sewing Turn off the power and check ...

Page 83: ... is not connected Turn off the power and check the connection of connector P3 Software related errors Code Cause Remedy E582 A memory switch version updating error was detected including specification mismatch Turn the power off and then back on again E583 A parameter version updating error was detected including specification mismatch Turn the power off and then back on again P C board related er...

Page 84: ...e detected during version updating Turn off the power and then repeat the version update procedure E885 Version update file could not be read from USB media during version updating Turn off the power and check the connection of the USB media E886 Problem with version update file detected during version updating Turn off the power and then repeat the version update procedure E887 Version update fil...

Page 85: ...48 0803 Japan Phone 81 566 95 0088 2019 Brother Industries Ltd All Rights Reserved This is the original instructions Please note that the contents of this manual may differ slightly from the actual product purchased as a result of product improvements I9081347B E 2019 08 B 1 ...

Reviews: