BASIC USAGE (Continued)
Using Print Options
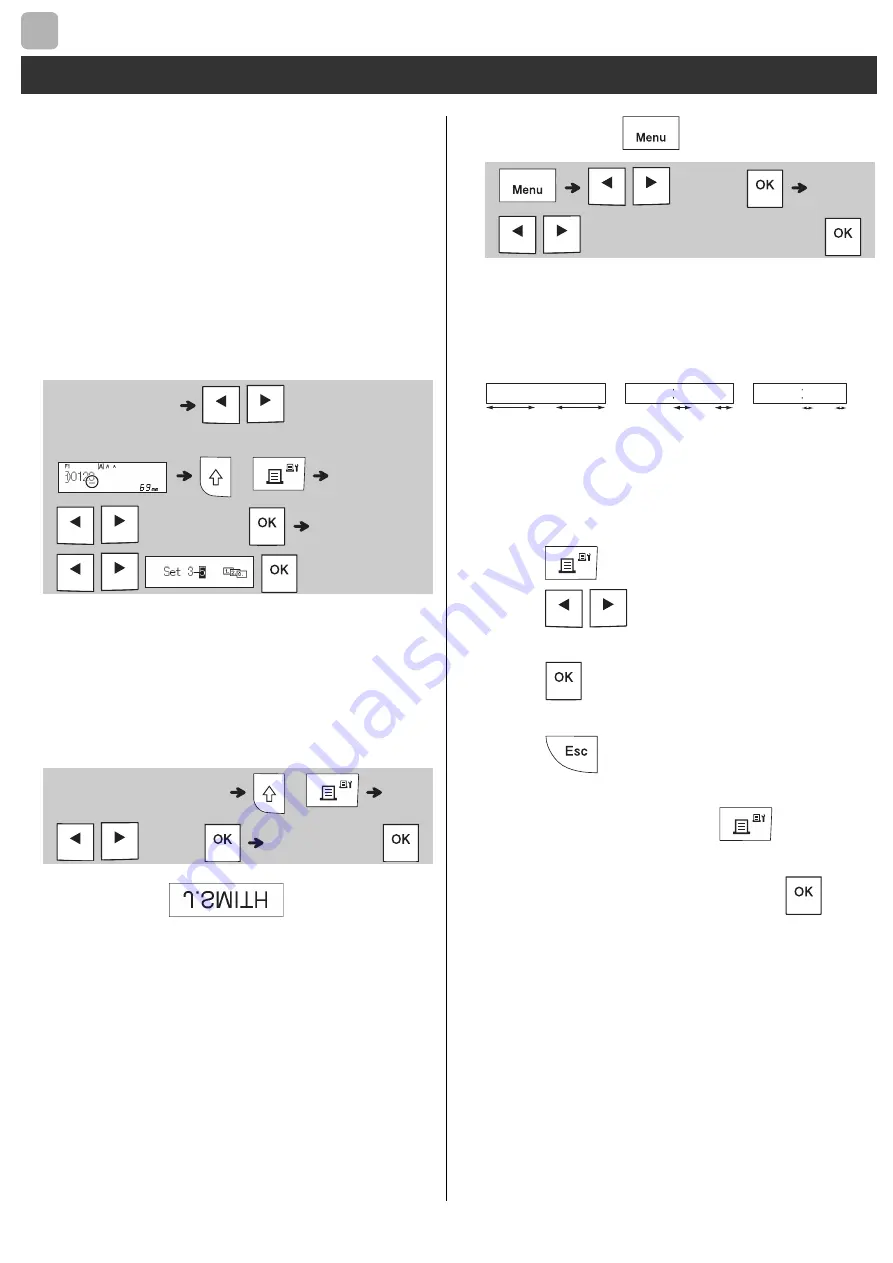
[Numbering]
You can print a series of up to nine ribbons/tapes
at a time using auto-numbering. Using this feature
you can automatically increase a selected
number by one after each one is printed. The
numbers of ribbons/tapes you can print at one
time depend on the initial number.
Example:
To print copies of a label containing a
serial number (0123, 0124 and 0125)
• Select the highest number you want to be
printed when setting the number.
[Mirror]
Example:
Follow the instructions below after
entering "J.SMITH" if you want to
Mirror Print "J.SMITH".
• Use clear tape in [Mirror], so you can read the
labels correctly from the opposite side when
attached on glass, windows or other
transparent surfaces.
Setting Margin (
)
[Full]/[Half]/[Narrow]
For leaving equal margins on both sides of the
text.
[Chain Print]
Use this setting when printing several ribbon/tape
with minimum margins.
1.
Enter text.
2.
Press
, then [Copies: ] appears.
3.
Press
/
or enter a number with
number keys to select the number of copies.
4.
Press
. Printing starts, and then the
message "Feed OK?" appears.
5.
Press
to enter more text.
6.
Clear the text, enter the text for the next
ribbon/tape, and then press
.
7.
When the message "Feed OK?" appears after
the last ribbon/tape is printed, press
.
8.
After the tape is fed, press the cutter lever to
cut off the chain of ribbons/tapes.
2
Printing Ribbons/Tapes (continued)
Enter numbers
/
Move the cursor
to the number you want to increment
+
/
[Numbering]
/
Enter text/characters
+
/
[Mirror]
[Mirror Print?]
/
[Margin]
/
[Full/Half/Narrow/Chain Print]
4 mm
4 mm
ABC
ABC
12 mm
12 mm
ABC
25 mm
25 mm
Full
Half
Narrow


