background image

27

Using Auto-Format Layouts

EDITING A LABEL

„

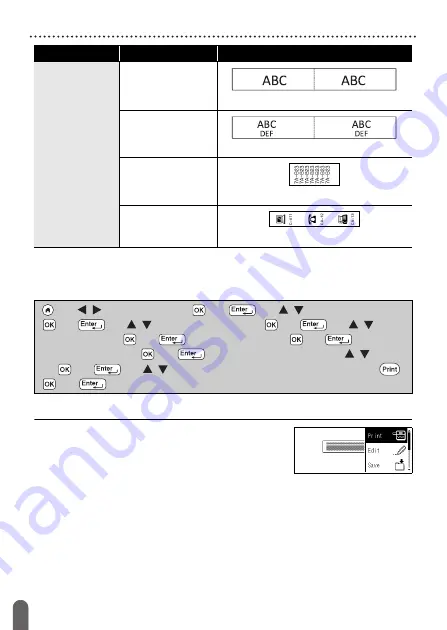
Using Block Layouts

Simply select a layout from the block layouts, enter the text and apply 

formatting as desired.

NOTE

• On the print menu screen:

x

Select [Edit] to change the text data or the 

bar code setup.

x

Select [Save] to store the label to the file 

memory.

For the file memory, refer to “USING THE FILE MEMORY” on 

page 39.

x

Select [Menu] to change the font, align or frame settings.

x

Select [Preview] to preview the label before printing.

x

Select [Print Options] to set the print settings. For details, refer to 

“Numbering Printing” on page 34 or “Mirror Printing” on page 34.

Cable Labeling

Flag 1

(0.47" x 3.5" [12 mm x 90 mm])

Flag 2

(0.47" x 3.5" [12 mm x 90 mm])

Cable Wrap

(0.70" x 1.5" [18 mm x 39 mm])

Faceplate(VRT)

(0.47" x 2.7" [12 mm x 70 mm])

Category

Value

Details

(

Î


/

 [Auto Format] 

Î


(

)  or  (

Î

 /


[Block 

Layouts] 

Î


(

)  or  (

Î


/

 Select a tape width 

Î


(

)  or  (

Î

 /


Select 

a block layout 

Î


(

)  or  (

Î

 Enter the text 

Î

 (

) or (

Î

 Repeat 

for each text field 

Î

 (

) or (

) to display the print menu 

Î


/

 [Print] 

Î

 (

) or (

Î


/

 Select the number of labels to be printed 

Î


(

), 

(

)  or  (

).

Summary of Contents for P-Touch PT-D450

Page 1: ...re you start using your P touch Keep this User s Guide in a handy place for future reference Please visit us at http support brother com where you can get product support and answers to frequently asked questions FAQs ELECTRONIC LABELING SYSTEM ...

Page 2: ...tal device pursuant to Part 15 of the FCC Rules These limits are designed to provide reasonable protection against harmful interference in a residential installation This equipment generates uses and can radiate radio frequency energy and if not installed and used in accordance with the instructions may cause harmful interference to radio communications However there is no guarantee that interfere...

Page 3: ...ublished covering the latest product s descriptions and specifications The contents of this manual and the specifications of this product are subject to change without notice If new versions of the PT D450 software become available this manual may not reflect the updated features Therefore you may find that the software and the contents in this manual are different Any trade names and product name...

Page 4: ...e the P touch labeler 12 Create a label with the P touch labeler 12 Create a label by connecting your labeler to a PC 13 EDITING A LABEL 15 Entering and Editing Text 15 Entering Text from the Keyboard 15 Adding a New Line 15 Adding a New Block 15 Deleting Text 15 Inserting a Tab 16 Using Text Reminder 16 Deleting Text Reminder Memory 17 Changing Text Reminder Setting 17 Entering Symbols 17 Enterin...

Page 5: ... 34 Adjusting the Label Length 36 Printing from the Label Collection 37 Printing a label from the label collection stored in the P touch labeler 37 Downloading a new Label Collection Category 38 USING THE FILE MEMORY 39 Saving Label Files 39 Printing Opening Deleting a Saved Label 39 Print 39 Open 39 Delete 39 RESETTING MAINTAINING YOUR P TOUCH LABELER 40 Resetting the P touch Labeler 40 Resetting...

Page 6: ...s 45 System Requirements 46 General Description Tape cassette compartment cover Tape viewer LCD display Tape exit slot Print head Keyboard Tape cassette compartment Tape cutter Release lever Battery compartment cover USB port AC adapter jack Battery compartment ...

Page 7: ...se the P touch labeler AC adapter in places of high humidity such as bathrooms Do not place heavy objects on or damage the power cord or plug Do not forcibly bend or pull the power cord Always hold the AC adapter when disconnecting from the power outlet Make sure that the plug is fully inserted to the power outlet Do not use an outlet that is loose Do not allow the P touch labeler AC adapter power...

Page 8: ...o avoid personal injury liquid leakage burns or heat Do not touch the cutter blade If leaked fluid from batteries gets on your skin or clothes immediately rinse them with clean water Remove the batteries and disconnect the AC adapter if you do not intend to use the P touch labeler Do not use a battery other than that specified Do not use combinations of old and new batteries or combinations of dif...

Page 9: ...is empty it will damage the print head Do not pull the tape while printing or feeding it will damage the tape and the P touch labeler It is recommended that you use the USB cable supplied with the P touch labeler Should another USB cable need to be used ensure it is of high quality construction Any data saved in memory will be lost due to failure or repair of the P touch labeler or if the battery ...

Page 10: ...g Your P touch labeler LCD Display Keyboard Carton Contents P touch labeler Starter Tape Cassette AC adapter USB Cable User s Guide 9 8 7 1 2 3 4 5 6 11 12 10 15 16 17 18 19 20 31 30 29 28 27 2625 21 22 23 24 14 13 35 34 33 32 The default language is English ...

Page 11: ...e beginning or end of the current line While selecting the settings press to go back to the default item Unless otherwise mentioned press to cancel any operation Press to return to the home screen Label length shown on LCD may slightly differ from the actual label length when printed 1 Caps mode 2 7 Style guidance 8 Tape width x Label length 9 Block number 10 Line number 11 Cursor 12 Return mark 1...

Page 12: ...tteries reverse the installation procedure NOTE For memory back up we recommend using AA alkaline batteries LR6 or Ni MH batteries HR6 together when using the AC adapter To safeguard and backup the P touch labeler s memory when the AC adapter is unplugged it is recommended to have AA alkaline batteries LR6 or Ni MH batteries HR6 installed in the P touch labeler When power is disconnected for more ...

Page 13: ...iting Battery insulation example 1 Cellophane tape 2 Alkaline or Ni MH battery Insert a Tape Cassette NOTE When inserting the tape cassette make sure that the tape and ink ribbon do not catch on the print head If you cannot close the tape cassette compartment cover check to ensure the release lever is in the up position If not lift the lever and then close the cover 1 2 CAUTION USING A COMBINATION...

Page 14: ...rn on the P touch labeler for the first time you are asked to set the default language Select language using or and then press or Unit The default setting is inch Feeding Tape To feed the tape press the following keys Setting LCD Display LCD Contrast The default setting is 0 Î Settings Î or Î Language Î or Î English Español Français Hrvatski Italiano Magyar Nederlands Norsk Polski Português Portug...

Page 15: ...any key The back light turns off when printing How to use the P touch labeler Create a label with the P touch labeler GETTING STARTED CREATING A LABEL NOTE In addition to entering text the P touch labeler has a large range of formatting options Examples of labels you can create using the P touch labeler Î Settings Î or Î Backlight Î or Î On Off Î or Preparing the P touch labeler P 7 Entering and E...

Page 16: ...Features Printing a label Setting Tape Cutting Options Printing from the Label Collection P 33 P 34 P 37 P touch Editor Makes it easy for anyone to create a wide variety of custom labels in complex layouts by using fonts templates and clip art Printer Driver Lets you print labels from the connected P touch labeler when using P touch Editor on your computer P touch Update Software Label collections...

Page 17: ...ther com You can find following information Software downloads Manuals Documents Frequently Asked Questions Troubleshooting Useful tips on using printer Consumable information Latest OS compatibility information The contents of this website are subject to change without notice Connect the P touch labeler to your computer with the included USB cable Launch the P touch Editor Software Enter the labe...

Page 18: ...y exist Too Many Lines is displayed Press or any other key to clear the error message Adding a New Block To create a new block of text lines to the right of your current text press and The cursor moves to the start of the new block NOTE A maximum of 5 blocks can be entered in one label If you press and when five blocks already exist Too Many Blocks is displayed Press or any other key to clear the ...

Page 19: ...beler remembers character sequences beginning with the character entered from a history of all printed character sequences to date and displays a list of options from which to select The default setting is On Example NOTE To close the list of words and return to the text entry screen press Î Tab Length Î or Î 0 0 4 0 0 100 mm Î or Î to return to the text entry screen Enter B Î Î The P touch labele...

Page 20: ... added to History The default setting is On Symbol List Î Settings Î or Î Text Reminder Î or Î Clear Memory Î or Î The message Clear All Text Reminder Memory appears Î or Î Settings Î or Î Text Reminder Î or Î ON OFF Î or Î On Off Î or Î Select Category Î or Î Choose a symbol Î or Î Settings Î or Î Symbol History Î or Î On Off Î or Category Symbols Punctuation Bracket Arrow Mathematics Currency Un...

Page 21: ...EDITING A LABEL 18 Entering Symbols Sign Electrical Datacom AV Business Professional Event Vehicle Personal Nature Earth Pictograph Category Symbols ...

Page 22: ... A LABEL Entering Accented Characters Accented Character List Enter the character Î Î Select accented character Î or Character Accented Characters Character Accented Characters a n A N c o C O d r D R e s E S g t G T i u I U k y K Y l z L Z ...

Page 23: ...text entry screen the same change will be applied to all lines of the label The actual printed font size depends on the tape width number of characters and number of input lines Once characters reach a minimum size the selected font will default to a custom font which is based on the Helsinki style This allows labels to print using the smallest text possible on narrow or multi line labels The 6 po...

Page 24: ... Helsinki Font Belgium Brussels Atlanta US Adams Los Angeles Brunei San Diego Sofia Florida Germany Calgary Letter Gothic Size Auto When Auto is selected the text is automatically adjusted to print in the largest size availableinthe font settings for each tape width Size 18 pt 6 pt 24 pt 9 pt 36 pt 12 pt 42 pt Width x 1 Width x 1 2 x 3 2 x 2 3 x 2 ...

Page 25: ...s selected the text width will be reduced to the size of x1 2 setting Setting Frames NOTE You can also select a frame by typing in the frame number Style Normal Style Italic Bold Bold Italic Outline Outline Italic Shadow Shadow Italic Solid Solid Vertical Italic Vertical Bold Line Off Line Strikeout Underline Align Left Align Right Center Justify Attribute Value Result Attribute Value Result Î Set...

Page 26: ...0 11 12 13 14 15 16 17 18 19 20 21 22 23 24 25 26 27 28 29 30 31 32 33 34 35 36 37 38 39 40 41 42 43 44 45 46 47 48 49 50 51 52 53 54 55 56 57 58 59 60 61 62 63 64 65 66 67 68 69 70 71 72 73 74 75 76 77 78 79 80 81 82 83 84 85 86 87 88 89 90 91 92 93 94 95 96 97 98 99 ...

Page 27: ...typing in the desired length To apply the setting after typing in the length press or and then or again Using Auto Format Layouts Using Templates Simply select a layout from the templates enter the text and apply formatting as desired Example Asset Tag Î Select an attribute Î or Î Set a value for that attribute Î or Î to return to the text entry screen Î Auto Format Î or Î Templates Î or Î Asset M...

Page 28: ...etails refer to Numbering Printing on page 34 or Mirror Printing on page 34 If the width of the current tape cassette does not match the set width for the selected layout an error message is displayed when you try to print the label Press or any other key to clear the error message and insert a tape cassette of the correct width If the number of characters entered exceeds the limit Text Too Long i...

Page 29: ...6 12 mm x 42 mm Cabinet Label 0 70 x 4 3 18 mm x 111 mm Address ID Address Label 0 70 x 2 7 18 mm x 70 mm Name Badge 1 0 70 x 2 8 18 mm x 72 mm Name Badge 2 0 70 x 2 8 18 mm x 72 mm Media SD Card Label 0 47 x 0 90 12 mm x 25 mm USB Flash Memory 0 35 x 0 90 9 mm x 25 mm CD Case Spine 1 0 23 x 4 4 6 mm x 113 mm CD Case Spine 2 0 13 x 4 4 3 5 mm x 113 mm Category Value Details ...

Page 30: ... settings x Select Preview to preview the label before printing x Select Print Options to set the print settings For details refer to Numbering Printing on page 34 or Mirror Printing on page 34 Cable Labeling Flag 1 0 47 x 3 5 12 mm x 90 mm Flag 2 0 47 x 3 5 12 mm x 90 mm Cable Wrap 0 70 x 1 5 18 mm x 39 mm Faceplate VRT 0 47 x 2 7 12 mm x 70 mm Category Value Details Î Auto Format Î or Î Block La...

Page 31: ...e set width for the selected layout an error message is displayed when you try to print the label Press or any other key to clear the error message and insert a tape cassette of the correct width Block Layouts Attribute Value Details 0 70 18mm 2LineA 2LineB 3Line 1 2LineA 1 2LineB 1 3Line 1 4Line 1 5Line ...

Page 32: ...29 Using Auto Format Layouts EDITING A LABEL 0 47 12mm 2LineA 2LineB 3Line 1 2Line 0 35 9mm 2LineA 2LineB 1 2Line 0 23 6mm 1 2Line Attribute Value Details ...

Page 33: ...for Width whenever possible Some bar code readers may not be able to read bar code labels created using the Small setting Continuously printing a large number of labels with bar codes can overheat the print head which may affect printing quality Setting Bar Code Parameters and Entering Bar Code Data NOTE Symbols are only available for the CODE39 CODE128 CODABAR or GS1 128 protocols When not using ...

Page 34: ...BAR Attribute Value Protocol CODE39 CODE128 EAN 8 EAN 13 GS1 128 UCC EAN 128 UPC A UPC E I 2 5 ITF CODABAR Width Small Large Under characters printed below bar code On Off C Digit check digit Off On only available for the CODE39 I 2 5 and CODABAR protocols Special Character Special Character SPACE ...

Page 35: ... of the bar code mark on the data entry screen and then open the Bar Code Setup screen by pressing To delete a bar code from a label position the cursor to the right of the bar code mark on the data entry screen and press Special Character SPACE NUL SOH STX ETX EOT ENQ ACK BEL BS HT LF VT FF CR SO SI DLE DC1 DC2 DC3 DC4 NAK SYN ETB CAN EM SUB ESC FS GS RS US DEL FNC3 FNC2 FNC4 FNC1 ...

Page 36: ...mage to the tape do not touch the cutter lever while the message Printing Copies or Feeding Tape Please Wait is displayed Do not pull the label coming out of the tape exit slot Doing so will cause the ink ribbon to be discharged with the tape making the tape no longer usable Do not block the tape exit slot during printing or when feeding tape Doing so will cause the tape to jam Single and Multiple...

Page 37: ...l tape Tape Cutting Options Î Number Î or Î Select start point Î or Î Select end point Î or Î Select the number of labels to be printed Î or Î Mirror Î or Î or Î Cut Option Î or Î Large Margin Small Margin Chain No Cut Special tape Î or to apply the settings Setting Description Example Large Margin Each label is printed leaving a margin of 0 94 23 9 mm on each end Small Margin A margin of 0 89 22 ...

Page 38: ...r the text No Cut Select this setting when printing multiple copies of a label or when using Fabric Iron On Tapes or other special tapes that cannot be cut by the tape cutter of the P touch labeler Feed the tape before using the cutter Otherwise a part of the text may be cut off Do not try to pull the tape since this may damage the tape cassette When using the special tapes that cannot be cut by t...

Page 39: ...djusting the Label Length When the tape cassette comes to the end the printed length may be less accurate In this case you can adjust the label length NOTE Approximately 1 of the total label length will be adjusted by 1 level Special tape Select this setting when using special tape When using Fabric Iron On Tapes or Heat Shrink Tube set Special tape for Cut Option before printing After printing re...

Page 40: ... Only 0 47 12 mm or 0 70 18 mm tape can be used for Label Collection Label Collection List Î Label Collection Î or Î Select a category Î or Î Select a label Î or Î Language Î or Î English USA French Canada Portuguese Brazil Spanish USA Î or Î Check the label image Î or Î Print Î or Î Select the number of copies Î or Category Label Files Office signage Communication ...

Page 41: ...wnloading a new Label Collection Category Using the P touch Update Software additional label collection categories can be downloaded to your labeler To download the new label collection categories please visit the Brother Solutions Center at http support brother com Attention Retail Category Label ...

Page 42: ... the message Discard changes and open saved label appears you have entered text on the text entry screen Press or to clear the entered text and open the saved label Press to cancel opening a saved label and return to the previous screen Delete NOTE To delete a saved label from the file select screen select a label using or and then press Type text and format label Î Î Select a file Î or Î File Î o...

Page 43: ...gs and saved label files are cleared when you reset the P touch labeler Language and unit settings will also be cleared You are asked to set the default language at the end of the resetting procedure For details refer to Setting Language and Unit on page 11 Î Settings Î or Î Reset Î or Î Select the resetting method Î or Î A confirmation message appears Î or Value Details Reset All Settings Downloa...

Page 44: ...t reset Turn off the P touch labeler Press and hold down and While holding down and press once and then release and NOTE Release before releasing the other keys Maintenance NOTE Always remove the batteries and disconnect the AC adapter before cleaning the P touch labeler Cleaning the Unit Wipe any dust and marks from the main unit using a soft dry cloth Use a slightly dampened cloth on difficult t...

Page 45: ... Tape adhesive can build up on the cutter blade after repeated use taking the edge off the blade which may result in the tape jamming in the cutter NOTE Do not touch the print head directly with your bare hands Refer to the instructions provided with the print head cleaning cassette for directions on how to use it NOTE About once every year wipe the cutter blade using a cotton swab moistened with ...

Page 46: ...pe is bent cut off the bent section and thread the tape through the tape exit slot If the tape is jammed remove the tape cassette and then pull out the jammed tape and cut it Check that the end of the tape passes through the tape guide before reinstalling the tape cassette The label is not printed correctly Remove the tape cassette and reinstall it pressing it firmly until it clicks into place If ...

Page 47: ...ion Message Cause Remedy Check of digits entered The number of digits entered in the bar code data does not match the number of digits set in the bar code parameters Enter the correct number of digits Cutter Malfunction The tape cutter has been closed when you tried to print or feed tape Turn the P touch labeler off and then on again before continuing When tape is tangled in the cutter remove the ...

Page 48: ...tions Tape cassette Standard TZe tape cassette 0 13 0 23 0 35 0 47 0 70 3 5 mm 6 mm 9 mm 12 mm 18 mm widths No of lines 0 70 18 mm tape 1 5 lines 0 47 12 mm tape 1 3 lines 0 35 9 mm tape 1 2 lines 0 23 6 mm tape 1 2 lines 0 13 3 5 mm tape 1 line Memory buffer size Maximum 2 800 characters File storage Maximum 50 files Auto Power off Battery 5 min 3 AC adapter 8 hours Operation temperature humidity...

Page 49: ...re 64 bit Windows 8 Windows 8 1 1 GB or more 32 bit or 2 GB or more 64 bit Macintosh OS X v10 7 5 2 GB or more OS X v10 8 x 2 GB or more OS X v10 9 x 2 GB or more Monitor Windows SVGA high color or higher graphics card Macintosh 256 colors or more Should you encounter any problems with your product please do not return your product to the store After referring to the User s guide if you still need...

Page 50: ...Printed in China LAF394001A ...

Reviews: