background image

10

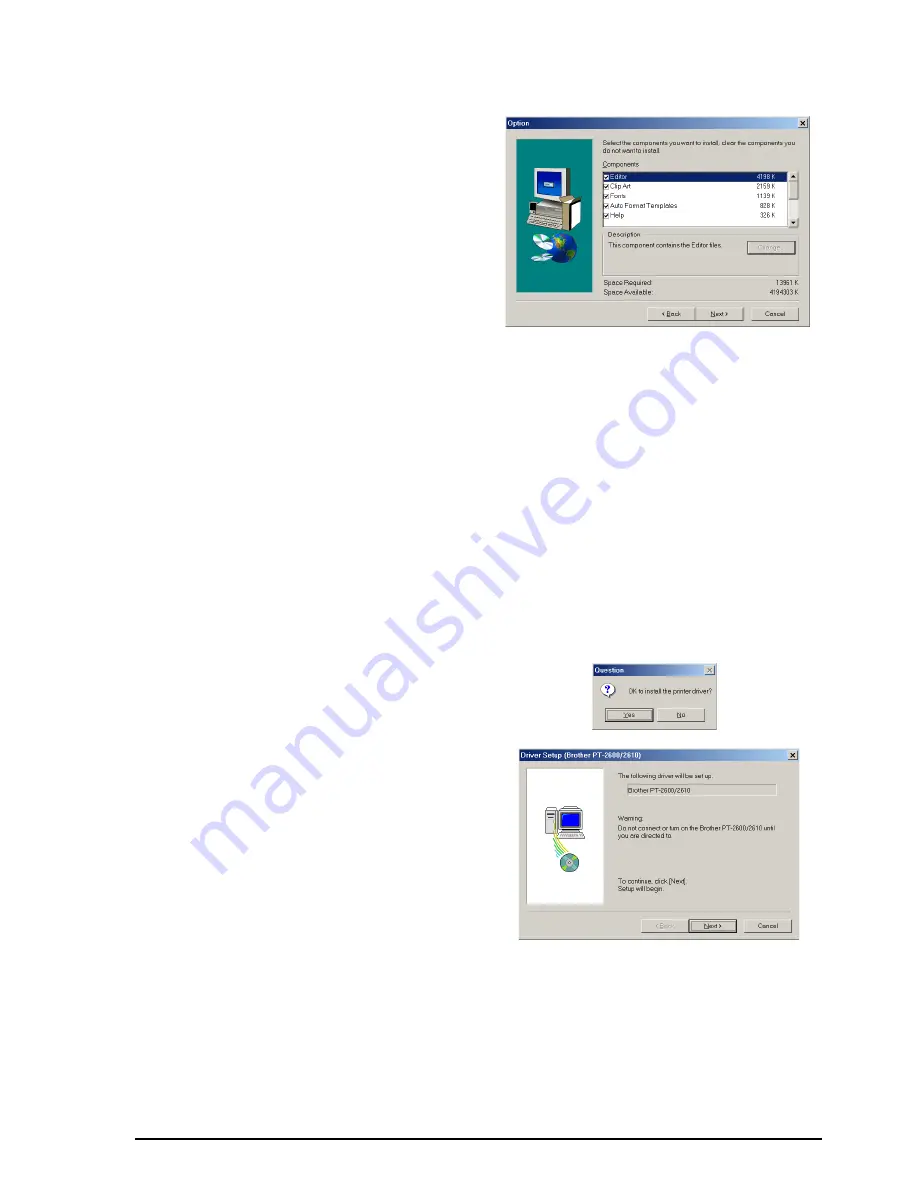
•For a Custom installation

Selecting “Custom”, then clicking the Next
button displays a dialog box that allows you
to select which options to install. Only the
options with a check mark beside them will
be installed. In addition to the basic options
listed for a Typical installation, the User’s
Guide can also be installed.
1) Select which options to install.

Editor:

 P-touch Editor 3.2 software

Clip Art:

 Illustrations for the P-touch Edi-

tor 3.2 Clip Art function

Fonts
Auto Format Templates:

 Templates for the Auto Format function

Help:

 Help files for P-touch Editor 3.2

User’s Guide: 

HTML User’s Guide for the P-touch Editor 3.2 (The User’s Guide can

also be viewed from the CD-ROM.)
If the Change button can be clicked while an option is selected, sub-components can
be selected. Click the Change button to display the Select Sub-components dialog
box, and then select the sub-components that you wish to install by putting a check
mark beside them. If certain options or sub-components are not installed, some P-
touch Editor functions may not be available. After selecting the desired sub-compo-
nents, click the Continue button.

2) Click the Next button to begin installation.

7

After P-touch Editor is installed, a dialog box
appears, allowing you to select whether or
not to install the printer driver.

To install the printer driver, click the Yes but-
ton. The first Driver Setup dialog box
appears, informing you that the PT-2600/
2610 printer driver will be installed.
Continue with the procedure in 

INSTALLING

THE PRINTER DRIVER

 on page 13.

Summary of Contents for P-touch PT-2600

Page 1: ...tart using your P touch Keep this User s Guide in a handy place for future reference Antes de usar su equipo por primera vez lea cuidadosamente esta guía de usuario Guarde esta guía de usuario para futuras referencias USER S GUIDE GUÍA DE USUARIO ...

Page 2: ...inter P touch 2600 2610 Model Number PT 2600 2610 complies with Part 15 of the FCC Rules Operation is subject to the following two condi tions 1 thisdevice may not cause harmful interference and 2 this device must accept any interference received including interference that may cause undesired operation This equipment has been tested and found to comply with the limits for a Class B digital device...

Page 3: ... INSTALLING THE SOFTWARE AND PRINTER DRIVER 7 READING THE USER S GUIDE 29 USING P TOUCH EDITOR 3 2 30 USING THE P TOUCH QUICK EDITOR 33 UNINSTALLING THE SOFTWARE PRINTER DRIVER 38 ATTACHING LABELS 41 PRINT HEAD ROLLERS 42 For Your Information POWER KEY 43 CURSOR KEYS 43 CODE ALT SHIFT KEYS 44 SPACE KEY 47 RETURN KEY 47 NEW BLOCK KEY 49 TAB FUNCTION 50 DELETE KEY 52 LINE OUT FUNCTION 52 CLEAR FUNCT...

Page 4: ...ORIZONTAL ALIGNMENT FUNCTION 85 MIRROR PRINTING FUNCTION 86 LENGTH FUNCTION 87 BARCODE FUNCTION 88 TZ CUT FUNCTION 92 PRINT KEY 93 FEED CUT FUNCTION 93 NUMBERING FUNCTION 94 REPEAT PRINTING FUNCTION 97 MEMORY FUNCTIONS 99 TROUBLESHOOTING 107 ERROR MESSAGE LIST 108 SPECIFICATIONS 113 ACCESSORIES For USA Only 115 INDEX 118 PT 2600 2610 CONTACT INFORMATION For USA Only 120 ...

Page 5: ... Accessory Items that expired in accordance with a rated life and 5 Problems arising from other than defects in materials or workmanship This limited warranty is VOID if this Product has been altered or modified in any way including but not limited to attempted warranty repair without authorization from Brother and or alteration removal of the serial number What to do if you think your Product is ...

Page 6: ...i you do not return your original Product to Brother within five 5 business days ii the problems of your original Product are not covered by the limited warranty iii the proper packaging instructions are not followed and has caused damage to the product or iv the warranty period on your original Product has expired or has not been sufficiently validated with a copy of the proof of purchase bill of...

Page 7: ...ccessories www brothermall com or 888 879 3232 BROTHER INTERNATIONAL CORPORATION 100 SOMERSET CORPORATE BLVD BRIDGEWATER NEW JERSEY 08807 0911 Please record your model and serial number and your date and location of Purchase below for your records Keep this information with your proof of purchase bill of sale in case your Product requires service Model Serial Date of purchase Store where purchased...

Page 8: ...1 TOP VIEW BOTTOM VIEW Getting Started GENERAL DESCRIPTION Tape compartment cover LCD display Keyboard AC adapter connector USB port Tape exit slot Battery compartment cover ...

Page 9: ...2 KEYBOARD LCD DISPLAY Power key Cursor keys Delete key Return key ...

Page 10: ...ove the bat teries to prevent them from leaking and damaging the machine When the AC adapter is connected unplugging the adapter from the electrical outlet before unplug ging it from the machine can delete all text files in the memory even if batteries are installed Use eight AA alkaline batteries in this machine If the batteries are not installed with their positive and negative poles pointing in...

Page 11: ...oles pointing in the correct direction the batteries may leak overheat or burst or the print head may overheat The AC adapter model AD 60 allows you to use this machine wherever there is an electrical outlet To connect the optional AC adapter 1 Insert the plug on the adapter cord into the connector marked DC IN 9 5V on the right side of the machine 2 Insert the plug on the adapter into the nearest...

Page 12: ...assette until there is no slack in the ribbon Also make sure that the end of the tape feeds under the tape guides for TZ tape only For stamp and AV label cassettes the tightening of the ink ribbon does not apply since they are not equipped with ink ribbons If you are using a new tape cassette provided with a stopper be sure to remove the stopper 4 Insert the tape cassette firmly into the tape comp...

Page 13: ...puter when you are instructed to do so Only use the enclosed USB interface cable to connect the PT 2600 2610 to the com puter To connect the P touch to the computer 1 Insert the flat A connector on the USB cable into the USB port on the computer 2 Insert the square B connector on the USB cable into the USB port on the right side of the P touch 3 Turn on the P touch When making a USB connection thr...

Page 14: ...ompatible with the Windows 2000 Server operating system With Windows XP printing and installation is only possible from an account with administrator privileges These operations cannot be performed from an account with limited privileges Hard disk free space At least 20 MB 100 MB to install full option Up to 100 MB of hard disk free space may be needed when printing long labels or large amounts of...

Page 15: ...Setup exe to dis play the dialog box 2 Click the upper button P touch Editor The InstallShield Wizard for installing the P touch Editor software starts up and then the Welcome dialog box appears To install just the printer driver click the lower button Driver The first Driver Setup dialog box appears informing you that the PT 2600 2610 printer driver will be installed Con tinue with the procedure ...

Page 16: ...ation of the entered information 5 Click the Yes button to register the entered information To change the registration information click the No button and then return to step 4 The Setup Type dialog box appears 6 Select the installation method and then click the Next button For a Typical or Compact installation Selecting Typical or Compact then clicking the Next button immediately starts installat...

Page 17: ...from the CD ROM If the Change button can be clicked while an option is selected sub components can be selected Click the Change button to display the Select Sub components dialog box and then select the sub components that you wish to install by putting a check mark beside them If certain options or sub components are not installed some P touch Editor functions may not be available After selecting...

Page 18: ...mputer before installing the software otherwise it may not be installed correctly Be sure to connect the P touch 2600 2610 only when you are instructed to do so 1 Insert the enclosed CD ROM into the com puter s CD ROM drive A dialog box auto matically appears allowing you to select what to install If the dialog box does not automatically appear double click My Computer on the desktop and then doub...

Page 19: ...SOFTWARE on page 7 3 Carefully read the contents of the Welcome dialog box and then click the Next button to continue The User Information dialog box appears 4 Type the necessary information into the appropriate boxes If the information has already been registered in Windows it will automatically appear and then click the Next button A dialog box appears asking for confirmation of the entered info...

Page 20: ...iver will be installed Continue with the procedure in INSTALLING THE PRINTER DRIVER on page 13 If the printer driver is already installed click the No button A dialog box appears explaining that installation is finished Select Yes I want to restart my computer now click the Finish button to restart the computer and then remove the CD ROM from the CD ROM drive INSTALLING THE PRINTER DRIVER With Plu...

Page 21: ... dialog box appears indicating that the printer driver has been installed 3 Click the Finish button A dialog box appears indicating that the installation is fin ished 4 Select Yes I want to restart my computer now click the Finish button to restart the computer and then remove the CD ROM from the computer 1 In the dialog box that appears informing you that the PT 2600 2610 printer driver will be i...

Page 22: ...mmended and then click the Next button A dialog box appears warning that the software has not passed Windows Logo testing 4 Click the Continue Anyway button to con tinue with the installation A Found New Hardware Wizard dialog box appears indi cating that the Found New Hardware Wizard has finished installing the software for the PT 2600 2610 5 Click the Finish button A Driver Setup dialog box appe...

Page 23: ... s CD ROM drive A dialog box auto matically appears allowing you to select what to install If the dialog box does not automatically appear double click My Computer on the desktop and then double click the CD ROM drive containing the CD ROM For Windows XP click My Computer in the Start menu and then double click the CD ROM drive containing the CD ROM Next double click Setup exe to display the dialo...

Page 24: ...the same computer To delete the printer driver follow with the procedure in UNINSTALLING THE PRINTER DRIVER on page 38 5 A dialog box appears instructing you to con nect the P touch 2600 2610 to the computer 6 Connect the P touch 2600 2610 to the com puter using a USB interface cable as described on page 6 and then turn on the P touch 2600 2610 A dialog box appears indicating that the printer driv...

Page 25: ...ning that the software has not passed Windows Logo testing 8 Click the Continue Anyway button to con tinue with the installation A Found New Hardware Wizard dialog box appears indi cating that the Found New Hardware Wizard has finished installing the software for the PT 2600 2610 9 Click the Finish button A Driver Setup dialog box appears indicating that the printer driver has been installed 0 Sel...

Page 26: ...B of available RAM USB port installed as standard equipment CD ROM drive The application is supplied on a CD ROM therefore the computer should be equipped with a CD ROM drive INSTALLING THE P TOUCH EDITOR 3 2 SOFTWARE The P touch Editor 3 2 software includes a variety of more complex functions for printing bar codes and images enabling you to design just about any label that you can image Install ...

Page 27: ...space is needed If enough hard disk space is available click the Install button For a custom installation Clicking the Custom Install button dis plays a dialog box that allows you to select which options to install Only the options with a check mark beside them are installed Select the options that you wish to install and then click the Install button In order to print from the P touch 2600 2610 P...

Page 28: ...nterface cable as described on page 6 Be sure to leave the P touch turned off 2 Turn on the Macintosh 3 Insert the enclosed CD ROM into the com puter s CD ROM drive 4 Double click the Mac OS X folder to open it 5 Double click the P touch Editor 3 2 folder to open it 6 Double click the P touch Editor 3 2 Installer icon in the folder that appears The installer starts up and then the Intro duction di...

Page 29: ... list and then click the Next button to start installing just the P touch Editor 3 2 application If certain options such as the Auto Format Templates and the Clip Art are not installed some P touch Edi tor functions may not be available For a custom installation Select Custom from the Feature Set list to display the list of options that can be selected for installation Only the options with a chec...

Page 30: ...r INSTALLING THE P TOUCH QUICK EDITOR SOFTWARE The P touch Quick Editor software provides quick access to the more simple label designing features for easy text input and instant printing of labels Install the P touch Quick Editor soft ware onto a Macintosh as described below 1 With the P touch 2600 2610 and the Macintosh turned off connect the P touch to the computer using the enclosed USB interf...

Page 31: ...k the Install button For a custom installation Clicking the Custom Install button dis plays a dialog box that allows you to select which options to install Only the options with a check mark beside them are installed Select the options that you wish to install and then click the Install button In order to print from the P touch 2600 2610 PT 2600 2610 Driver must be selected for installation 7 When...

Page 32: ...P touch turned off 2 Turn on the Macintosh 3 Insert the enclosed CD ROM into the com puter s CD ROM drive 4 Double click the Mac OS X folder to open it 5 Double click the P touch Quick Editor folder to open it 6 Double click the Quick Editor Installer icon in the folder that appears The installer starts up and then the Introduc tion dialog box appears With Mac OS X 10 1 or later ...

Page 33: ...n will be per formed as desired and then click the Install button After P touch Quick Editor is installed a dialog box appears indicating that the installation is finished 0 Click the Done button and then restart the computer INSTALLING THE PT 2600 2610 PRINTER DRIVER MAC OS X 10 1 OR LATER 1 With the P touch 2600 2610 and the Macintosh turned off connect the P touch to the computer using the encl...

Page 34: ...4 Double click the Mac OS X folder to open it 5 Double click the Driver Installer icon in the folder that appears The installer starts up and then the Introduction dialog box appears 6 Click the Next button A dialog box appears allowing you to check the instal lation ...

Page 35: ...t Chooser to display the Chooser window 3 In the list on the left click the PT 2600 2610 icon Then select the appropriate printer from the list on the right 4 Close the Chooser window to confirm your settings 1 Turn on the P touch 2600 2610 2 Double click the Applications folder on the Macintosh HD to open it 3 Double click the Utilities folder to open it 4 Double click Print Center to start it up...

Page 36: ... read it On an IBM PC Compatible Computer From the CD ROM 1 Start up Windows Explorer 2 Select the CD ROM drive 3 Double click the Ptouch folder 4 Double click the Manual folder 5 Double click Main htm With the Start button 1 Click the Start button in the taskbar to display the Start menu 2 Point to Programs 3 Point to P touch Editor 3 2 4 Click The User s Guide P touch Editor 3 2 On a Macintosh C...

Page 37: ...grams 3 Select P touch Editor 3 2 4 Click P touch Editor 3 2 With Windows Explorer 1 Start up Windows Explorer 2 Select the drive and directory where P touch Editor is installed 3 Double click Ptedit3 exe When P touch Editor is started the following window is displayed On an IBM PC compatible computer USING P TOUCH EDITOR 3 2 Title bar Rulers Cursor Menu bar Standard toolbar Property dock Layout a...

Page 38: ...he following explanations are for Windows 98 98 SE and Me the operations for Windows 2000 and XP and Macintosh are the same unless specifically mentioned The desired Properties can be displayed by clicking the icon in the property dock On a Macintosh computer Status bar Menu bar Layout area Draw toolbar Print area Database toolbar Property dock Object dock Print toolbar Title bar Rulers Page Prope...

Page 39: ...xt button on the draw toolbar Text can be typed in and the pointer changes from selection pointer to I beam pointer 2 Move the I beam pointer to the position in the layout area where you wish to type in text and then click the left mouse button 3 The cursor flashes in the layout area to indi cate that you can now type in text 4 Use the computer keyboard to type in the text Click this button to hid...

Page 40: ...details refer to the User s Guide supplied on the P touch Editor 3 2 CD ROM The database function of P touch Editor 3 2 Windows version uses database files that are compatible with Microsoft Access 97 By upgrading P touch Editor 3 2 using a program available on the CD ROM P touch Editor will become compatible with Access 2000 Refer to the Readme file located at Ptouch Editor Ac2k on the CD ROM and...

Page 41: ...ay the Start menu 2 Select Programs 3 Click P touch Quick Editor When P touch Quick Editor is started the following window is displayed P touch Quick Editor can be hidden or displayed by clicking its icon in the system tray at the right of the taskbar Double click the P touch Quick Editor icon in the P touch Quick Editor folder installed on the computer When the P touch Quick Editor is started the...

Page 42: ... the label view until the layout is the desired size AV Label Three preset label formats for AV labels are available allowing you to easily create address or file folder labels by simply selecting the format then entering the text ENTERING TEXT The entire text can quickly be formatted by specifying the font size style and alignment In addition a frame can be drawn around the text 1 Click the arrow...

Page 43: ...t Symbols in the menu that appears and then click Insert Change The Input Symbol dialog box appears Macintosh Hold down the Control key and click in the label view or text box select Symbol font in the menu that appears and then click Import Change A dialog box dis playing symbols appears 2 In the Symbol Font list select the desired symbol font 3 In the Symbol List view select the desired symbol 4...

Page 44: ...you to print the text in reverse so it s perfect for attaching to the inside of windows for TZ tape only Copies This option allows you to enter the number of copies to be printed 4 Windows Click the OK button to start printing Macintosh Click the Print button The layout is printed If you want to start printing without changing the print options simply click the Print button or click the arrow besi...

Page 45: ...ge Remove button in Win dows XP 5 A message appears asking if you wish to delete the selected application Click the Yes button to delete the application If you do not wish to delete the application click the No button 6 In the dialog box that appears indicating that the application is deleted click the OK but ton UNINSTALLING THE PRINTER DRIVER Uninstall the PT 2600 2610 printer driver from a PC a...

Page 46: ...then click the Finish button On a Macintosh Computer Uninstall the P touch Editor 3 2 software the P touch Quick Editor software or the PT 2600 2610 printer driver from a Macintosh as described below Before deleting the printer driver be sure that the P touch is turned off and disconnected from the computer 1 Drag the following to the Trash icon P touch Editor 3 2 folder to delete the P touch Edit...

Page 47: ... that appears The uninstaller starts up 5 Click the Uninstall button After P touch Editor 3 2 is removed a dialog box appears indicating that the uninstallation is finished 6 Click the Quit button To uninstall the P touch Quick Editor software 1 Double click the Applications folder on the Macintosh HD to open it 2 Double click the P touch Quick Editor folder to open it 3 Double click the Uninstall...

Page 48: ... ironed garment at the location where you wish to attach it in such a way that the printed text can be read correctly Cover the label with another piece of cloth and use an iron set to a medium high temperature 320 to 356 F 160 to 180 C and press down firmly for 15 to 30 seconds For more details refer to the instructions included with the fabric tape cassette STAMP TAPE Refer to pages 71 through 7...

Page 49: ...remove the tape cassette if one is installed The print head and rollers are located in the tape compartment 3 Print head Use a dry cotton swab to gently wipe the print head with an up and down motion Rollers Use a dry cotton swab to wipe each roller with an up and down motion while rotating them with your finger 4 Install a tape cassette close the tape compartment cover and then try printing again...

Page 50: ...ne Press o The current session s information is stored in the internal memory The machine s LCD display shows two rows of 9 characters however the text that you enter can be up to 272 characters long and contain up to 5 text blocks with up to 7 text lines each You can review and edit different parts of the text by moving the cursor backward and forward LEFT CURSOR KEY To move the cursor one charac...

Page 51: ...r up to the previous line Press e once If the cursor is in the first line of text it will move to the beginning of the line To move the cursor up several lines Hold down e until the cursor moves to the desired line To move the cursor to the beginning of the entire text Hold down c and press e DOWN CURSOR KEY To move the cursor down to the following line Press h once If the cursor is in the last li...

Page 52: ...the right hand side of the keys Hold down a and press the key of the desired character written in color The Alt indi cator on the left side of the display comes on while a is held down EXAMPLE To start the Symbol function Hold down c and press a once To type in Hold down a and press once The Alt indicator comes on while a is held down 1 D A N G E R _ Ü 1 0 1 2 _ 1 0 1 2 _ Alt ...

Page 53: ...mode is similar to holding down s It allows you to type capital letters continu ously To type in many capital letters 1 Hold down c and press s The Caps indicator on the left side of the display comes on 2 Press the keys of the desired letters or symbols 3 To exit Caps mode hold down c and press s The Caps indicator goes off To type in Hold down s and press 5 1 5 _ 1 5 _ 1 _ Caps ...

Page 54: ...rd processor this machine s Return key _ is used to end a line of text and start another one When you have finished entering one line press the Return key to make a new line and move the cursor to it The text can only contain a maximum of seven lines If you press _ when seven text lines already exist the error message 7 LINE LIMIT will appear To add a space Press r SPACE KEY TZ Tape AV Label 1 J _...

Page 55: ...nswering yes To answer no press Refer to DELETE KEY on page 52 To add a new line Press _ The return mark appears to indicate the end of the line To select an item from a list Press _ To answer yes Press _ Tape widths Maximum number of lines that can be printed 1 4 6 mm 2 3 8 9 mm 2 1 2 12 mm 3 3 4 18 mm 5 1 24 mm 7 Stamp 3 4 18 mm 3 Stamp 1 24 mm 5 Label sizes Maximum number of lines that can be p...

Page 56: ...ed in the fifth block when c is held down and _ is pressed the error message 5 BLOCK LIMIT appears If the cursor is positioned in the middle of a text block when c is held down and _ is pressed the block splits into two and the character to the left of the cursor s current position becomes the end of the block To add a new block Hold down c and press _ once The new block mark appears in the text t...

Page 57: ...ars To set the tab length 1 Hold down c and press W once The current tab length is displayed 2 Press e or h until the desired length is displayed or use the number keys to type in the length To change the units inches or centimeters used to display the tab lengths press M until the desired units are displayed 3 Press _ To add a tab Hold down c and press Q once The tab mark appears in the text to i...

Page 58: ...t the tab length to 1 1 Hold down c and press W once 2 Press h until 1 0 is displayed 3 Press _ To add a tab Hold down c and press Q once Margin Tab 1 2 3 0 cm Tab 1 2 3 0 cm Margin 2 0 i n c h T A B L E N G T H 1 O i n c h T A B L E N G T H 1 a r t N O _ ...

Page 59: ... on page 47 To delete one character 1 Press f w e or h to position the cursor below the character immediately to the right of the character that you wish to delete 2 Press once To delete a sequence of characters 1 Press f w e or h to position the cursor below the character immediately to the right of the last character that you wish to delete 2 Hold down until all of the characters that you wish t...

Page 60: ...TZ tape only Alignment Tab length Mirror printing for TZ tape only and Length for TZ tape only are returned to their default settings or whether just the text is erased To delete all of the text and return all formats to their default settings 1 Hold down c and press 2 Press e or h until TXT FORMAT is selected flashing To return to the text without erasing anything press 3 Press _ To delete 012 34...

Page 61: ...to the text without erasing anything press 3 Press _ EXAMPLE To clear the text and formats 1 Hold down c and press 2 Press e until TXT FORMAT is flashing 3 Press _ To clear just the text 2 3 4 5 6 7 8 9 _ 1 G a r d e n T E X T O N L Y T X T F O R M A T T E X T O N L Y T X T F O R M A T 1 _ 2 3 4 5 6 7 8 9 _ 1 G a r d e n ...

Page 62: ...er that they are com bined with The following accented characters are available 1 Hold down c and press 2 Press h until TEXT ONLY is flashing 3 Press _ Letters Accented characters Letters Accented characters A À Á Ä Â Ã Æ i í ï î a à á ä â ã æ N Ñ C Ç n ñ c ç O Ó Ö Ô Õ E È É Ë Ê E o ó ö ô õ e è é ë ê e U Ù Ú Ü Û I Í Ï Î u ù ú ü û T E X T O N L Y T X T F O R M A T T E X T O N L Y T X T F O R M A T ...

Page 63: ... desired accented character appears enlarged within the frame in the middle of the display 4 Press _ The accented character is added to the text To type in a series of accented characters hold down c before pressing _ Then continue adding accented characters by selecting them as explained in steps 2 and 3 and holding down c while pressing _ Press just _ after selecting the last character in the se...

Page 64: ...ey tops there are 67 additional marks available with the Symbol function The following symbols are available 3 Press w until É appears in the frame 4 Press _ Group Symbol 1 Ü Æ æ Ã ã e Õ õ 2 2 3 2 3 4 3 4 5 6 É 1 R E S U M E _ SYMBOL FUNCTION TZ Tape AV Label E TM R C ...

Page 65: ... 3 Press _ The symbol is added to the text To type in a series of symbols hold down c before pressing _ Then con tinue adding symbols by selecting them as explained in step 2 and holding down c while pressing _ Press just _ after selecting the last symbol in the series EXAMPLE To add the symbol 1 Hold down c and press a 2 Press e or h until the row containing appears and then press f or w until ap...

Page 66: ...ressed or ADDRES1 if iwas pressed can be selected by pressing r The number of the auto format layout that was last used is underlined Selecting this layout displays the text that was entered in it at that time The label sizes are displayed in the currently selected unit of measurement inches or milli meters The unit of measurement can be changed with the Tab length or Length functions An auto form...

Page 67: ...ssette with the specified tape width must be installed To change the text entered in the layout A Press e or h until the EDIT MORE command is displayed B Press _ The first field for the selected layout appears in the display C Repeat step 4 until the text is edited as you wish The MENU appears again when _ is pressed after editing the last field in the layout To finish using the Auto Format functi...

Page 68: ... To change the character style of the label 5 Press e or h until CHNGE STL is displayed 6 Press _ 7 Press e or h until ELEGANT is displayed 8 Press _ F I L E S H O R T 3 5 1 2 2 9 _ 1 T I T L E P R I N T M E N U C H N G E S T L M E N U O R I G I N A L C H A R S T Y L E L E G A N T C H A R S T Y L P R I N T M E N U ...

Page 69: ...address label using a layout for AV labels 1 Press i 2 Press e or h until layout 4 ADDRES4 is displayed 3 Press _ 4 Type in Mr R Becker and then press _ 5 Type in 29 South Main St and then press _ 1 1 C O P I E S 1 A D D R E S 1 4 A D D R E S 4 1 N A M E 2 A D D R E S S 1 3 A D D R E S S 2 ...

Page 70: ...e or h until CHNGE STL is displayed 8 Press _ 9 Press e or h until FORMAL is displayed 0 Press _ To print the label A Make sure that PRINT is displayed and then press _ P R I N T M E N U C H N G E S T L M E N U O R I G I N A L C H A R S T Y L F O R M A L C H A R S T Y L P R I N T M E N U 1 1 C O P I E S ...

Page 71: ...R VHSC 2 3 4 3 2 18 mm 81 mm 11 SYMBOL 44 DURATION 22 TITLE 55 REC MODE 33 SUBTITLE 66 DATE 7 AUDIO 1 1 4 3 1 6 mm 80 mm 11 SYMBOL 33 SUBTITLE 22 TITLE 8 AUDIO 2 1 2 3 5 12 mm 89 mm 11 SYMBOL 33 SUBTITLE 22 TITLE 9 3 8 3 5 9 mm 89 mm 10 AUDIO 3 1 2 3 5 12 mm 89 mm 11 SYMBOL 32 TITLE 11 3 8 3 5 9 mm 89 mm 12 DAT 1 1 4 2 2 6 mm 56 mm 11 TITLE 22 SUBTITLE 13 DAT 2 3 8 3 3 9 mm 85 mm 11 SYMBOL 23 SUBT...

Page 72: ...mm 11 NAME 23 NEW PRICE 22 OLD PRICE 26 3 4 3 6 18 mm 92 mm 27 ORGANIZ L 1 3 2 24 mm 82 mm 11 NAME 34 ADDRESS2 22 COMPANY 45 ADDRESS3 33 ADDRESS1 28 ORGANIZ S 1 2 6 24 mm 65 mm 29 FILE LONG 1 7 2 24 mm 183 mm 11 TITLE 30 3 4 7 2 18 mm 183 mm 31 FILE LONGV 1 7 2 24 mm 183 mm 32 3 4 7 2 18 mm 183 mm 33 FILE SHORT 1 3 7 24 mm 94 mm 34 3 4 3 7 18 mm 94 mm 35 1 2 2 9 12 mm 74 mm 36 3 8 2 9 9 mm 74 mm 3...

Page 73: ...pe width label length Layout fields 1 ADDRES1 AV2067 Address labels 11 NAME 33 ADDRESS2 22 ADDRESS1 2 ADDRES2 3 ADDRES3 4 ADDRES4 5 ADDRES5 11 NAME 33 ADDRESS2 22 ADDRESS1 44 ADDRESS3 6 ADDRES6 7 ADDRES7 11 NAME 33 ADDRESS2 22 ADDRESS1 44 ADDRESS3 15 ADDRESS3 8 RETURN1 AV1957 Return address labels 11 NAME 33 ADDRESS2 22 ADDRESS1 9 RETURN2 10 RETURN3 11 NAME 33 ADDRESS2 22 ADDRESS1 44 ADDRESS3 11 R...

Page 74: ...2 3 VCR 8mm 1 4 VCR 8mm 2 5 VCR VHSC 1 6 VCR VHSC 2 7 AUDIO 1 8 AUDIO 2 9 AUDIO 2 10 AUDIO 3 11 AUDIO 3 12 DAT 1 13 DAT 2 14 MINI DISK1 15 MINI DISK2 16 NAME PLATE 17 NAME PLATE 18 ADDRESS 19 ADDRESS Layout samples for TZ tape ...

Page 75: ...IPMENT 21 EQUIPMENT 22 SLIDE 23 PRICE 24 PRICE 25 SALE PRICE 26 SALE PRICE 27 ORGANIZ L 28 ORGANIZ S 29 FILE LONG 30 FILE LONG 31 FILE LONGV 32 FILE LONGV 33 FILE SHORT 34 FILE SHORT 35 FILE SHORT 36 FILE SHORT ...

Page 76: ...OPPY 39 miniDV1 40 miniDV2 41 FREE FORM1 42 FREE FORM1 43 FREE FORM1 44 FREE FORM1 45 FREE FORM2 46 FREE FORM2 47 FREE FORM2 48 FREE FORM2 1 ADDRES1 2 ADDRES2 3 ADDRES3 4 ADDRES4 5 ADDRES5 6 ADDRES6 Layout samples for AV labels ...

Page 77: ...N2 3 RETURN3 4 RETURN4 1 FILING1 2 FILING2 3 FILING3 4 FILING4 CHAR STYLE setting Sample Font setting Style setting ORIGINAL Layout default ITALIC Layout default ITALIC DYNAMIC FONT 8 SOLID Character styles for TZ tape and AV labels ...

Page 78: ... 18 mm wide or large 1 24 mm wide stamp film cassette 2 Hold down c and press U once The message STAMP FORMAT appears in the display 3 Press _ The text is automatically formatted for the installed stamp centered within the preset message area with the tape length and margins automatically adjusted 4 Press p to cut the text out of the stamp stencil film 5 After the stamp stencil film is cut off rem...

Page 79: ...a stamp 5 Remove the stamp frame from around the stamp film holder ink pad one side at a time and then remove the protective seal covering the ink pad and the backing paper from the stamp stencil film 6 With the glossy side of the stamp stencil film upward align one of its ends with the slit on the side of the stamp film holder F O R M A T S T A M P 2 1 2 3 4 M a i n 1 J S m i t h 1 1 C O P I E S ...

Page 80: ... the other end of the stamp stencil film over the other side of the stamp film holder and hold it in place with your finger 9 Fit the stamp frame over the stamp stencil film and push it into place 0 Insert the stamp film holder straight into its cap Be sure that the stamp is correctly covered in order to prevent ink spills Guides Fold over ...

Page 81: ...erline or frame setting as described on pages 75 to 83 The selected setting will only be applied to the text block containing the cursor When selecting a format setting the current setting is displayed first When selecting a frame setting for local formatting only the square and rounded frames are available Since only one local format setting at a time can be applied to the text block repeat the a...

Page 82: ...e current font setting 2 Continue pressing k until the desired font setting is displayed 3 Press _ to apply the selected font setting to the text EXAMPLE 4 Continue pressing m until the I SHAD style set ting is displayed 5 Press _ HELSINKI BRUSSELS US FLORIDA BELGIUM SAN DIEGO LOS ANGELES ISTANBUL To select the FONT 2 font setting 1 Press k once I S H A D S T Y L E TZ Tape AV Label FONT FUNCTION 1...

Page 83: ... setting the machine compares your text with the width of the installed tape and automatically adjusts the characters to the largest possible size However seven other point sizes are also available and each can be printed with any of the three width settings 2 Continue pressing k until FONT 2 is displayed 3 Press _ Tape Widths Sizes in points 1 4 6 mm 6 9 12 3 8 9 mm 6 9 12 18 1 2 12 mm 6 9 12 18 ...

Page 84: ...text consisting of just one line of only uppercase letters and no accented characters will be printed with a character size slightly larger than the maximum character size possible for that label i e 62 points for AV2067 address labels and 48 points for AV1957 return address labels and AV1789 file folder labels To change the size setting 1 Press l once to display the current size setting 2 Continu...

Page 85: ... when a setting other than MEDIUM is selected 3 Press _ to apply the selected width setting to the text EXAMPLE To select the 24 point size setting 1 Press l once 2 Continue pressing l until 24 is displayed 3 Press _ To select the WIDE width setting 1 Press n once 2 Continue pressing n until WIDE is displayed 3 Press _ A U T O S I Z E 2 4 S I Z E M E D I U M W I D T H W I D E W I D T H ...

Page 86: ...e bottom of the display shows the current style setting when any setting other than NORMAL is selected Refer to Reference at the end of this section for samples of the available settings To change the style setting 1 Press m once to display the current style setting 2 Continue pressing m until the desired style setting is displayed The current style setting is shown by the style indicator at the b...

Page 87: ...Font Setting Style Setting NORMAL BOLD OUTLINE SOLID SHADOW ITALIC FONT 1 FONT 2 FONT 3 FONT 4 FONT 5 FONT 6 FONT 7 FONT 8 Font Setting Style Setting I BOLD I OUTL I SOLID I SHAD VERT FONT 1 FONT 2 FONT 3 FONT 4 FONT 5 FONT 6 ...

Page 88: ...n to display the cur rent underline setting 2 While still holding down c continue pressing 5 until the desired underline setting is displayed The Udl Frm indicator comes on when a setting other than OFF is selected 3 Release c to apply the selected underline setting to the text EXAMPLE FONT 7 FONT 8 UNDL ON1 UNDL ON2 To select the ON1 underline setting 1 While holding down c press 5 once and keep ...

Page 89: ...change the frame setting 1 While holding down c press 6 once and keep c held down to display the cur rent frame setting 2 While still holding down c continue pressing 6 until the desired frame setting is dis played The Udl Frm indicator comes on when any setting other than OFF is selected 3 Release c to apply the selected frame setting to the text EXAMPLE 2 While still holding down c continue pres...

Page 90: ...83 REFERENCE REFERENCE 2 While still holding down c continue pressing 6 until the candy frame is displayed 3 Release c ...

Page 91: ...plied to labels printed on TZ tape The tape margins of AV labels cannot be adjusted To change the tape margin setting 1 While holding down c press E once and keep c held down to display the cur rent tape margin setting 2 While still holding down c continue pressing E until the desired tape margin setting is displayed 3 Release c to apply the selected tape margin setting to the entire text EXAMPLE ...

Page 92: ...t printed on both TZ tape and AV labels To change the horizontal alignment setting 1 While holding down c press R once and keep c held down to display the cur rent horizontal alignment setting 2 While still holding down c continue pressing R until the desired horizontal align ment setting is displayed 3 Release c to apply the selected horizontal alignment setting to the entire text 2 While still h...

Page 93: ... While holding down c press p once and keep c held down to display the cur rent mirror printing setting 2 While still holding down c continue pressing p until the desired mirror printing set ting is displayed 3 Release c to apply the selected mirror printing setting to the entire text To select the RIGHT horizontal alignment setting 1 While holding down c press R once and keep c held down 2 While ...

Page 94: ...argins Then the display will show the cur rent label length setting ON or OFF 2 While still holding down c continue pressing T until the desired label length setting is displayed The Length indicator comes on when ON is selected 3 Release c If ON was selected the current label length setting is displayed 4 Press e or h to select the desired length or use the number keys to enter a length To change...

Page 95: ...books available Since this machine is not specifically designed for special barcode label making some barcode readers may not be able to read the labels Print barcodes with black ink on a white background To select a label length of 5 1 While holding down c press T once and keep c held down 2 While still holding down c continue pressing T until ON is displayed 3 Release c 4 Press e until 5 0 inch ...

Page 96: ...can only contain one barcode If a barcode has already been entered in the block when c is held down and Y is pressed the error message 1 BARCODE PER BLOCK appears To quit the Barcode function without making any changes hold down c and press Y 2 Type in the new barcode data or edit the old data To change the barcode parameter settings 3 Press e To return to the barcode data without changing any par...

Page 97: ... 2 VALUE SPECIAL CHARACTER VALUE SPECIAL CHARACTER VALUE SPECIAL CHARACTER 3 69 ENQ 87 ETB 4 70 ACK 88 CAN 11 71 BEL 89 EM 28 72 BS 90 SUB 29 73 HT 91 ESC 30 74 LF 91 32 75 VT 92 FS 59 76 FF 92 60 77 CR 93 GS 61 78 SO 93 62 79 SI 94 RS 63 _ 80 DLE 94 64 NUL 81 DC1 95 US 64 82 DC2 95 DEL 65 SOH 83 DC3 96 FNC 3 66 STX 84 DC4 97 FNC 2 67 ETX 85 NAK 100 FNC 4 68 EOT 86 SYN 102 FNC1 ...

Page 98: ... 1 Hold down c and press Y once 2 Press e 3 Press f or w until the CH DIG parameter is displayed 4 Press e or h until ON is displayed 5 Press _ 6 Press 1 2 3 then 4 7 Press _ C O D E 3 9 _ P R O T O C O L C O D E 3 9 C H D I G O F F O N C H D I G _ C O D E 3 9 _ C O D E 3 9 1 2 3 4 A ...

Page 99: ...with the Numbering func tion Repeat printing function or Memory print function you can choose whether to cut off each label after it is printed or cut off the string of labels only after they have all been printed To turn the TZ Cut function on or off 1 While holding down c press Z once and keep c held down to display the cur rent TZ cut setting 2 While still holding down c continue pressing Z unt...

Page 100: ...ed by the number of the label being printed is displayed If the selected character size is too large for the width of the installed tape cassette the message CHR SIZE AUTO appears To allow the text size to automatically be adjusted press p or _ To stop the text size from being changed press EXAMPLE The Feed Cut function is used to feed out 1 24 mm of TZ tape and automatically cut it off for exampl...

Page 101: ...d only the letters and numbers in the numbering field will be increased when the labels are printed or just one label will be printed if the field only contains a non alphanumeric character To use the Numbering function 1 Hold down c and press O The message START appears in the display To cancel the Numbering function at any time hold down c and press O or press just 2 Press f w e or h until the f...

Page 102: ... display Continue with step 8 to finish printing 8 Press e or h until the desired setting EACH LABEL or AFTER LAST is displayed If EACH LABEL is selected each label is cut off after it is printed If AFTER LAST is selected the string of labels are cut off only after they have all been printed 9 Press p or _ to begin printing the labels The number of the copy being printed is displayed EXAMPLE To pr...

Page 103: ...g example CUT MENU is set to EACH LABEL 6 Press p or _ If CUT MENU was set to AFTER LAST the string of three labels would not be cut off until after the last one is printed 2 3 C O P I E S 1 3 C O P I E S 3 3 C O P I E S E A C H L A B E L C U T M E N U 2 3 C O P I E S 1 3 C O P I E S 3 3 C O P I E S ...

Page 104: ...s displayed If the TZ Cut function is set to ON each TZ label is automatically cut off after it is printed This completes the procedure for TZ tapes disregard steps 4 and 5 AV Label CUT MENU appears in the display Continue with step 4 to finish printing 4 Press e or h until the desired setting EACH LABEL or AFTER LAST is displayed If EACH LABEL is selected each label is cut off after it is printed...

Page 105: ...d press I 2 Press 3 3 Press p or _ If TZ tape is being printed on If AV labels are being printed on In the following example CUT MENU is set to EACH LABEL 1 C O P I E S 3 C O P I E S 2 3 C O P I E S 1 3 C O P I E S 3 3 C O P I E S E A C H L A B E L C U T M E N U ...

Page 106: ...the originally stored file When a file is no longer needed or more space is necessary the Memory delete function can be used to delete it With the Memory print function either a single file or multiple files stored in the memory can be quickly selected for printing When inserting new batteries be sure to insert the new ones within five minutes of removing the old ones otherwise any text files stor...

Page 107: ...he message OVER WRITE appears in the display and you must decide whether or not to overwrite it delete it from the memory and store the new one If the maximum number of characters has already been stored the error message MEMORY FULL appears in the display If this occurs an existing text file must be deleted before the new one can be stored To overwrite the stored file with the new one Press _ to ...

Page 108: ...rmat function 2 Press e or h to select the file number containing the text that you wish to recall The text stored under the selected file number is shown To see other parts of the selected text file press f or w To display the text stored under other file numbers press e or h 3 Press _ Any text previously entered in the display is erased and the text stored under the selected file number is recal...

Page 109: ...u wish to delete The text stored under the selected file number is shown To see other parts of the selected text file press f or w To display the text stored under other file numbers press e or h 3 Press _ The message OK TO CLEAR appears To go back and select a different text file press 4 Press _ to delete the text file that was selected EXAMPLE To delete the text stored under file number 4 1 Hold...

Page 110: ... stored auto format layout files 1 Press i or j depending on the type of layout that you wish to print 2 Hold down c and press 0 The name of the layout appears in the top line of the dis play and the file number and beginning of the most recently stored or recalled text appear in the bottom line To quit the Memory print function without printing text hold down c and press 0 or press just 3 Press e...

Page 111: ...xt that you wish to print E Press r so that the file number flashes F Repeat steps D and E until the file numbers for all files that you wish to print are flashing G Press _ MENU appears in the display H Make sure that PRINT is flashing and then press _ All of the selected files are printed To finish printing stored files I Press e or h until the EXIT command is displayed J Press _ EXAMPLE To prin...

Page 112: ...old down c and press 0 3 Since this is one of the files that we wish to print press r 4 Press e or h until file number 3 is dis played P R I N T 2 R B E C K 2 2 C O P I E S 1 2 C O P I E S 4 A D D R E S 4 0 R B e c k A D D R E S S 4 P R I N T 0 R B e c k A D D R E S S 4 3 B R e y n A D D R E S S 1 ...

Page 113: ...106 5 Press r 6 Press _ 7 Press _ 3 B R e y n A D D R E S S 1 P R I N T M E N U 2 2 C O P I E S 1 2 C O P I E S ...

Page 114: ...ed 3 The text files that you stored in the mem ory are no longer there If the batteries are low replace them with new ones 4 The printed characters are not formed properly If you are using alkaline batteries they may be low Try using the AC adapter or replace the batteries with new ones 5 A blank horizontal line appears through the printed label Clean the print head as explained on page 42 6 Strip...

Page 115: ...S WEAK This message appears when the installed alkaline batteries become weak Replace the batteries or use the AC adapter BUFFER EMPTY This message appears if you hold down c and press T but no text has been entered in the dis play Enter some text before starting this function This message appears if you try to print but no text has been entered in the display Enter text before printing BUFFER FUL...

Page 116: ...f the tape cut ter is closed when you try to print or feed the tape Turn the P touch off then on again EEPROM ERROR This message appears if a checksum error occurred when the P touch was turned on or if the keyword was dam aged and failed to initialize Contact your service representa tive FEED ERROR This message appears if the AV label sensor cannot detect the labels Replace the AV label cassette ...

Page 117: ...he text to less than 3 3 1 3 1 meter before trying to print This message appears if the Length function is used to set a label length that is less than 1 6 4 0 cm or more than 11 8 30 0 cm Set the label length between 1 6 4 0 cm and 11 8 30 0 cm This message appears if the Tab Length function is used to set a tab length that is more than 11 8 30 0 cm Set the tab length so that it is less than 11 8...

Page 118: ...hen an auto format layout for a 1 24 mm wide tape is selected Install a 1 24 mm wide tape cassette SET 3 4 TAPE SET 18mm TAPE This message appears if an 3 4 18 mm wide tape cassette is not installed when an auto format layout for an 3 4 18 mm wide tape is selected Install an 3 4 18 mm wide tape cassette SET 1 2 TAPE SET 12mm TAPE This message appears if a 1 2 12 mm wide tape cassette is not instal...

Page 119: ... cassette is not installed when an AV1789 File folder label lay out of the Auto Format function is selected Install an AV1789 File folder label cassette TAB LIMIT This message appears if the maximum number of tabs has already been added to the text when you hold down c and press Q Reduce the number of tabs in the text TEXT TOO HIGH This message appears if the size of the text is larger than the wi...

Page 120: ...lowing three types AV2067 Address labels 3 4 2 5 8 20 mm 67 mm AV1957 Return address labels 3 4 2 1 4 19 mm 57 mm AV1789 File folder labels 5 8 3 1 2 17 mm 89 mm Power Supply Eight AA alkaline batteries AM3 LR6 or optional AC adapter model AD 60 input AC 120V 60Hz Auto power off if no key is pressed for 5 minutes Print Head 128 dot 180 dpi Dimensions 7 2 3 W 9 1 2 D 2 2 3 H 194 242 66 mm Weight 1 ...

Page 121: ...even lines Maximum five blocks Memory Size Approx 4 000 characters Character Size For TZ tapes Seven sizes 6 9 12 18 24 36 and 48 points 62 point one line of only capital letters on 1 24 mm wide tape For AV labels Seven sizes 6 9 12 18 24 36 and 48 points 62 point one line of only capital letters on AV2067 address labels All are available in narrow medium and wide widths Availability depends on ta...

Page 122: ...e 1 26 99 TZ 355 White characters on black adhesive 1 26 99 TZ B51 Black characters on fluorescent orange adhesive 1 28 99 TZ S151 Industrial strong adhesive black characters on clear adhesive 1 25 99 TZ S251 Industrial strong adhesive black characters on white adhesive 1 25 99 3 4 18 mm wide laminated tapes TZ 141 Black characters on clear adhesive 1 18 99 TZ 145 White characters on clear adhesiv...

Page 123: ...adhesive 1 18 99 TZ S231 Industrial strong adhesive black characters on white adhesive 1 18 99 3 8 9 mm wide laminated tapes TZ 121 Black characters on clear adhesive 1 14 99 TZ 221 Black characters on white adhesive 1 16 99 TZ 325 White characters on black adhesive 1 18 99 TZ 421 Black characters on red adhesive 1 16 99 TZ S121 Industrial strong adhesive black characters on clear adhesive 1 17 99...

Page 124: ... 99 SH MB Additional 3 4 Black Pre Inked Stamp Holder 1 24 99 Stock No Description Qty Package Price TZ CL4 3 4 Cleaning tape 1 20 99 AD 60 AC Adapter 1 24 99 6994 Protective carrying case 1 29 99 Stock No Description Qty Package Price AV2067 Address labels 3 4 2 5 8 20 mm 67 mm 1 11 99 AV1957 Return address labels 3 4 2 1 4 19 mm 57 mm 1 11 99 AV1789 File folder labels 5 8 3 1 2 17 mm 89 mm 1 11 ...

Page 125: ...de key 45 Computer connection 6 Confirming a command 48 Cursor keys 43 D Deleting characters 52 text and formats 53 text lines 52 text only 54 Deleting stored files 102 E Entering accented characters 45 55 capital letters 46 spaces 47 symbols 45 46 57 tabs 50 Error messages 108 F Fabric tape 41 Feeding cutting 93 Fonts 75 Frames 82 I Incrementing 94 K Keyboard 2 L Label length 87 Laminated tape 41...

Page 126: ...g function 97 Return key 47 S Shift key 46 Size 77 Spaces 47 Specifications 113 Stamp tape 41 Stamps 71 Storing files 99 Style 79 Symbols 57 T Tab length 50 Tabs 50 Tape cassettes 5 Tape length 87 Text alignment 85 framing 82 margins 84 size 77 style 79 underlining 81 width 78 Text blocks 49 Text lines 47 Troubleshooting 107 U Underlining 81 Uppercase letters 46 W Width 78 ...

Page 127: ...terCard Discover or American Express you may call toll tree 1 888 879 3232 or complete the order form in your user s guide and fax both sides of the form to 1 800 947 1445 For purchasing accessories on the Internet http www brothermall com To order by mail or pay by check please complete the accessory order form and mail it along with payment to Brother International Corporation Attn Consumer Acce...

Page 128: ...ame and address in the space below 6 Place your order a Call toll free anytime 1 888 879 3232 b Order on line at www brothermall com c Fax completed form to 1 800 947 1445 d Mail completed form along with proper payment to BROTHER INTERNATIONAL CORP Attn Consumer Accessory Div P O Box 341332 Bartlett TN 38184 1332 Supply Accessory Subtotal AZ CA CO CT FL GA IL LA MA MD MI MN MO NC NJ NV NY OH PA T...

Page 129: ...rCard Discover or American Express you may call toll tree 1 888 879 3232 or complete the order form in your user s guide and fax both sides of the form to 1 800 947 1445 For purchasing accessories on the Internet http www brothermall com To order by mail or pay by check please complete the accessory order form and mail it along with payment to Brother International Corporation Attn Consumer Access...

Page 130: ...ame and address in the space below 6 Place your order a Call toll free anytime 1 888 879 3232 b Order on line at www brothermall com c Fax completed form to 1 800 947 1445 d Mail completed form along with proper payment to BROTHER INTERNATIONAL CORP Attn Consumer Accessory Div P O Box 341332 Bartlett TN 38184 1332 Supply Accessory Subtotal AZ CA CO CT FL GA IL LA MA MD MI MN MO NC NJ NV NY OH PA T...

Page 131: ...Printed in China LA8144001 ...

Reviews: