background image

Preview

• Pressing the Preview key displays a preview 

of the label, and may differ from the actual 
label when printed.

• If the LCD cannot display all the text at once, 

press 

 / 

 to display the hidden text.

• Press 

 / 

 / 

 to exit Preview 

mode.

Feeding (Tape Feed)

• This function feeds approximately 25 mm 

of blank tape.

• Do not pull uncut tape from the Tape Cassette 

as this may damage the Tape Cassette.

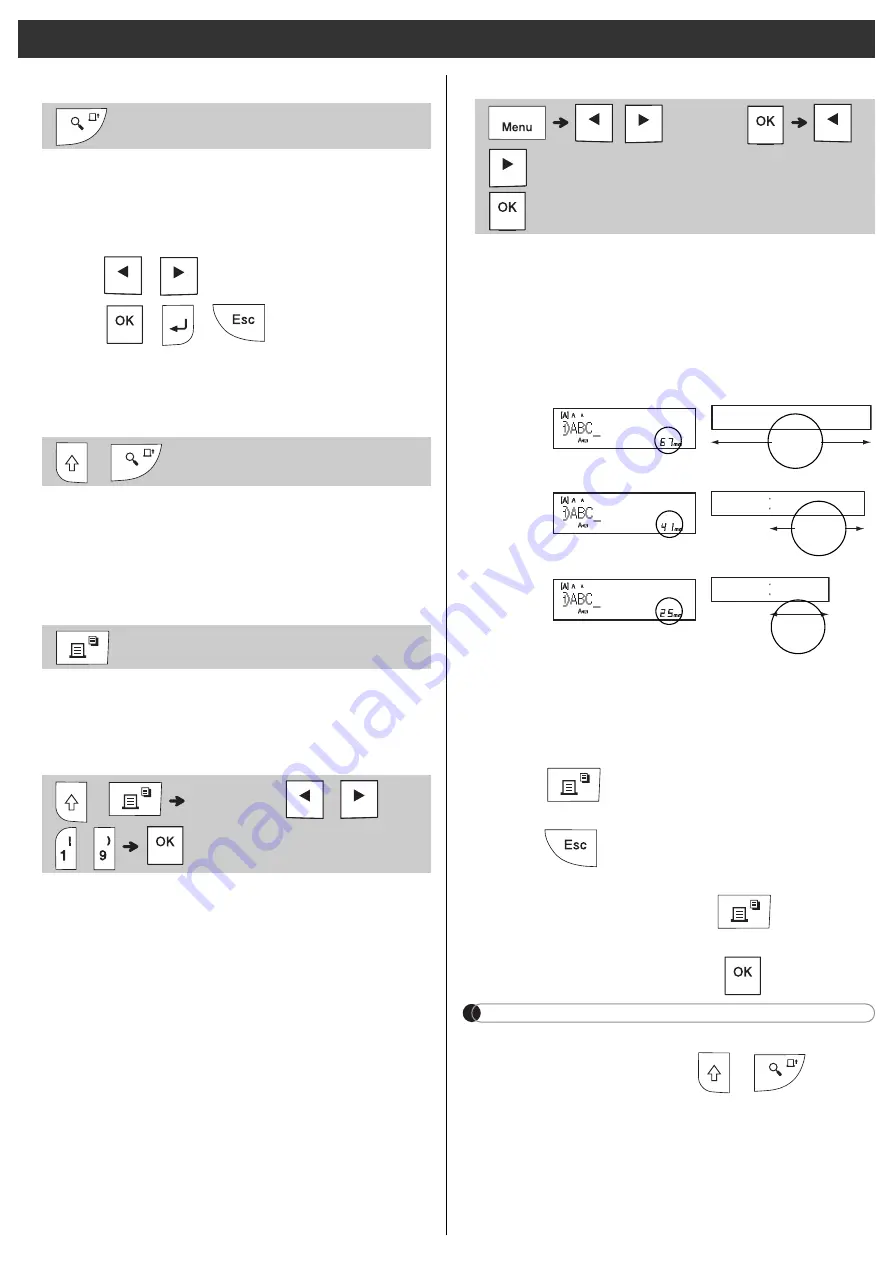
Printing

Press the Print key to print the text displayed on 
the LCD.

Printing Multiple Copies

• You can print up to nine copies of each label.
• DO NOT touch the Tape Cutter Lever while 

the message [

Please Wait

] is displayed on 

the LCD.

To cut tape:

 When printing ends, push the 

Tape Cutter Lever after the message 
[

Please Cut

] appears.

• To remove tape backing, fold the tape 

lengthwise (with the text facing inward), to 
expose the inside edges that run down the 
centre of the tape backing. Peel and apply.

Setting Margins

[

Full

] / [

Half

] / [

Narrow

]

Use one of these options to customise margin 
length before and after your text.
The printed dots (:) indicate the end of the label. 
Cut along the printed dots (:) with scissors.

[

Chain Print

(tape-saving option)

Use this option to print multiple different labels 
with narrow margins. This option saves tape.

1.

Enter your text.

2.

Press .

3.

When [

Feed OK?

] appears on the LCD, 

press 

 to change the text.

4.

Clear the text, enter the text you want on the 

next label, and then press 

.

5.

After your last label prints, when [

Feed OK?

appears on the LCD, press 

NOTE

• When you use [

Chain Print

], feed the tape 

before using the cutter (

 + 

), 

otherwise part of the text may be cut off.

• Do not pull the tape, as this may damage 

the Tape Cassette.

• The printed dots (:) indicate the end of the 

label. Cut along the printed dots (:) with 

scissors.

Printing Labels


 + 


 + 

   [

Copies:

 / 

 / 

-   


 / 

 [

Margin

]  


 / 

 [

Full

 / 

Half

 / 

Narrow

 / 

Chain


Print

LCD

Printout

Full

Half

Narrow

67mm

ABC

41mm

ABC

25mm

ABC

Summary of Contents for P-touch E110

Page 1: ...English User s Guide E110 ...

Page 2: ... Cutter Lever Cassette Cover 1 2 Thank you for purchasing a Brother P touch labelling machine Use your new Brother P touch labelling machine to create a wide variety of custom self adhesive labels This P touch labelling machine uses Brother TZe or HGe tapes TZe and HGe tape cassettes are available in many colours and sizes For a complete list of tapes compatible with your P touch labelling machine...

Page 3: ...apes with this machine Close the Cassette Cover and gently press until it locks into place NOTE If you prefer to use the optional AC Adapter AD 24ES instead of using batteries 1 Insert the Power Adapter cord into the AC Adapter Socket on the side of the P touch labelling machine 2 Insert the Power Adapter into an earthed AC electrical socket Tape Exit Slot Toothed Wheel Cutter Edge End of Tape Tap...

Page 4: ...up to 80 characters in length LCD 1 Size 2 Cursor 3 Shift 4 Caps 5 Cable Wrap 6 Cable Flag 7 Faceplate 8 Label Length If a specific label length has been selected also appears Label length displayed on the LCD may differ slightly from the actual printed label length 1 2 7 6 4 3 8 5 ...

Page 5: ...r keys 9 Shift key 10 Caps key 11 Accent key 12 Tape Cutter lever 13 Clear key 14 Print key 15 Preview key 16 Cursor key Right Use with the Shift key to go to end of the text 17 Cable Flag key 18 Faceplate key 19 Serialise key 20 Backspace key 21 Enter key 22 Symbols key 23 Space key Pressing the Preview key displays a preview of the label and may differ from the actual label when printed 1 2 3 4 ...

Page 6: ...inactive for five minutes To cancel any operation press To return to the default setting press the Space key Use this function to set LCD brightness There are five levels from 2 darkest to 2 brightest The default setting is 0 NOTE To return to the default setting press the Space key Initial Settings Language English Español Français Hrvatski Italiano Magyar Melayu Nederlands Norsk Polski Português...

Page 7: ...ort brother com for the latest information about the recommended batteries Supplies and Accessories Cassettes Visit the Brother Solutions Center at support brother com for the latest information about consumables AC Adapter AD 24ES Cutter Unit TC 4 replacement WARNING Do not touch the cutter blade directly with your fingers Cutter Board Specifications Dimensions W x D x H Approx 109 W X 202 D X 55...

Page 8: ... Entering Tabs The tab symbol appears when you insert a tab in the text Changing Tab Length To return to the default tab length press the Space key Please note the default length varies based on your tape size Cursor Keys To move to the end of your text To move to the beginning of your text Entering Accented Characters See the Accented Characters table in this guide The order of accented character...

Page 9: ... to nine different labels Each tape holds up to 80 characters including spaces Assign a number 1 9 to each saved file so you can reuse it and edit or overwrite stored files as needed Saving a new file NOTE When saving a file if you reuse a number that is already assigned to another file Overwrite OK appears on the LCD To overwrite the previously saved file press To cancel without saving press Prin...

Page 10: ...ls You can also insert Symbols by pressing the shortcut keys as shown below Text Key Select an item Size Large Medium Small Style Normal Bold Outline Shadow Italic I Bold I Outline I Shadow Vertical V Bold Width Normal 2 1 2 Underline and Frame Undl Frame Select a frame type 2 3 Symbols Key Select category Select a symbol Punctuation Space key Currency History Greek Brackets Electrical Bullets Dat...

Page 11: ...side edges that run down the centre of the tape backing Peel and apply Setting Margins Full Half Narrow Use one of these options to customise margin length before and after your text The printed dots indicate the end of the label Cut along the printed dots with scissors Chain Print tape saving option Use this option to print multiple different labels with narrow margins This option saves tape 1 En...

Page 12: ... select Auto the flag length is automatically adjusted according to the text length Flag length 10 mm to 200 mm Auto Default Auto Use the Cable Flag function when the diameter of the object is more than 3 mm Text cannot be rotated when using the Cable Flag function NOTE We recommend using Flexible ID Tape for labels attached to cables and wires To cancel the Cable Wrap Cable Flag Faceplate functio...

Page 13: ...Default 50 mm Use this function to create multiple labels with a number or letter automatically incremented on each label This serialising function can also be used with the Cable Wrap Cable Flag or Faceplate templates to save time entering and printing a series of labels You can serialise numbers from 01 50 Faceplate Select a faceplate length Input text Serialise Input text Select a character to ...

Page 14: ... Unit LCD contrast Resetting the P touch Labelling Machine CAUTION USING A COMBINATION OF DIFFERENT BATTERIES SUCH AS ALKALINE WITH Ni MH MAY RESULT IN AN EXPLOSION DISPOSE OF USED BATTERIES ACCORDING TO THE INSTRUCTIONS Remove the batteries if you do not intend to use the P touch labelling machine for an extended period of time Dispose of batteries at an appropriate collection point not in the ge...

Page 15: ...Punctuation Brackets Bullets Super Subscript Mathematics Arrows Currency Greek Electrical Safety AV Security Datacom Category Symbols Accented Characters ...

Page 16: ...text is entered is pressed when no text is entered or was pressed when no text was entered while using templates 2 Line Limit 1 Line Limit You tried to enter a third line by pressing You tried to print or preview two lines of text while 3 5 mm or 6 mm tape was installed Install a larger tape size No Cassette There is no cassette installed Install a cassette with the mark or mark Cutter Pressed The...

Page 17: ...ings are cleared A blank horizontal line appears through the printed tape There may be some dust on the Print Head Remove the cassette and use a dry cotton swab to gently wipe the Print Head with an up and down motion See the Installing Power Supply and Tape Cassette section for the Print Head location The P touch labelling machine has locked up nothing happens when a key is pressed even though th...

Reviews: