background image

27

Al igual que en una máquina de escribir o procesador de texto, la tecla de retorno ( 

r

 ) de

esta máquina se emplea para poner fin a una línea de texto y empezar otra. Cuando haya ter-
minado de introducir una línea, presione la tecla de retorno para hacer una línea nueva y
mover al cursor a la misma.

El texto solamente puede contener un máximo de seis líneas. Si presiona 

r

 cuando

ya existan seis líneas, aparecerá el mensaje de error “6 LINE LIMIT!”. 

La tecla de retorno también podrá utilizarse para seleccionar un ítem de una lista (p. ej.,
añadir un símbolo o un carácter acentuado al texto) o para aplicar un ajuste seleccionado.
Es posible que aparezcan en el visualizador de LCD algunas preguntas para que confirme un
comando, especialmente cuando la función que usted ha seleccionado es para borrar o afec-
tar archivos. En estos casos, si presiona 

r

 es como si respondiera “sí”.

Para contestar “no”, presione 

*

. Consulte la descripción de la TECLA DE BORRADO

(DEL) de la page 29.
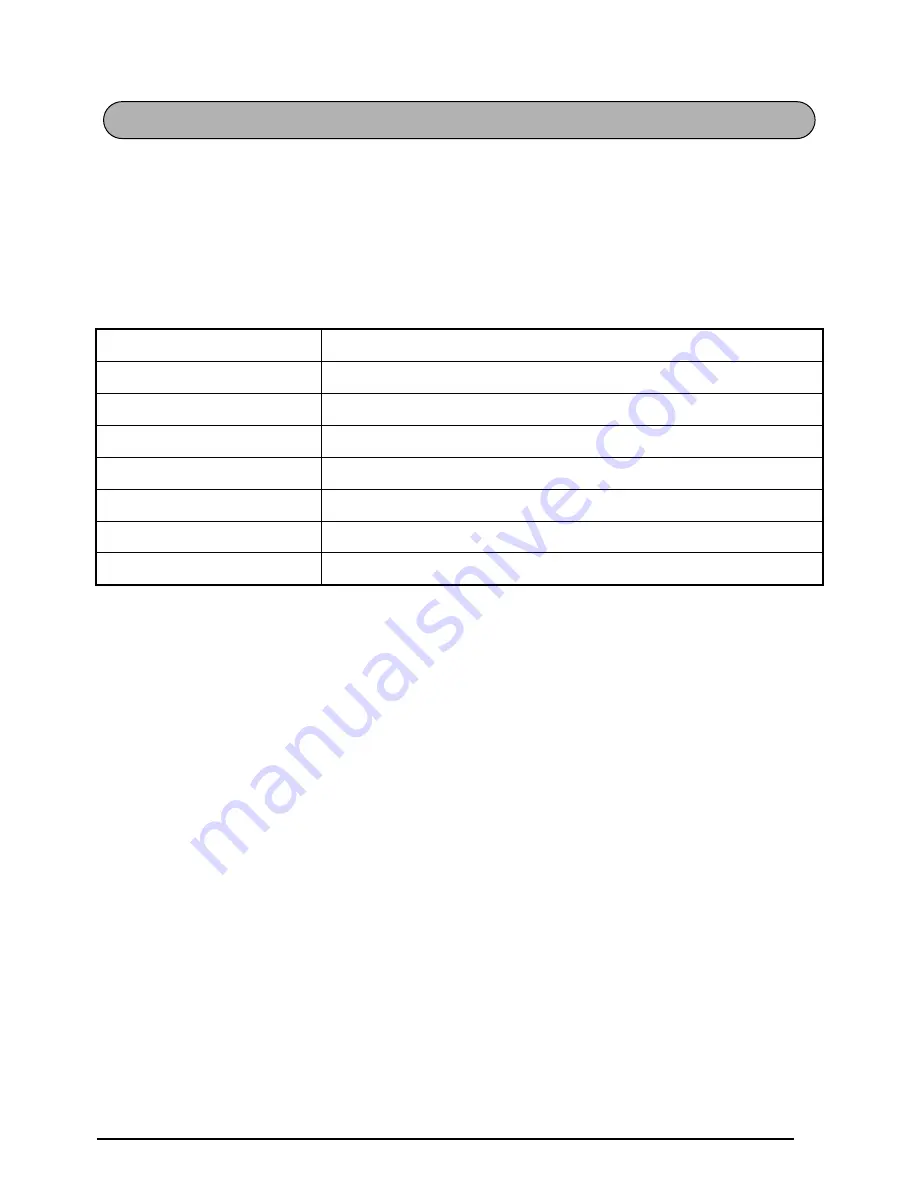
Anchuras de cinta

Número máximo de líneas que pueden imprimirsed

1/4” (6 mm)

2

3/8” (9 mm)

2

1/2” (12 mm)

3

3/4” (18 mm)

6

1” (24 mm)

6

Sello 3/4” (18 mm)

3

Sello 1” (24 mm)

5

TECLA DE RETORNO

Summary of Contents for P-Touch 2300

Page 1: ...310 GUIDE USUARIO you start using your P touch ndy place for future reference imera vez lea cuidadosamente esta Guía de Usuario ara futuras referencias ...

Page 2: ...LS 24 PRINT HEAD ROLLERS 25 For Your Information POWER KEY 26 CURSOR KEYS 26 CODE ALT SHIFT KEYS 27 SPACE KEY 30 RETURN KEY 30 TAB FUNCTION 31 DELETE KEY 33 LINE OUT FUNCTION 34 CLEAR FUNCTION 35 ACCENT FUNCTION 37 SYMBOL FUNCTION 38 AUTO FORMAT FUNCTION 40 STAMP FUNCTION 41 FONT FUNCTION 44 SIZE WIDTH FUNCTIONS 45 STYLE FUNCTION 47 UNDERLINE FUNCTION 49 FRAME FUNCTION 50 TAPE MARGIN FUNCTION 51 H...

Page 3: ... CUT FUNCTION 56 PRINT KEY 57 FEED CUT FUNCTION 57 NUMBERING FUNCTION 58 REPEAT PRINTING FUNCTION 59 MEMORY FUNCTIONS 61 TROUBLESHOOTING 65 ERROR MESSAGE LIST 66 SPECIFICATIONS 69 ACCESSORIES For USA Only 70 PT 2300 2310 CONTACT INFORMATION For USA Only 74 ...

Page 4: ...iii ...

Page 5: ...1 TOP VIEW BOTTOM VIEW Getting Started GENERAL DESCRIPTION Tape compartment cover LCD display Keyboard AC adaptor connector USB port Tape exit slot Battery compartment cover ...

Page 6: ...t use tapes that do not have the mark Do not pull on the tape being fed from the P touch This may damage the tape cassette Do not use the machine in dusty places and keep it out of both direct sunlight and rain Power key Return key Cursor keys Delete key GENERAL PRECAUTIONS ...

Page 7: ...the memory even if bat teries are installed Use eight AA alkaline batteries in this machine This portable machine can be used anywhere by installing eight 8 AA alkaline batteries When you change the batteries always replace all eight at the same time To change the batteries 1 Remove the battery compartment cover on the back of the machine 2 If batteries are already installed remove them 3 Insert e...

Page 8: ... Remove the batteries and disconnect the AC adaptor if you do not intend to use this machine for an extended period of time When the power is disconnected all text shown in the display and stored in the memory will be lost When the AC adaptor is connected unplugging the adaptor from the electrical out let before unplugging it from the machine can delete all text files in the memory even if batteri...

Page 9: ...in the other tape cassette is loose use your finger to wind the toothed wheel in the direction of the arrow on the cassette until there is no slack in the ribbon Also make sure that the end of the tape feeds under the tape guides If you are using a new tape cassette provided with a stopper be sure to remove the stopper 4 Insert the tape cassette firmly into the tape compartment making sure that th...

Page 10: ... with the PT 2300 2310 When connecting the P touch to a computer use a standard USB cable high speed compatible with series A and B connectors To connect the P touch to the computer 1 Insert the flat A connector on the USB cable into the USB port on the computer 2 Insert the square B connector on the USB cable into the USB port on the right side of the P touch 3 Turn on the P touch The USB cable n...

Page 11: ...000 administrator privileges are required In addition printing requires power user or administrator privileges This software cannot be operated in Users groups This software is not compatible with the Windows 2000 Server operating system With Windows XP printing and installation is only possible from an account with administrator privileges These operations cannot be performed from an account with...

Page 12: ... 2300 2310 printer driver will be installed Continue with the procedure in To install the USB printer driver on page 10 4 Carefully read the contents of the dialog box and then click the Next button to continue The User Information dialog box appears 5 Type the necessary information into the appropriate boxes If the information has already been registered in Windows it will automatically appear an...

Page 13: ... immediately starts installation Typical All of the basic options P touch Editor Version 3 1 clip art Auto Format templates Help and 13 fonts are installed Compact Only P touch Editor Version 3 1 is installed For a Custom Installation Selecting Custom then clicking the Next button displays a dialog box that allows you to select which options to install Only the options with a check mark beside the...

Page 14: ...Click the Next button to begin installation 8 After P touch Editor is installed a dialog box appears allowing you to select whether or not to install the printer driver To install the printer driver click the Yes but ton The first Driver Setup dialog box appears informing you that the PT 2300 2310 printer driver will be installed Continue with the procedure in To install the USB printer driver bel...

Page 15: ...described on page 6 and then turn on the PT 2300 2310 A dialog box appears showing that the printer driver has been installed 3 Click the Finish button A dialog box appears showing that the installation is fin ished 4 Select Yes I want to restart my computer now click the Finish button to restart the computer and then remove the CD ROM from the computer With Windows 98 98SE ME 2000 ...

Page 16: ...touch 2300 2310 to the computer using the enclosed USB interface cable as described on page 6 and then turn on the P touch 2300 2310 3 In the first Found New Hardware Wizard dia log box that appears select Install the soft ware automatically Recommended and then click the Next button 4 If a dialog box warning appears indicating that the software has not passed Windows Logo testing simply continue ...

Page 17: ...an be viewed either by inserting the CD ROM into the drive each time you wish to refer to it or by installing it onto your hard disk so that it is quickly avail able at any time Since the User s Guide is an HTML document a browser is needed to read it From the CD ROM 1 Start up Windows Explorer 2 Select the CD ROM drive 3 Double click Main htm in the Manual folder within the P touch folder on the ...

Page 18: ...you to select whether to replace add or delete the PT 2300 2310 printer driver 4 Select the desired operation and then click the Next button If Replace with new Brother PT 2300 2310 is selected the previously installed printer driver is deleted and replaced with a new one Select this option when upgrading the printer driver or when running Windows 2000 XP and changing to a PT 2300 2310 with a diff...

Page 19: ... puter With Windows XP In the first Found New Hardware Wizard dialog box that appears select Install the software auto matically Recommended and then click the Next button If a dialog box warning appears indicating that the software has not passed Windows Logo test ing simply continue with the installation In the Found New Hardware Wizard dialog box that appears indicating that installation of the...

Page 20: ... If Delete Brother PT 2300 2310 was selected A dialog box appears asking for confirmation to delete all PT 2300 2310 printer drivers Click the Yes button A dialog box appears show ing that the printer drivers have been deleted Click the Finish button If a dialog box appears explaining that the computer should be restarted select the option for restarting the computer and then click the Finish butt...

Page 21: ...MB USB port CD ROM drive The application is supplied on a CD ROM therefore the computer should be equipped with a CD ROM drive 2 Connect the PT 2300 2310 to the Macintosh using a USB interface cable Be sure to leave the PT 2300 2310 turned off 3 Turn on the Macintosh 4 Insert the P touch Editor Version 3 1 CD ROM into the computer s CD ROM drive 5 Double click the P touch Editor 3 1 Installer icon...

Page 22: ...alled Select the options that you wish to install and then click the Install button In order to print from the PT 2300 2310 PT 2300 2310 Driver must be selected for installation 7 When the installation is finished and the following dialog box appears click the Quit button 8 When the dialog box appears asking if you wish to restart the computer click the Restart button to restart the computer ...

Page 23: ...er s Guide is an HTML document a browser is needed to read it From the CD ROM Double click Main htm in the User s Guide folder within the P touch Editor Ver 3 1 folder on the CD ROM With the Start button Double click Main htm in the User s Guide folder within the P touch Editor Ver 3 1 folder installed on the hard disk To Delete P touch Editor Version 3 1 and the Printer Driver When deleting the p...

Page 24: ...art button 1 Click the Start button in the taskbar to display the Start menu 2 Select Programs 3 Select P touch Editor 3 1 4 Click P touch Editor 3 1 With Windows Explorer 1 Start up Windows Explorer 2 Select the drive and directory where P touch Editor is installed 3 Double click Ptedit3 exe After P touch Editor is started the following window is displayed STARTING P TOUCH EDITOR Title bar Rulers...

Page 25: ...0 2000 XP and Macintosh are the same unless specifically mentioned The desired Properties can be displayed by clicking the icon in the property dock Click an icon to display its Properties Page Properties Status bar Menu bar Layout area Draw toolbar Print area Database toolbar Property dock Object dock Print toolbar Title bar Rulers Page Properties icon Font Properties icon Layout Properties icon ...

Page 26: ... type in text and then click the left mouse button 3 The cursor flashes in the layout area to indi cate that you can now type in text 4 Use the computer keyboard to type in the text 5 To create a new line of text press the keyboard s Enter key With P touch Editor version 3 1 text is always typed in using the insert mode The overwrite mode cannot be used to type in text To change the font and text ...

Page 27: ... Editor Version 3 1 CD ROM The database function of P touch Editor Version 3 1 Windows version uses database files that are compatible with Microsoft Access 97 By upgrading P touch Editor Version 3 1 using a program available on the CD ROM P touch Editor will become compatible with Access 2000 Refer to the Readme file located at English Ptouch Editor Ac2k on the CD ROM the folder name for French i...

Page 28: ...ece of fabric printed with your text onto garments using an iron After printing the text onto fabric tape and cutting off the label using scissors place the label on an ironed garment at the location where you wish to attach it in such a way that the printed text can be read correctly Cover the label with another piece of cloth and use an iron set to a medium high temperature 320 to 356 F 160 to 1...

Page 29: ...assette if one is installed The print head and rollers are located in the tape compartment 3 Print head Use a dry cotton swab to gently wipe the print head with an up and down motion Rollers Use a dry cotton swab to wipe each roller with an up and down motion while rotating them with your finger 4 Install a tape cassette close the tape compartment cover and then try printing again 5 If a blank str...

Page 30: ...lays it when you turn on the machine again To turn on the machine Press o The previous session s information appears in the LCD display To turn off the machine Press o The current session s information is stored in the internal memory The machine s LCD display shows two rows of 9 characters however the text that you create can be up to 99 characters long You can review and edit your text by using ...

Page 31: ...cursor to the beginning of the entire text Hold down c and press h DOWN CURSOR KEY To move the cursor down to the following line Press e once If the cursor is in the last line of text it will move to the end of the line To move the cursor down several lines Hold down e until the cursor moves to the desired position To move the cursor to the end of the entire text Hold down c and press e Most chara...

Page 32: ...haracter written in color The Alt indi cator on the left side of the display comes on while a is held down EXAMPLE To start the Symbol function Hold down c and press a once To type in Hold down a and press once The Alt indicator comes on while a is held down 1 D A N G E R _ Caps Alt Æ æ Ã ã Caps Alt Ü 1 0 1 2 _ Caps Alt 1 0 1 2 _ Caps Alt ...

Page 33: ...ar to holding down s It allows you to type capital letters continu ously To type in many capital letters 1 Hold down c and press s The Caps indicator on the left side of the display comes on 2 Press the keys of the desired letters or symbols 3 To exit Caps mode hold down c and press s The Caps indicator goes off To type in Hold down s and press 5 1 5 _ Caps Alt 1 5 _ Caps Alt 1 _ Caps Alt ...

Page 34: ...riter or word processor this machine s return key r is used to end a line of text and start another one When you have finished entering one line press the return key to make a new line and move the cursor to it The text can only contain a maximum of six lines If you press r when six text lines already exist the error message 6 LINE LIMIT will appear To add a space Press _ SPACE KEY 1 J _ Caps Alt ...

Page 35: ...answer yes Press r This function allows you to separate sections of a line of text by adding tabs This enables you to create perfectly aligned columns without having to type in several spaces All tabs have the same length and are measured from either the beginning of the line or the previous tab if there is more than one The tab length can be set between 0 0 and 11 8 0 0 and 30 0 cm The text can c...

Page 36: ...ss Q once The tab mark appears in the text to indi cate the position of the tab If the text in front of a tab extends past the point where the next section of text should start the text will instead start at the following tab position For example if the tab length is set to 1 2 3 0 cm and the following text is typed in The label shown below will be printed EXAMPLE To set the tab length to 1 1 Hold...

Page 37: ...nfirm a command may appear on the LCD display especially when the function that you have chosen will delete or affect files In these cases pressing is like answering no To answer yes press r Refer to RETURN KEY on page 30 To delete one character 1 Press f w h or e to position the cursor below the character immediately to the right of the character that you wish to delete 2 Press once 2 Press e unt...

Page 38: ...text Press to return to your text To answer no Press With the Line Out function you can easily remove an entire line of text To delete a line of text 1 Press f w h or e to position the cursor within the line of text that you wish to delete 2 Hold down c and press 0 once Each time 0 is pressed while c is held down one line of text is deleted EXAMPLE To delete 012 345 6789 Hold down c and press 0 on...

Page 39: ...just the text is erased To delete all of the text and return all formats to their default settings 1 Hold down c and press 2 Press h or e until TXT FORMAT is selected flashing To return to the text without erasing anything press 3 Press r EXAMPLE To clear the text and formats 1 Hold down c and press 2 Press h until TXT FORMAT is flashing 3 Press r CLEAR FUNCTION 2 3 4 5 6 7 8 9 _ 1 G a r d e n Cap...

Page 40: ...To return to the text without erasing anything press 3 Press r EXAMPLE To clear just the text 1 Hold down c and press 2 Press e until TEXT ONLY is flashing 3 Press r 2 3 4 5 6 7 8 9 _ 1 G a r d e n Caps Alt T E X T O N L Y T X T F O R M A T Caps Alt T E X T O N L Y T X T F O R M A T Caps Alt 1 _ Caps Alt ...

Page 41: ...down s or hold down c and press s to turn on Caps mode before pressing the letter key 3 Press f or w until the desired accented character appears enlarged within the frame in the middle of the display 4 Press r The accented character is added to the text To type in a series of accented characters hold down c before pressing r Then continue adding accented characters by selecting them as explained ...

Page 42: ...ailable with the Symbol function The following symbols are available To add the accented character É 1 Hold down c and press A 2 Hold down s and press E 3 Press w until É appears in the frame 4 Press r a u A U A C C E N T Caps Alt É Ë Ê E Caps Alt È È Ë Ê E Caps Alt É 1 R E S U M É _ Caps Alt SYMBOL FUNCTION ...

Page 43: ...to the text To type in a series of symbols hold down c before pressing r Then con tinue adding symbols by selecting them as explained in steps 2 and 3 and hold ing down c while pressing r Press just r after selecting the last symbol in the series EXAMPLE Group Symbol 1 Ü Æ æ Ã ã e Õ õ 2 2 3 2 3 4 3 4 5 To add the symbol 1 Hold down c and press a 2 Press h or e until the row containing appears then...

Page 44: ...n setting Horizontal alignment setting DEFAULT OFF FULL LEFT 3 5 FLOPPY 2 8 7 0 cm NONE CENTER miniDV 1 7 4 3 cm NONE CENTER VHS SPINE 5 5 14 0 cm NONE CENTER VHS 3 0 7 7 cm NONE CENTER VCR8mm CASE 3 6 9 2 cm NONE CENTER VCR8mm 2 9 7 3 cm NONE CENTER VHS C SPINE 1 8 4 5 cm NONE CENTER VHS C 2 3 5 8 cm NONE CENTER AUDIO CASSETTE 3 5 8 9 cm NONE CENTER DAT CASSETTE 2 2 5 6 cm NONE CENTER MINI DISK 2...

Page 45: ...ssette select this function to automatically center the text and adjust the tape length and margins to a perfect format for the pre inked stamp film holders Since the stamp holder is reusable just make a new stamp stencil film and replace the one in the holder To make a stamp 1 Type in the text and then insert a medium 3 4 18 mm wide or a large 1 24 mm wide stamp film cassette 2 Hold down c and pr...

Page 46: ...ult settings TXT FORMAT before creating the next label EXAMPLE To cut a stamp 1 Enter the text and insert a stamp film cassette in the tape compartment 2 Hold down c and press U 3 Press r 4 Press p to engrave the stamp stencil film and then automatically cut off To affix a stamp 5 Remove the stamp frame from around the stamp film holder ink pad one side at a time then remove the protective seal co...

Page 47: ...he other end of the stamp stencil film over the other side of the stamp film holder and hold it in place with your finger 9 Fit the stamp frame over the stamp stencil film and push it into place 0 Insert the stamp film holder straight into its cap Be sure that the stamp is correctly covered in order to prevent ink spills Guides Fold over ...

Page 48: ... to display the current font setting 2 While still holding down c continue pressing 1 until the desired font setting is displayed 3 Release c to apply the selected font setting to the entire text EXAMPLE To select the FONT 2 font setting 1 While holding down c press 1 once and keep c held down 2 While still holding down c continue pressing 1 until FONT 2 is displayed 3 Release c FONT FUNCTION 1 F ...

Page 49: ... a width setting other than MEDIUM is selected the Width indicator comes on With the AUTO size setting the machine compares your text with the width of the installed tape and automatically adjusts the characters to the largest possible size However seven other point sizes are also available and each can be printed with any of the three width settings Tape widths Sizes in points 1 4 6 mm 6 9 12 3 8...

Page 50: ...he entire text With the AUTO setting selected and 3 4 18 mm or 1 24 mm wide tape installed text consisting of just one line of only capital letters and no accented characters will be printed with a character size of 52 points If 1 2 12 mm wide tape is installed the text will be printed with a character size of 29 points EXAMPLE To select the 24 point size setting 1 While holding down c press 2 onc...

Page 51: ...following style settings are available NORMAL BOLD OUTLINE SHADOW ITALIC I BOLD italic bold I OUTL italic outline I SHAD italic shadow VERT vertical The default style setting is NORMAL The style indicator at the bottom of the display shows the current style setting when any setting other than NORMAL is selected Refer to Reference at the end of this section for samples of the available settings To ...

Page 52: ...ly the selected style setting to the entire text EXAMPLE REFERENCE REFERENCE To select the I SHAD style setting 1 While holding down c press 4 once and keep c held down 2 While still holding down c continue pressing 4 until I SHAD is displayed 3 Release c Font setting Style setting NORMAL BOLD OUTLINE SHADOW ITALIC FONT 1 FONT 2 FONT 3 FONT 4 N O R M A L S T Y L E Caps Alt I S H A D S T Y L E Caps...

Page 53: ...While holding down c press 5 once and keep c held down to display the current underline setting 2 While still holding down c continue pressing 5 until the desired underline set ting is displayed The Undl Frm indicator comes on when the UNDL ON setting is selected 3 Release c to apply the selected underline setting to the entire text Font setting Style setting I BOLD I OUTL I SHAD VERT FONT 1 FONT ...

Page 54: ...RAME OFF is selected the Undl Frm indicator on the right side of the display comes on To change the frame setting 1 While holding down c press 6 once and keep c held down to display the current frame setting To select the UNDL ON underline setting 1 While holding down c press 5 once and keep c held down 2 While still holding down c continue pressing 5 until UNDL ON is displayed 3 Release c O F F U...

Page 55: ...etting is FULL however three other settings are also available When a setting other than FULL is selected extra tape is fed out before printing starts The extra tape is cut off if the Auto cut function is set to ON so that the left and right margins are equal To select the candy frame setting 1 While holding down c press 6 once and keep c held down 2 While still holding down c continue press ing 6...

Page 56: ...t in one of three ways In addition if the Length function was used to set the length of the label the text will align within the label according to the selected horizontal alignment setting The default setting is LEFT however two other settings are also available To select the HALF tape margin setting 1 While holding down c press E once and keep c held down 2 While still holding down c continue pr...

Page 57: ...ext so that the characters can be read from the tape side of the tape If mirror printed labels are attached to glass or some other clear material they can be read correctly from the opposite side When using the Mirror printing function the text should be printed on clear tape The default mirror printing setting is OFF To select the RIGHT horizontal alignment setting 1 While holding down c press R ...

Page 58: ...to fit the length of the entered text there may be times when you will want to make a label with a specific length The Length function allows you to set the label length between 1 6 and 11 8 4 0 cm and 30 0 cm The default length setting is OFF When the Length function is set to ON the Length indicator on the right side of the display comes on To select the ON mirror printing setting 1 While holdin...

Page 59: ...s displayed 4 Press h or e to select the desired length or use the number keys to enter a length To change the units inches or centimeters used to display the label length press M until the desired units are displayed To change the length in 1 1 0 cm steps hold down either h or e and then release the key when the desired setting is displayed 5 Press r EXAMPLE To select a label length of 5 1 While ...

Page 60: ... set to OFF hold down c and press _ once to feed the tape then cut it 1 While holding down c press Z once and keep c held down to display the current auto cut setting 2 While still holding down c continue pressing Z until the desired auto cut setting is displayed 3 Release c to apply the selected auto cut setting EXAMPLE 4 Press h until 5 0inch is displayed 5 Press r To turn on the Auto cut functi...

Page 61: ...EXAMPLE The Feed Cut function is used to feed out 1 24 mm of tape and automatically cut it off for example after printing with the Auto cut function set to OFF or when printing has been inter rupted To feed and cut off 1 24 mm of tape Hold down c and press _ once 1 24 mm of tape is fed out and cut off 2 While still holding down c continue pressing Z until ON is displayed 3 Release c To print a lab...

Page 62: ...ting 3 Press a number key between 1 and 9 or press h or e to select the last num ber that is to be printed To cancel the Numbering hold down c and press O or press just 4 Press p or r to begin printing the labels The number of each copy is displayed while it is being printed If the Auto cut function is set to ON each label is automatically cut off after it is printed EXAMPLE To print three labels ...

Page 63: ... display with the current setting 2 Press a number key between 1 and 9 or press h or e to select the number of copies that are to be printed To cancel the Repeat printing hold down c and press I or press just 3 Press 3 4 Press p or r Caps Alt U N T I L 3 N U M B E R 1 3 C O P I E S Caps Alt Caps Alt 2 3 C O P I E S Caps Alt 3 3 C O P I E S REPEAT PRINTING FUNCTION ...

Page 64: ...abel is automatically cut off after it is printed EXAMPLE To print three copies of a label 1 Hold down c and press I 2 Press 3 3 Press p or r If the Auto cut function is set to ON each label is automatically cut off after it is printed 1 C O P I E S Caps Alt Caps Alt 3 C O P I E S 1 3 C O P I E S Caps Alt Caps Alt 2 3 C O P I E S Caps Alt 3 3 C O P I E S ...

Page 65: ...ith the AC adaptor STORING TEXT To store a text file 1 Hold down c and press 7 The message STORE appears on the display with the currently selected file number If the maximum number of characters has already been stored the error message MEMORY FULL appears in the display If this occurs an existing text file must be deleted before the new one can be stored To quit the Store function without storin...

Page 66: ...lay is erased and the text stored under the selected file number is recalled into the display DELETING A FILE To delete a text file 1 Hold down c and press 9 The message CLEAR appears on the display with the file number and beginning of the most recently stored or recalled text To cancel the Memory delete function without deleting the text file hold down c and press 9 or press just 2 Press a numbe...

Page 67: ... 7 2 Press 4 3 Press r To recall the text from file number 1 1 Hold down c and press 8 2 Press 1 3 Press r Caps Alt S T O R E 0 Caps Alt S T O R E 4 Caps Alt 1 J S m i t h _ Caps Alt R E C A L L 9 J S m i t Caps Alt R E C A L L 1 B i l l R e Caps Alt 1 _ i l l R e y n B ...

Page 68: ...elete the text stored under file number 4 1 Hold down c and press 9 2 Press 4 3 Press r 4 Press r Caps Alt C L E A R 1 B i l l R e Caps Alt C L E A R 4 J S m i t Caps Alt O K T O C L E A R Caps Alt 1 _ i l l R e y n B ...

Page 69: ... stored in the mem ory are no longer there If the batteries are low replace them with new ones 4 The printed characters are not formed properly If you are using alkaline batteries they may be low Try using the AC adaptor or replace the batteries with new ones 5 A blank horizontal line appears through the printed label Clean the print head as explained on page 25 6 Striped tape appears You have rea...

Page 70: ...ce after the maximum number of characters has already been entered Delete some existing text so that more text can be entered CAN T HERE This message appears if the cursor is at the end of the text when you hold down c and press O Move the cursor below a number before holding down c and pressing O CASSETTE CHANGED This message appears if the tape cas sette is changed while the P touch is receiving...

Page 71: ... the text to less than 3 3 1 3 1 meter before trying to print This message appears if the Length function is used to set a label length that is less than 1 6 4 0 cm or more than 11 8 30 0 cm Set the label length between 1 6 4 0 cm and 11 8 30 0 cm This message appears if the Tab Length function is used to set a tab length that is more than 11 8 30 0 cm Set the tab length so that it is less than 11...

Page 72: ... SOLDER X This message appears if there is a problem with the machine s software Contact your service representa tive TAB LIMIT This message appears if the maximum number of tabs has already been added to the text when you hold down c and press Q Limit the number of tabs in the text to 50 TEXT TOO HIGH This message appears if the size of the text is larger than the width of the installed tape Redu...

Page 73: ... AD 60 Auto power off if no key is pressed for 5 minutes Print Head 128 dot 180 dpi Dimensions 7 3 5 W 9 1 2 D 2 1 2 H 194 242 65 5 mm Weight 1 83 lbs 830 g without a tape cassette and batteries installed Buffer Size Maximum 91 characters Maximum six lines Memory Size Approximately 300 characters Character Size Six sizes 6 9 12 18 24 36 and 42 points 52 point capital letters only All are available...

Page 74: ...8 9 mm strong adhesive black characters on white adhesive 1 17 99 TZ S231 1 2 12 mm strong adhesive black characters on white adhesive 1 18 99 TZ S241 3 4 18 mm strong adhesive black characters on white adhesive 1 21 99 TZ S251 1 24 mm strong adhesive black characters on white adhesive 1 25 99 TZ S611 1 4 6 mm strong adhesive black characters on yellow adhesive 1 15 99 TZ S621 3 8 9 mm strong adhe...

Page 75: ...ength 1 28 99 3 4 18mm wide laminated tapes TZ 141 Black characters on clear adhesive 1 18 99 TZ 145 White characters on clear adhesive 1 20 99 TZ 241 Black characters on white adhesive 1 20 99 TZ 242 Red characters on white adhesive 1 20 99 TZ 243 Blue characters on white adhesive 1 20 99 TZ 344 Gold characters on black adhesive 1 23 99 TZ 345 White characters on black adhesive 1 23 99 TZ 441 Bla...

Page 76: ... 14 99 TZ 221 Black characters on white adhesive 1 16 99 TZ 325 White characters on black adhesive 1 18 99 TZ 421 Black characters on red adhesive 1 16 99 1 4 6mm wide laminated tapes TZ 111 Black characters on clear adhesive 1 12 99 TZ 211 Black characters on white adhesive 1 14 99 TZ 315 White characters on black adhesive 1 17 99 Stock No Description QTY PACKAGE PRICE SK LB Stamp making kit for ...

Page 77: ...73 ...

Page 78: ...form to 1 800 947 1445 For purchasing accessories on the Internet http www brothermall com To order by mail or pay by check please complete the accessory order form and mail it along with payment to Brother International Corporation Attn Consumer Accessory Division P O Box 341332 Bartlett TN 38133 1332 Fax Back System Brother Customer Service has installed an easy to use Fax Back System so you can...

Page 79: ...me and address in the space below 6 Place your order a Call toll free anytime 1 888 879 3232 b Order on line at www brothermall com c Fax completed form to 1 800 947 1445 d Mail completed form along with proper payment to BROTHER INTERNATIONAL CORP Attn Consumer Accessory Div P O Box 341332 Bartlett TN 38184 1332 Supply Accessory Subtotal AZ CA CO CT FL GA IL LA MA MD MI MN MO NC NJ NV NY OH PA TN...

Page 80: ...rm to 1 800 947 1445 For purchasing accessories on the Internet http www brothermall com To order by mail or pay by check please complete the accessory order form and mail it along with payment to Brother International Corporation Attn Consumer Accessory Division P O Box 341332 Bartlett TN 38133 1332 Fax Back System Brother Customer Service has installed an easy to use Fax Back System so you can g...

Page 81: ...me and address in the space below 6 Place your order a Call toll free anytime 1 888 879 3232 b Order on line at www brothermall com c Fax completed form to 1 800 947 1445 d Mail completed form along with proper payment to BROTHER INTERNATIONAL CORP Attn Consumer Accessory Div P O Box 341332 Bartlett TN 38184 1332 Supply Accessory Subtotal AZ CA CO CT FL GA IL LA MA MD MI MN MO NC NJ NV NY OH PA TN...

Page 82: ...GUIA DE INSTRUCCIONES ...

Page 83: ...de la Clase B siguiendo el apartado 15 de las normas de la FCC Estos límites están pensados para pro porcionar una protección razonable contra interferencias nocivas dentro de una instala ción residencial Este equipo podría interferir de forma nociva con comunicaciones por radio si no se instala y utiliza siguiendo las instrucciones No obstante no existe ninguna garantía de que no vayan a suceder ...

Page 84: ...CIÓN DE BORRADO DE LÍNEA LINE OUT 30 FUNCIÓN DE REPOSICIÓN CLEAR 30 FUNCIÓN DE ACENTOS 31 FUNCIÓN DE SÍMBOLOS 32 FUNCIÓN DE FORMATO AUTOMÁTICO 33 FUNCIÓN DE SELLOS 34 FUNCIÓN DEL TIPO DE CARACTERES 35 FUNCIONES DE TAMAÑO Y DE ANCHURA 35 FUNCIÓN DE ESTILO 37 FUNCIÓN DE SUBRAYADO 37 FUNCIÓN DE MARCOS 38 FUNCIÓN DE CINTA 39 FUNCIÓN DE LA ALINEACIÓN HORIZONTAL 39 FUNCIÓN DE IMPRESIÓN EN MODO ESPEJO 40...

Page 85: ...ii FUNCIONES DE LA MEMORIA 44 SOLUCIÓN DE PROBLEMAS 46 LISTA DE MENSAJES DE ERROR 47 ESPECIFICACIONES 50 ACCESORIOS Sólo para EE UU 51 INFORMACIÓN PARA CONTACTAR CON PT 2300 2310 Sólo para EE UU 54 ...

Page 86: ...ningún objeto encima ni dentro de la máquina Para evitar daños no toque el borde de la cuchilla Utilize sólo el adaptador de CA modelo AD 60 exclusivamente diseñado para esta máquina El empleo de otro cancelaría la garantía No intente desmontar el adaptador de CA Cuando el equipo no se utilice durante períodos prolongados de tiempo y no sea necesa rio conservar los archivos de texto en la memoria ...

Page 87: ...eden orientados en la dirección correcta 4 Coloque la cubierta del compartimiento de las pilas Asegúrese de insertar las pilas nuevas antes de que transcurran cinco minutos desde que se extraen las pilas gastadas porque de lo contrario el texto que se visualiza en la pantalla y los archivos de texto almacenados en la memoria se per derían a menos que la máquina esté enchufada a una toma de CA con ...

Page 88: ...e el adaptador de CA si no se propone utilizar el equipo durante períodos de tiempo prolongados Cuando se desconecta la alimen tación se pierden el texto que se muestra en la pantalla y el que está almacenado en la memoria Cuando el adaptador de CA esté enchufado en la máquina si se desenchufa el adaptador de la toma de CA se correrá el riesgo de perder todos los archivos de texto de la memoria au...

Page 89: ...ilice un dedo para bobinar la rueda den tada en el sentido de la flecha de dicho casete hasta tensar la cinta Además cerciórese de que el extremo de la cinta esté debajo de las guías de la misma Si está utilizando un casete de cinta nuevo provisto de retén cerciórese de extraer éste 4 Inserte firmemente el casete de cinta en el compartimiento de la cinta asegurándose de que toda la parte posterior...

Page 90: ... USB Cuando conecte la P touch a un PC utilice un cable USB estándar conectores de alta velocidad compatibles con la serie A y B Para conectar la P touch al PC 1 Inserte el conector plano A del cable USB en el puerto USB del PC 2 Inserte el conector cuadrado B del cable USB en el puerto USB del lado derecho de la P touch 3 Encienda la P touch El cable USB que se necesita para conectar la P touch a...

Page 91: ... imprimir requiere usuario avanzado o privilegios de administrador Este software no se puede utilizar en Grupo de usuarios Este software no es compatible con el sistema operativo Windows 2000 Server Con Windows XP la impresión e instalación solamente son posibles desde una cuenta con privilegios de administrador Estas operaciones no se pueden realizar desde una cuenta con privilegios limitados Mem...

Page 92: ...insta lar el controlador de impresora de la PT 2300 2310 Continúe con el procedimiento Para Instalar el Controlador de Impresora USB de la página 9 4 Lea atentamente el contenido del cuadro de diálogo y a continuación haga clic sobre el botón Next para continuar Aparecerá un cuadro de diálogo User Information 5 Ingrese la información necesaria en los cuadros apropiados Si la información ya ha sido...

Page 93: ...iatamente la instalación Typical Se instalan todas las opciones bási cas P touch Editor Version 3 1 clips de arte plantillas Auto For mat Ayuda y 13 fuentes Compact Solamente se instala el P touch Editor Version 3 1 Para una Instalación Custom Al seleccionar Custom y a continuación hacer clic sobre el botón Next apare cerá un cuadro de diálogo que le permite seleccionar las opciones que quiera ins...

Page 94: ...n Next para comenzar la instalación 8 Después de instalar el P touch Editor apare cerá un cuadro de diálogo que le permitirá seleccionar si quiere o no instalar el controla dor de impresora Para instalar el controlador de impresora haga clic sobre el botón Yes Aparecerá el primer cuadro de diálogo Driver Setup informán dole que se va a instalar el controlador de impresora de la PT 2300 2310 Contin...

Page 95: ...a 5 y a continuación encienda la PT 2300 2310 Aparecerá un cuadro de diálogo mostrándole que el contro lador de impresora ha sido instalado 3 Haga clic sobre el botón Finish Aparecerá un cuadro de diálogo mostrándole que la instalación ha terminado 4 Seleccione Yes I want to restart my computer now haga clic sobre el botón Finish para reiniciar el PC y a continuación extraiga el CD ROM del PC Con ...

Page 96: ...300 2310 al PC utilizando el cable de inter face USB suministrado como se describe en las página 5 y después encienda la P touch 2300 2310 3 En el primer cuadro de diálogo Found New Hardware Wizard que aparece seleccione Install the software automatically Recomended y después haga clic sobre el botón Next 4 Si aparece un cuadro de diálogo de aviso indicando que el software no ha pasado la prueba d...

Page 97: ...ntroduciendo el CD ROM en la unidad cada vez que desee consultarla o bien instalándola en el disco duro para tenerla disponible rápidamente en cualquier momento Dado que la Guía del usuario es un documento HTML es necesario un navegador para poder leerla Desde el CD ROM 1 Inicie el Windows Explorer 2 Seleccione la unidad de CD ROM 3 Haga doble clic sobre Main htm en la carpeta Manual que hay dentr...

Page 98: ...e permitirá seleccionar si quiere sustituir agregar o eliminar el controla dor de impresora de la PT 2300 2310 4 Seleccione la operación deseada y a continu ación haga clic sobre el botón Next Si se selecciona Replace with new Brother PT 2300 2310 el controlador de impresora que haya sido instalado antes será eliminado y sustituido con uno nuevo Seleccione esta opción cuando quiera actualizar un c...

Page 99: ...ra reiniciar el PC Con Windows XP En el primer cuadro de diálogo Found New Hard ware Wizard que aparece seleccione Install the software automátically Recomended y después haga clic sobre el botón Next Si aparece un cuadro de diálogo de aviso indi cando que el software no ha pasado la prueba del logotipo Windows simplemente continúe con la instalación En el cuadro de diálogo Found New Hardware Wiza...

Page 100: ...10 Aparecerá un cuadro de diálogo pidiéndole que confirme que quiere eliminar todos los controla dores de impresora PT 2300 2310 Haga clic sobre el botón Yes Aparecerá un cuadro de diálogo mostrándole que los controla dores de impresora han sido eliminados Haga clic sobre el botón Finish Si aparece un cuadro de diálogo explicando que el PC ha de ser reiniciado seleccione la opción para reiniciarlo...

Page 101: ...disco duro cuando se impriman etiquetas largas o grandes can tidades de datos Espacio libre de memoria disponible Como mínimo 24 MB Puerto USB Unidad de CD ROM La aplicación se suministra en un CD ROM por lo tanto el PC deberá estar equipado con una unidad CD ROM 2 Conecte la PT 2300 2310 al Macintosh utilizando un cable de interface USB Asegúrese de dejar la PT 2300 2310 apagada 3 Encienda el Mac...

Page 102: ...nstall se visualizará un cuadro de diál ogo que le permitirá seleccionar las opciones que quiera instalar Seleccione solamente las opciones que quiera instalar y a continuación haga clic sobre el botón Install Para poder imprimir desde la PT 2300 2310 deberá seleccionar PT 2300 2310 Driver para la instalación 7 Cuando termine la instalación y aparezca el siguiente cuadro de diálogo haga clic sobre...

Page 103: ...o HTML es necesario un navegador para poder leerla Desde el CD ROM Haga doble clic sobre Main htm en la carpeta User s Guide que hay dentro de la carpeta P touch Editor Ver 3 1 del CD ROM Con el botón Start Haga doble clic sobre Main htm en la carpeta User s Guide que hay dentro de la carpeta P touch Editor Ver 3 1 instalada en el disco duro Para Eliminar el P touch Editor Version 3 1 y el Control...

Page 104: ...e tareas para visualizar el menú de inicio 2 Seleccione Programs 3 Seleccione P touch Editor 3 1 4 Haga clic sobre P touch Editor 3 1 Con el Explorador de Windows 1 Active el explorador de Windows 2 Seleccione la unidad y el directorio donde haya instalado el P touch Editor 3 Haga doble clic sobre Ptedit3 exe Una vez iniciado el P touch Editor se visualizará la pantalla siguiente INICIO DEL P TOUC...

Page 105: ...izar haciendo clic sobre el icono de las mismas en el sitio de propiedades Haga clic sobre un icono para visualizar sus propiedades Propiedades de página Barra de estado Barra de menús Área de composición Barra de herramientas de dibujo Área de impresión Barra de herramientas de la base de datos Banco de propiedades Banco de objetos Barra de herramientas de impresión Barra de título Reglas Icono d...

Page 106: ...ués haga clic con el botón izquierdo del ratón 3 El cursor parpadeará en el área de diseño para indicar que ahora puede introducir texto 4 Utilice el teclado del PC para introducir el texto 5 Para crear una nueva línea de texto presione la tecla Enter del teclado Con el P touch Editor versión 3 1 el texto habrá que teclearlo utilizando el modo de inserción El modo de sobreescritura no podrá utiliz...

Page 107: ... de base de datos del P touch Editor Version 3 1 La función de base de datos del P touch Editor Version 3 1 versión Windows utiliza archivos de base de datos que son compatibles con Microsoft Access 97 Si actualiza el P touch Editor Version 3 1 utilizando un programa disponible en el CD ROM el P touch Editor será compatible con Access 2000 Consulte el archivo Readme ubicado en English Ptouch Edito...

Page 108: ...resa con el texto en la prendar de vestir empleando una plancha Después de imprimir el texto en la cinta de tela y de haber cortado la etiqueta empleando unas tijeras coloque la etiqueta sobre una prenda planchada en la posición el la que desee ponerla de modo que el texto impreso pueda leerse correcta mente Cubra la etiqueta con otra tela y emplee un ajuste de la plancha de temperatura medio alta...

Page 109: ...imiento de la cinta 3 Cabezal de impresión Emplee un palillo con punta de algodón seco para frotar con cui dado la cabeza de impresión con movimiento hacia arriba y abajo Rodillos Emplee un palillo con punta de algodón seco para frotar cada rodillo con movi miento hacia arriba y abajo mientras los gira con el dedo 4 Instale un casete de cinta cierre la cubierta del compartimiento de la cinta y des...

Page 110: ... la derecha Mantenga presionado w hasta que el cursor se mueva a la posición deseada Para mover el cursor al final de la línea actual Mantenga presionado c y presione w TECLA DEL CURSOR HACIA ARRIBA Para mover el cursor a la línea anterior Presione h una vez Si el cursor está en la primera línea del texto se moverá al principio de la línea Para mover el cursor varias líneas hacia arriba Mantenga p...

Page 111: ...carácter deseado escrita en color El indicador Alt de la izquierda del visualizador se encenderá mientras se tiene presionado a TECLA SHIFT Para escribir una letra mayúscula o un símbolo impreso en la esquina superior izquierda de la tecla Mantenga presionado s y presione la tecla de la letra o símbolo deseado El modo de Mayúsculas funciona de forma similar que manteniendo pulsada s Le permite tec...

Page 112: ...ambién podrá utilizarse para seleccionar un ítem de una lista p ej añadir un símbolo o un carácter acentuado al texto o para aplicar un ajuste seleccionado Es posible que aparezcan en el visualizador de LCD algunas preguntas para que confirme un comando especialmente cuando la función que usted ha seleccionado es para borrar o afec tar archivos En estos casos si presiona r es como si respondiera s...

Page 113: ...ntenga pulsada c y presione W una vez Se visualizará la longitud de tabula ción actual 2 Presione h o e hasta que se visualice la longitud deseada o utilice las teclas numé ricas para introducir la longitud Para cambiar las unidades pulgadas o centímetros utilizadas para la indicación de la longitud de las tabulaciones presione M hasta que se visualicen las unidades deseadas 3 Presione r Para añad...

Page 114: ...ue usted ha seleccionado es para borrar o afec tar archivos En estos casos si presiona es como si respondiera sí Para contestar no presione r Consulte la descripción de la TECLA DE RETORNO de la page 27 Para borrar un carácter 1 Presione f w h o e para situar el cursor debajo del carácter que está inme diatamente a la derecha del carácter que usted desea borrar 2 Presione una vez Para borrar una s...

Page 115: ...ión reposición podrá utilizarse para elegir si se desea borrar todo el texto y todas las funciones de formato tipo de caracte res tamaño ancho estilo subrayado marco margen de la cinta alineación longitud de la tabulación impresión en modo espejo y longitud volverán a sus ajustes iniciales o borrar solamente texto Para borrar todo el texto y reponer todos los formatos a sus ajustes iniciales 1 Man...

Page 116: ...da c y presione s para pasar al modo de mayúsculas antes de pulsar la tecla de la letra 3 Presione f o w hasta que aparezca el carácter acentuado deseado ampliado dentro del recuadro en el centro del visualizador 4 Presione r El carácter acentuado será añadido al texto Para escribir una secuencia de caracteres acentuados mantenga presionada c antes de pulsar r Después continúe añadiendo caracteres...

Page 117: ... y presione f o w hasta que aparezca el símbolo deseado ampliado en el recuadro en el centro del visual izador 3 Presione r El símbolo será añadido al texto Para escribir una secuencia de símbolos mantenga presionada c antes de pul sar r Después continúe añadiendo símbolos seleccionándolos como se ha explicado en los pasos 2 y 3 manteniendo pulsada c y presionando r Después de haber seleccionado e...

Page 118: ...presionando _ 3 Presione r para aplicar el ajuste seleccionado El indicador de longitud se encenderá cuando seleccione un ajuste que no sea DEFAULT Ajuste de formato automático Ajuste de longitud de la etiqueta Aajuste del margen de la cinta Aajuste de la alineación horizontal DEFAULT OFF FULL LEFT 3 5 FLOPPY 2 8 7 0 cm NONE CENTER miniDV 1 7 4 3 cm NONE CENTER VHS SPINE 5 5 14 0 cm NONE CENTER VH...

Page 119: ...i ché del membrete y adhiéralo al tampón de tinta o soporte de películas Después de definir el formato de sello para un casete de sello grande 1 24 mm de ancho asegúrese de utilizar la función de Borrado para devolver todas las funciones de formato a sus ajustes iniciales TXT FORMAT antes de crear la siguiente etiqueta Para adherir un membrete 1 Extraiga el marco del membrete de entorno al lado al...

Page 120: ...do 2 Siguiendo manteniendo presionada c continúe presionando 1 hasta que se visualice el tipo de caracteres actualmente ajustado 3 Para aplicar el ajuste de tipo de caracteres seleccionado a todo el texto suelte c El tamaño de los caracteres puede ajustarse empleando las funciones de tamaño Size y de ancho Wide Puesto que el tamaño de los caracteres que puede utilizarse depende del ancho de la cin...

Page 121: ...ce el tamaño actualmente ajustado mediante el indicador del mismo El ajuste de tamaño actual se muestra mediante los indicadores de tamaño en la parte superior del visualizador 3 Para aplicar el ajuste de tamaño seleccionado a todo el texto suelte c Con el ajuste AUTO seleccionado y cinta de 3 4 18 mm o 1 24 mm de ancho instalada el texto consistente en solamente una línea de letras mayúsculas sol...

Page 122: ...R MAL Consulte el apartado de Referencia al final de esta sección para ver muestras de los ajustes disponibles Para cambiar el ajuste del estilo 1 Manteniendo presionada c pulse una vez 4 y mantenga presionada c para hacer que se visualice el estilo actualmente ajustado 2 Siguiendo manteniendo presionada c continúe presionando 4 hasta que se visualice el estilo actualmente ajustado mediante el ind...

Page 123: ...er un diseño más decorativo o una etiqueta con más énfasis El ajuste inicial es FRAME OFF sin embargo también hay disponibles los siguientes seis ajustes Si se selecciona cualquier ajuste que no sea FRAME OFF se encenderá el indicador de Undl Frm situado a la derecha del visualizador Para cambiar el ajuste del marco 1 Manteniendo presionada c pulse una vez 6 y mantenga presionada c para hacer que ...

Page 124: ...ara hacer que se visualice la cinta actualmente ajustado 2 Siguiendo manteniendo presionada c continúe presionando E hasta que se visualice la cinta actualmente ajustado 3 Para aplicar el ajuste de la cinta seleccionado a todo el texto suelte c Podrá elegir alinear texto en una de las tres formas disponibles Además si utilizó la función de longitud para ajustar la longitud de la etiqueta los texto...

Page 125: ...uetas con impresión en modo espejo a un vidrio o en otro material transparente podrán leerse correctamente desde el lado opuesto Cuando emplee la función de impresión en modo espejo el texto se imprimirá en cinta transparente El ajuste inicial para la impresión en mode espejo es OFF Para activar o desactivar la impresión en mode espejo 1 Manteniendo presionada c pulse una vez p y mantenga presiona...

Page 126: ...ice brevemente la longitud actual de la etiqueta texto y ambos márge nes y después haga que se visualice el ajuste de longitud de etiqueta actual ON u OFF 2 Manteniendo presionada c continúe presionando T hasta que se visualice el ajuste de longitud de etiqueta deseado Cuando seleccione ON se encenderá el indicador de longitud 3 Suelte c Si había seleccionado ON se visualizará la longitud actual d...

Page 127: ...se visualice el ajuste de corte automático deseado 3 Suelte c para aplicar el ajuste de corte automático seleccionado Después de haber introducido su texto y de haber elegidos los ajustes de formato deseados podrá imprimir Si la función de corte automático está activada ON la etiqueta se cortará automática mente después de haberse impreso Para imprimir una etiqueta Presione p una vez Se visualizar...

Page 128: ...o de cada copia se visualizará mientras esté copiándose Si la función de Corte automático está ajustada en ON cada etiqueta será cortada después de imprimirse Esta función le permite imprimir hasta 9 copias del mismo texto Para emplear la función de impresión repetida 1 Mantenga presionada c y presione I En el visualizador aparecerá el mensaje COPIES con el ajuste actual 2 Presione una tecla numér...

Page 129: ...tación de CA ALMACENAMIENTO DE TEXTO Para almacenar un archivo de texto 1 Mantenga presionada c y presione 7 En el visualizador aparecerá el mensaje STORE con el número de archivo seleccionado actualmente Si ya se ha almacenado el número máximo de caracteres en el visualizador apare cerá el mensaje de error MEMORY FULL Cuando ocurra esto tendrá que borrar un mensaje existente antes de poder almace...

Page 130: ...exto introdu cido en el número de archivo seleccionado se vera en la pantalla BORRADO DE UN ARCHIVO Para borrar un archivo de texto 1 Mantenga presionada c y presione 9 En el visualizador aparecerá el mensaje CLEAR con el número de archivo y el principio del texto almacenado o invocado más recientemente Para abandonar la función de borrado de la memoria sin borrar el archivo de texto mantenga puls...

Page 131: ... no están ella Si las pilas están gastadas reemplácelas por otro nuevo 4 Los caracteres impresos no se forman correctamente Si está empleando pilas alcalinas quizás estén gastadas Pruebe utilizando el adaptador de CA o reemplace las pilas por otras nuevas 5 Aparece una línea horizontal en blanco a través de la etiqueta impresa Limpie el cabezal de impresión como se ha explicado en la página 24 6 A...

Page 132: ... mensaje aparecerá si intenta intro ducir un carácter símbolo espacio o cambiar de línea cuando ya haya sido introducido el número máximo de caracteres Borre algo del texto existente para poder introducir más texto CAN T HERE Este mensaje aparecerá cuando man tenga presionada c y presione O si el cursor está al final del texto Ponga el cursor debajo de un número antes de mantener pre sionada c y p...

Page 133: ... mensaje aparecerá si el cursor está al final del texto cuando man tenga pulsada c y presione O Mueva el cursor hasta debajo del número manteniendo pul sada c y presionando O LENGTH LIMIT Este mensaje aparece si el texto es más largo de 3 3 1 3 1 metro cuando trate de imprimirlo Acorte el texto a menos de3 3 1 3 1 metro antes de tratar imprimir Este mensaje aparecerá si utilizó la función de longi...

Page 134: ...de la máquina Póngase en contacto con su representante de servicio Desconecte la alimentación de la máquina y entonces mien tras mantiene presionado c y R vuelva a conectar la ali mentación SOLDER X Este mensaje aparece si hay algún problema con el software de la máquina Póngase en contacto con su representante de servicio TAB LIMIT Este mensaje aparecerá si ya se ha añadido el número máximo de ta...

Page 135: ...exión automática de la alimentación si no se pulsa ninguna tecla durante 5 minutos Cabezal de impresión 128 puntos 180 dpi Dimensiones 7 3 5 W 9 1 2 D 2 1 2 H 194 242 65 5 mm Peso 1 83 lbs 830 g sin casete de cinta ni pilas instalados Tamaño de la memoria intermedia Máximo de 91 caracteres Máximo de seis líneas Tamaño de la memoria Aprox 300 caracteres Tamaño de caracteres Seis tamaños 6 9 12 18 2...

Page 136: ...TZ S151 1 24 mm adhesivo fuerte caracteres negros sobre fondo transparente 1 25 99 TZ S155 1 24 mm adhesivo fuerte caracteres blancos sobre fondo transparente 1 25 99 TZ S211 1 4 6 mm adhesivo fuerte caracteres negros sobre fondo blanco 1 15 99 TZ S221 3 8 9 mm adhesivo fuerte caracteres negros sobre fondo blanco 1 17 99 TZ S231 1 2 12 mm adhesivo fuerte caracteres negros sobre fondo blanco 1 18 9...

Page 137: ... TZ 451 Caracteres negros sobre fondo rojo 1 23 99 TZ 651 Caracteres negros sobre fondo amarillo 1 23 99 TZ 252 Caracteres rojos sobre fondo blanco 1 23 99 TZ 354 Caracteres dorados sobre fondo negro 1 26 99 TZ 355 Caracteres blancos sobre fondo negro 1 26 99 TZ B51 Caracteres negros sobre cinta adhesiva naranja fluorescente de 16 4 de largo 1 28 99 Cintas laminadas de 3 4 18 mm TZ 141 Caracteres ...

Page 138: ...negro 1 20 99 TZ 631 Caracteres negros sobre fondo amarillo 1 17 99 Cintas laminadas de 3 8 9 mm TZ 121 Caracteres negros sobre fondo transparente 1 14 99 TZ 221 Caracteres negros sobre fondo blanco 1 16 99 TZ 325 Caracteres blancos sobre fondo negro 1 18 99 TZ 421 Caracteres negros sobre fondo rojo 1 16 99 Cintas laminadas de 1 4 6 mm TZ 111 Caracteres negros sobre fondo transparente 1 12 99 TZ 2...

Page 139: ...1 800 947 1445 Para adquirir accesorios por Internet http www brothermall com Para hacer pedidos por correo o pagar con cheque le rogamos que rellene la hoja de pedido de accesorios y la envíe junto con el importe a Brother International Corporation Attn Consumer Accessory Division P O Box 341332 Bartlett TN 38133 1332 Sistema de contestación por fax El servicio de asistencia postventa de Brother ...

Page 140: ...ga su pedido a Llame al servicio de llamada gratis 1 888 879 3232 en cualquier momento b Haga su pedido por Internet en www brothermall com c Envíe por fax la hoja de pedido rellena al 1 800 947 1445 d Envíe por correo la hoja de pedido rellena inclu yendo el pago apropiado a BROTHER INTERNA TIONAL CORP Attn Consumer Accessory Div P O Box 341332 Bartlett TN 38184 1332 Subtotal de suministros acces...

Page 141: ...800 947 1445 Para adquirir accesorios por Internet http www brothermall com Para hacer pedidos por correo o pagar con cheque le rogamos que rellene la hoja de pedido de accesorios y la envíe junto con el importe a Brother International Corporation Attn Consumer Accessory Division P O Box 341332 Bartlett TN 38133 1332 Sistema de contestación por fax El servicio de asistencia postventa de Brother ti...

Page 142: ...ga su pedido a Llame al servicio de llamada gratis 1 888 879 3232 en cualquier momento b Haga su pedido por Internet en www brothermall com c Envíe por fax la hoja de pedido rellena al 1 800 947 1445 d Envíe por correo la hoja de pedido rellena inclu yendo el pago apropiado a BROTHER INTERNA TIONAL CORP Attn Consumer Accessory Div P O Box 341332 Bartlett TN 38184 1332 Subtotal de suministros acces...

Page 143: ......

Reviews: