Brother MFC-580 Owner'S Manual Download Page 19

   Preparation and Simple Use Guide   

11

PREP

ARA

TION

AND SIMPLE USE

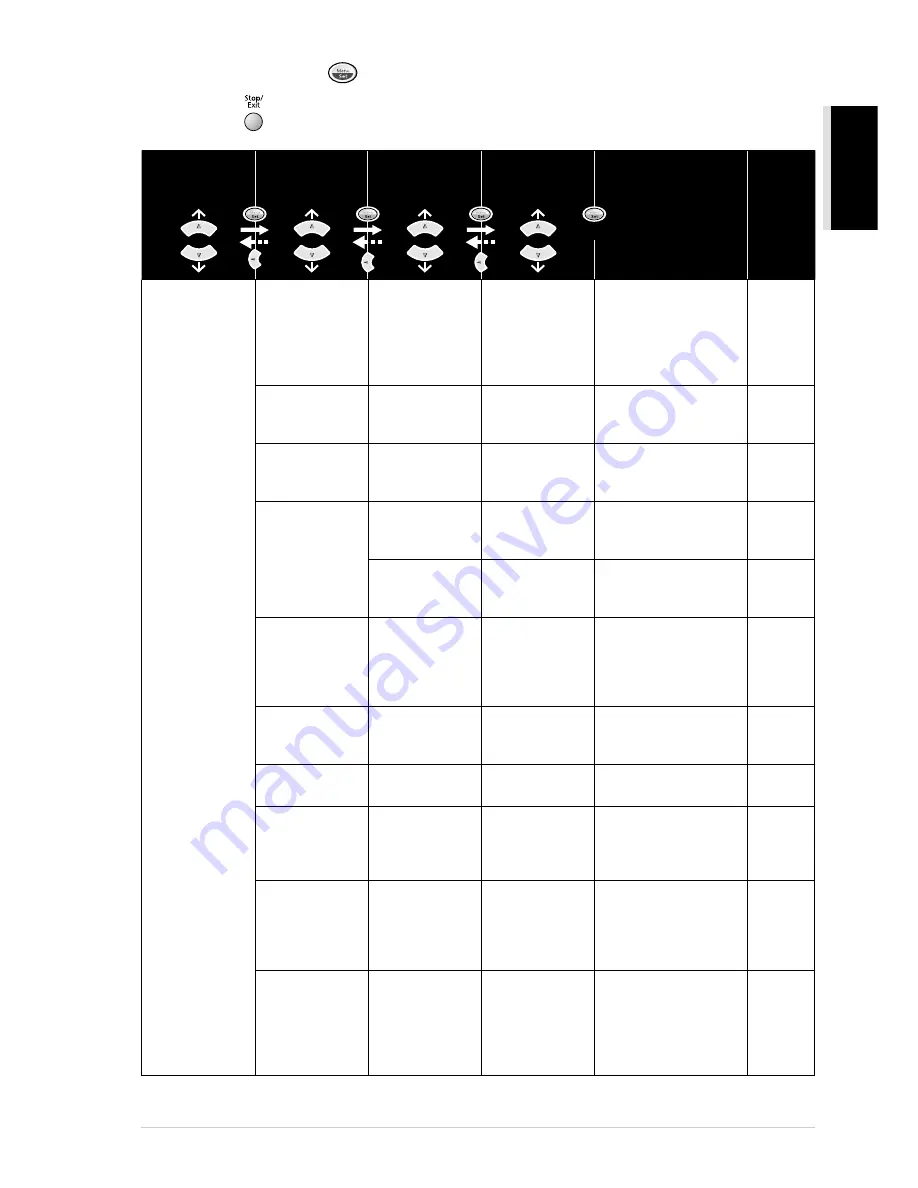
To access the menu, press 


Menu/Set

.

To exit, press 


Stop/Exit

.

* The factory setting (option) is shown in bold.

1. GENERAL 

SETUP

1. PAPER 

TYPE

PLAIN

INKJET
GLOSSY
(4-COLOUR/
3-COLOUR)
TRNSPRNCY

Identifies the type of 
paper in the cassette 
Multi-purpose sheet 
feeder.

15

2. DATE/TIME

Enter date and time for 
LCD display and to print 
on transmissions.

15 

3. STATION ID

Program the name, fax 
number to appear on 
each transmitted page.

16 

4. VOLUME

1. RING

OFF
HIGH

LOW

Adjusts ring volume.

17 

2. BEEPER

OFF
HIGH

LOW

Adjusts beeper volume.

17 

5. PBX

ON

OFF

Turn on this function if 
the machine is 
connected to PABX 
(private automatic 
Branch Exchange.)

17 

6. CLOCK 

CHANGE

Adjust the machine’s 
clock by one hour for 
summer/winter time.

18 

7. POWER 

SAVE

ON

OFF

Power save mode.

18

8. TONE/PULSE

(Except for 
the Nordic 
countries)

TONE

PULSE

Select the dialling mode.

18 

9. LOCAL 

LANGUAGE
(For Czech, 
Hungarian and 
Polish)

CZECH
HUNGARIAN
POLISH

ENGLISH

Allows you to change 
the LCD language.

See 

Quick 

Setup 

Guide

9. LOCAL 

LANGUAGE
(For Norwegian, 
Swedish, 
Danish and 
Finnish)

NORWEGIAN
SWEDISH
DANISH
FINNISH

ENGLISH

Allows you to change 
the LCD language.

See 

Quick 

Setup 

Guide

Main Menu

Menu

Selections

Options

Descriptions

Page

Submenu

to accept

Summary of Contents for MFC-580

Page 1: ...MFC 580 OWNER S MANUAL ...

Page 2: ...E APPROPRIATE CONNECTOR APPROVAL INFORMATION Brother advises that this product may not function correctly in a country other than where it was originally purchased and does not offer any warranty in the event that this product is used on public telecommunication lines in another country ...

Page 3: ...ii ...

Page 4: ...e or function by checking the Index at the back of this manual Also throughout this manual you will see special symbols alerting you to important information cross references and warnings Illustrations of some screen displays also help you choose the correct key presses Symbols Used In This Manual Additionally the machine has a Reports key Press Reports and 1 to print a help list of basic operatio...

Page 5: ...m settings more quickly by pressing Menu Set and the menu number using the dial pad A complete list of the function selections options and settings that are available is provided at the beginning of this manual See Menu Mode Menu Selection Table page 10 Alternating Displays The LCD sometimes alternates between the currently selected option and a help message giving brief instructions about how to ...

Page 6: ...mbers for Easy Dialling 19 Chapter 2 Sending a Fax Scanning Adjustment 20 Dialling a Number 21 Sending Operation 22 Chapter 3 Receiving a Fax Receive Mode Settings 24 Receiving a Fax 26 Chapter 4 Telephone Voice Operation Making Voice Calls with an External Telephone 28 Chapter 5 Printing Reports Transmission Report and Journal Setting 30 Using the Reports Key 31 ADVANCED FAX USE Chapter 6 Advance...

Page 7: ... Printer Driver 53 Choosing the Right Kind of Paper 53 Multi Purpose Sheet Feeder 54 Simultaneous Printing Faxing 54 Printer Operation Keys 54 Checking the Print Quality 54 Chapter 12 Printer Driver Settings For Windows Only Using the Brother MFC 580 Printer Driver 55 Paper Tab 55 The Quality Colour Tab 58 Advanced Tab 62 Support Tab 65 Chapter 13 Using the Windows Based Brother Control Centre For...

Page 8: ...m your Macintosh Application 101 Using Brother TWAIN Scanner Driver with Your Apple Macintosh 105 MAINTENANCE Chapter 17 Troubleshooting and Maintenance Error Messages 111 Document Jams and Paper Jams 113 Difficulty with Operation 117 How to Improve Print Quality 121 Packing and Shipping the machine 124 Regular Maintenance 127 IMPORTANT INFORMATION Chapter 18 Important Safety Information Important...

Page 9: ...w the instructions on the Brother Quick Setup Guide to set up the machine 2 Setting the Document Documents must be between 9 and 21 6 cm wide and 12 7 and 35 6 cm long This machine can only scan an image 20 8 cm wide regardless of how wide the document is Make sure you insert documents face down top edge first Adjust the paper guides to fit the width of your document The automatic document feeder ...

Page 10: ...or other equipment that might disrupt the power supply Avoid interference sources such as speakers or the base units of cordless phones DO NOT use curled wrinkled folded or ripped document or document with staples paper clips paste liquid paper or tape attached DO NOT use cardboard newspaper or fabric Make sure documents written with ink are completely dry 3 Sending a black white fax Insert the do...

Page 11: ...tible inks may cause damage to the print head in this machine and such damage will not be covered by warranty Warranty coverage does not apply to problems caused by the use of 3rd party ink or 3rd party ink cartridges We can only recommend the use of genuine Brother consumables If you install an ink cartridge in the wrong colour position you must clean the print heads several times after correctin...

Page 12: ...chine is earthed via the mains plug you can protect yourself from potentially hazardous electrical conditions on the telephone network by keeping the power to the machine on when you connect it to a telephone line Similarly you can protect yourself when you want to move the machine by disconnecting the telephone line first and then the power cord For U K If you need to remove the moulded mains plu...

Page 13: ...rcuit such that extension devices are connected downstream of the machine in a master slave configuration In such a configuration this machine can always detect whether a telephone is in use thus it will not attempt to seize the line during that time This is known as telephone off hook detection The inadvisable configuration is shown in figure 1 below and the recommended master slave configuration...

Page 14: ...s there are only 8 10 seconds of CNG tones left for the fax handshake Make sure you carefully follow instructions in this manual for recording your outgoing message We do not recommend using the toll saver feature on your external answering machine if it exceeds 4 rings Connections 1 You may connect an external TAD to the machine as shown below 2 Set your external TAD to two rings or less The mach...

Page 15: ...r OGM by giving your Remote Activation Code for people sending manual faxes For example After the beep leave a message or send a fax manually by pressing 51 and Start Please note that some faxes that are sent manually cannot be received automatically because some fax machines do not send a fax tone if the call is manually dialled In these cases you must inform callers that they must enter the remo...

Page 16: ... quality for Copy Colour Copy Makes a full colour copy Mono Copy Makes a black and white copy 4 Reports You can access the Reports menu so you can select a report to print Help Quick Dial Journal Xmit Verify System Setup List and Order Form 5 Liquid Crystal Display LCD LCD displays messages to help you set and operate the machine 6 Dial Pad Dials phone and fax numbers and can be used as a keyboard...

Page 17: ...lour fax Mono Fax Start Starts sending a black and white fax 0 Fax Resolution For the Next Fax Only Sets the resolution when you send a fax A Tel R Telephone Recall This key is used to have a telephone conversation having picked up the external handset in F T pseudo ringing etc Also use this key to gain access to an outside line and or to recall the operator or transfer a call to another extension...

Page 18: ... menu level Press or key to scroll to your next menu selection and then press Menu Set When you finish setting an option the LCD shows ACCEPTED You can also program the machine by pressing Menu Set and then the menu numbers For example to set FAX RESOLUTION to FINE press Menu Set 2 2 2 and or to select FINE and then press Menu Set Access the Menu Go to next menu level Accept an option Scroll throu...

Page 19: ...17 2 BEEPER OFF HIGH LOW Adjusts beeper volume 17 5 PBX ON OFF Turn on this function if the machine is connected to PABX private automatic Branch Exchange 17 6 CLOCK CHANGE Adjust the machine s clock by one hour for summer winter time 18 7 POWER SAVE ON OFF Power save mode 18 8 TONE PULSE Except for the Nordic countries TONE PULSE Select the dialling mode 18 9 LOCAL LANGUAGE For Czech Hungarian an...

Page 20: ...ter code to activate or deactivate the machine from a remote location 38 6 AUTO REDUCTION ON OFF Reduces size of image 26 7 MEM RECEIVE ON OFF Automatically stores any incoming faxes in its memory if it runs out of paper 27 8 POLLING RX STANDARD SECURE TIMER You call another fax machine to receive a fax from it 39 2 SETUP SEND 1 CONTRAST AUTO LIGHT DARK Change the lightness or darkness of a fax yo...

Page 21: ...ial numbers in memory 19 2 SETUP GROUPS Set up a Group number for broadcasting 34 4 REPORT SETTING 1 XMIT REPORT ON ON IMAGE OFF OFF IMAGE Initial setup for Transmission Verification Report and Journal period 30 2 JOURNAL PERIOD OFF 7 4 2 Days 24 12 6 3 1 Hours 30 5 REMOTE FAX OPT 1 FAX FWD ON OFF Set the machine to forward faxes 42 2 FAX STORAGE ON OFF Store incoming faxes in memory for remote re...

Page 22: ... Danish manual included on the CD ROM 3 COPY 1 QUALITY NORMAL FAST BEST Selects copy quality 51 2 COLOUR ADJUST 1 RED R R R R R Adjusts the amount of Red in copies 51 2 GREEN G G G G G Adjusts the amount of Green in copies 51 3 BLUE B B B B B Adjusts the amount of Blue in copies 51 3 CONTRAST Adjusts the contrast 51 4 TEST PRINT You can print a test sample page to check print quality and adjust th...

Page 23: ...settings remain unaffected 1 Press Menu Set 1 2 2 Enter the two digits of the year and press Menu Set 02 is registered as 2002 in the machine 3 Enter two digits for the month and press Menu Set 4 Enter two digits for the day and press Menu Set 5 Enter the time in 24 hour format and press Menu Set 6 Press Stop Exit The print quality of black ink varies depending on the kind of glossy paper you are ...

Page 24: ...example the machine is installed in the United Kingdom and your national telephone number is 0161 444 5555 then you must set the fax number of your station ID as 44 161 444 5555 1 Press Menu Set 1 3 2 Enter your fax number up to 20 digits and press Menu Set 3 Enter your name up to 20 characters using the dial pad and the chart To enter a space press twice 4 Press Menu Set 5 Press Stop Exit When yo...

Page 25: ...beeper is set to LOW or HIGH the machine beeps every time you press a key or make an error and at the end of sending or receiving a fax 1 Press Menu Set 1 4 2 2 Press or to select your setting 3 When the screen displays the setting you want press Menu Set 4 Press Stop Exit PABX and TRANSFER The machine is initially set to be connected with PSTN Public Switched Telephone Network lines However many ...

Page 26: ... Menu Set when the screen displays your selection 4 Press Stop Exit Setting the Dialling Mode Tone Pulse Except for the Nordic Countries The machine is initially set to TONE If you are using a PULSE dial line you can change the setting to PULSE by following the steps below 1 Press Menu Set 1 8 The screen prompts you to select PULSE or TONE 2 Use or to select the dialling mode 3 Press Menu Set when...

Page 27: ... store the number without a name 5 Press Menu Set Return to Step 2 to store another Speed Dial number OR Press Stop Exit When you dial a Speed dial number the screen displays the name you have stored or if you have not stored a name the number you have stored Changing Speed Dial Numbers If you try to store a Speed Dial number in a location where a number is already stored the screen displays the c...

Page 28: ...lect additional settings The display returns to Setup Send menu 6 Enter a fax number and press Mono Fax Start to send a fax Fax Resolution When you have a document in the ADF you can use the Fax Resolution key to temporarily change the setting Press Fax Resolution repeatedly until the LCD shows the setting you want OR You can change the default setting 1 Press Menu Set 2 2 2 2 Press or to select t...

Page 29: ...ed number will be dialled in the order you entered it as soon as you press Mono Fax Start For example You store 555 on Speed Dial 01 and 7000 on Speed Dial 02 If you press Search Speed Dial 0 1 Search Speed Dial 0 2 and Mono Fax Start you can dial 555 7000 To temporarily change a number you can substitute part of the number with manual dialling using the dial pad So if you press Search Speed Dial ...

Page 30: ...he fax number you want to call See Dialling a Number page 21 4 When you hear the fax tone press Mono Fax Start 5 To hang up replace the handset of the external phone Colour Fax transmission Your Multi Function Centre allows you to transmit a colour fax 1 Insert the document face down in the ADF 2 Enter the fax number using the dial pad Speed Dial or Search 3 Press Colour Fax Start If the machine i...

Page 31: ...e machine will start dialling and sending the fax If memory becomes full the machine will send the document in real time even if REAL TIME TX is set to OFF Sometimes you may want to send an important document immediately without waiting for memory transmission You can set REAL TIME TX to ON 1 Insert the document face down in the ADF 2 Press Menu Set 2 2 5 3 To change the default setting press or t...

Page 32: ...t from the phone company ringing to alert you to pick up the call Lift the external telephone s handset and then press Tel R to answer If you select this setting you will need to set the Ring Delay and F T Ring Time features on the following pages 3 TAD ANSWER MACH with an External Answering Machine This is the only setting in which you can use an external answering machine Your telephone answerin...

Page 33: ...30 40 or 70 seconds no other phones on the same line ring the special F T pseudo ring However you can answer the call on any extension phone in a separate wall socket on the same line as the machine See Operation from an External or Extension Telephone page 37 1 Press Menu Set 2 1 3 2 Press or to select how long the machine will ring to alert you that you have a voice call and then press Menu Set ...

Page 34: ...or phone line connection just press the Activation Code 5 1 at the external or extension telephone 1 Press Menu Set 2 1 4 2 Press or to select ON or OFF and press Menu Set 3 Press Stop Exit Receiving a Fax Printing a Reduced Incoming Document Auto Reduction If you choose ON the machine reduces an incoming document automatically so that it fits on one page of A4 recording paper regardless of the si...

Page 35: ...eeder and press Mono Fax Start If the MEMORY RECEPTION switch is OFF at this time The current fax reception will continue with the remaining page s being stored in memory subject to available memory Subsequent incoming fax calls will not be automatically answered until fresh paper is put in the multi purpose sheet feeder To print the last fax received put paper in the multi purpose sheet feeder an...

Page 36: ...ou have stored in Speed Dial memories See Storing Speed Dial Numbers page 19 1 Pick up the external telephone s handset 2 Press Search Speed Dial 3 To search for numbers alphabetically by name enter the first letter of the name by using the dial pad and then press or OR To search for numbers numerically by Speed Dial number press or 4 When the screen displays the name you want to call press Mono F...

Page 37: ...er 2 When you are asked to enter any number press on the control panel of the machine Any digits dialled after this sends tone signals 3 When you hang up the machine returns to pulse dialling service Fax Tel F T Mode When you share one line for your telephone and fax machine in the Fax Tel F T Mode the machine can determine whether an incoming call is a fax or a telephone call See Select Receive M...

Page 38: ...u typically send multiple faxes to the same destinations you may need a reminder to identify each fax transmission You can select OFF IMAGE or ON IMAGE to print a portion of the first page of the fax message on the report 1 Press Menu Set 2 4 1 2 Press or to select OFF OFF IMAGE ON and ON IMAGE 3 Press Menu Set 4 Press Stop Exit Setting the Journal Period You can set the machine to print activity ...

Page 39: ...ps and functions Lists names and numbers stored in Speed Dial memory in numerical order Journal lists information about the last 200 incoming and outgoing faxes TX means Transmit RX means Receive Prints a Transmission Verification Report for your last transmission Lists settings for GENERAL SETUP SETUP RECEIVE SETUP SEND REPORT SETTING and REMOTE FAX OPT You can print an accessories order form to ...

Page 40: ...nd a fax up to 24 hours later 1 Insert the document face down in the ADF 2 Press Menu Set 2 2 3 3 Enter the time you want the fax to be sent in 24 hour format for example enter 19 45 for 7 45 PM and press Menu Set 4 Press 1 if you want to select additional settings The display returns to the SETUP SEND menu OR Press 2 if you are finished choosing settings and go to Step 5 The screen prompts you to...

Page 41: ...he same broadcast Use the Search Speed Dial to help you choose the numbers easily After the broadcast is completed a Broadcast Report will be printed automatically to let you know the results 1 Insert the document face down in the ADF 2 Enter a number using Speed Dial Group number Search or the dial pad See Setting Groups for Broadcasting page 34 Example Group number 3 Press Menu Set You will be p...

Page 42: ... example for Speed Dial location 05 and 09 press Search Speed Dial 0 5 and Search Speed Dial 0 9 on the dial pad 5 Press Menu Set The screen prompts you to enter a name 6 Use the dial pad to enter a name for the group up to 15 characters for example NEW CLIENTS and press Menu Set See Entering Text page 139 7 Press Stop Exit Cancelling a Job While Scanning the Document You can cancel a job while yo...

Page 43: ...enu Set 2 0 1 2 Enter a 4 digit number as a new password 3 Press Menu Set The screen prompts you to re enter the password 4 Re enter the password and press Menu Set 5 Press or to choose SET TX LOCK 6 Press Menu Set The screen prompts you to enter the password 7 Enter a 4 digit password followed by Menu Set This is the same as the security password of the machine already stored The screen displays ...

Page 44: ...r 2 seconds followed by TX LOCK MODE TX Lock is now switched ON Switching OFF TX Lock 1 When TX Lock is switched ON press Menu Set 2 Enter a 4 digit password and press Menu Set The screen displays ACCEPTED then after 2 seconds the display reverts to normal TX Lock is now switched OFF If you forget the TX Lock password please contact your Brother dealer or Brother for assistance If the password you...

Page 45: ...s used only in Fax Tel F T Mode You have to set Remote Activation to ON in Menu Set 2 1 5 to use 5 1 or 5 1 If you answer a call and no one is on the line assume you re receiving a fax At an extension phone press 5 1 wait for fax receiving tones chirps then hang up At an external phone press 5 1 and wait for the phone to be disconnected the screen displays RECEIVING before you hang up Your caller ...

Page 46: ...ou can have a separate phone number for the machine The machine has a BT Call Sign compatible distinctive ringing function allowing you to dedicate a second phone number on the same phone line just for receiving faxes To enable the machine to work with BT Call Sign Only with your external phone 1 Set the machine to MANUAL mode Menu Set 2 1 2 2 Press Menu Set 2 0 2 The screen displays the current s...

Page 47: ...is when you call another fax machine to receive a fax from it Setup for Polling Receive Standard 1 Press Menu Set 2 1 8 2 Press or to choose STANDARD and press Menu Set 3 Enter the fax number you are polling and press Mono Fax Start Setup for Polling Receive with Secure Code You need to make sure you are using the same secure code as the other party 1 Press Menu Set 2 1 8 2 Press or to choose SECU...

Page 48: ...just specify several destinations in Step 4 Afterwards a Sequential Polling Report will be printed 1 Press Menu Set 2 1 8 2 Press or to choose STANDARD SECURE or TIMER and press Menu Set when the screen displays the setting you want 3 If you selected STANDARD go to Step 4 If you selected SECURE enter a four digit number and press Menu Set and then go to Step 4 If you selected TIMER enter the time ...

Page 49: ...t with Secure Code When you choose POLLING SECURE anyone who polls the machine must enter the polling ID number 1 Insert the document face down in the ADF 2 Press Menu Set 2 2 6 3 Press or to choose SECURE and press Menu Set 4 Enter a four digit number and press Menu Set 5 Press 1 to select DOC if you want the machine to scan the printed document at the time it is polled OR Press 2 to select MEMOR...

Page 50: ...on t lose the messages Fax Forwarding Programming a Fax Forwarding Number When Fax Forwarding and Fax Storage are set to ON the machine stores the received fax in memory then dials the fax machine phone number you ve programmed and forwards the fax message 1 Press Menu Set 2 5 1 2 Press or to select ON or OFF and press Menu Set The screen prompts you to enter the number of the fax machine where fa...

Page 51: ...mple if your hotel room does not have a fax machine you can enter the number of the fax machine at the hotel s Front Desk 1 Dial your fax number from a touch tone phone 2 When the machine answers and beeps immediately enter your Remote Access Code the factory setting is 1 5 9 3 The machine signals the kinds of messages received 1 long beep Fax message s No long beep No messages 4 The machine promp...

Page 52: ...ax Storage ON Press 6 Turn Fax Storage OFF Press 7 This is only possible if there are no faxes stored in the memory or if all faxes have been erased using Remote Control 9 6 3 Retrieve or Erase a Fax Press 9 6 then to Retrieve all faxes Press 2 then enter the number of remote fax machine and then press After the beep hang up and wait Erase all fax messages Press 3 If the data stored in the memory ...

Page 53: ...ne prints your fax messages Changing the Fax Forwarding Number You can change the default setting of your fax forwarding number from a remote fax machine 1 Dial the machine s number 2 When you hear the beep immediately enter your Remote Access Code the factory setting is 1 5 9 3 When you hear two short beeps use the dial pad to press 9 5 4 4 Enter the new number of the remote fax machine where you...

Page 54: ... Multiple Copies Not Available for Colour Copies You can make multiple copies in black and white 1 Insert the document face down in the ADF 2 Using the dial pad enter the number of copies you want up to 99 For example press 3 8 for 38 copies 3 Press Mono Copy Do NOT pull on the paper while copying is in progress To cancel press Stop Exit Press Stop Exit again to release the original document Incom...

Page 55: ...Copy Setting You can improve your copies by using the Copy keys Quality and Options These settings are temporary and the machine returns to its default settings when you finish copying Copying Using Multiple Settings You can try different combinations of settings for the best results After you finish your settings using the Quality and Options keys the screen displays Press or if you want to selec...

Page 56: ...o and special copy options for the next copy only Press Quality and NORMAL Recommended mode for ordinary printouts Good copy quality with adequate copy speed FAST Fast copy speed and lowest ink consumption Use FAST to save time documents to be proof read large documents or many copies BEST Use this mode to copy precise images such as photographs BEST uses the highest resolution and slowest speed P...

Page 57: ... Press Mono Copy or Colour Copy OR Press or for additional settings Enlarge Reduce Copies 1 Insert the document face down in the ADF 2 Press Options and press or to select ENLARGE REDUCE and then press Menu Set 3 Press or to choose an enlargement or reduction ratio and press Menu Set You can reduce to 94 78 or 50 of the original size OR You can enlarge to 104 150 or 200 OR You can select MANUAL an...

Page 58: ...to one page 1 Insert the documents face down in the ADF 2 Press Options and or to select SPECIAL and then press Menu Set Press or to select 2IN1 and then press Menu Set 3 Press Mono Copy OR Press or additional settings 2 in 1 Special Copy Option is not available with reduced enlarged or colour copies 2 1 1 2 ...

Page 59: ...L FAST or BEST and press Menu Set when the screen displays your selection 3 Press Stop Exit Colour Adjustment 1 Press Menu Set 3 2 2 Press or to select RED GREEN or BLUE and press Menu Set 3 Press or to adjust the degree of colour and press Menu Set 4 Return to Step 2 to select the next colour OR Press Stop Exit Copy Contrast You can choose the contrast setting for a copy Greater contrast can help...

Page 60: ...xamples of documents which should not be copied Paper money Bonds or other certificates of indebtedness Certificates of Deposit Armed Forces Service or Draft papers Passports Postage stamps cancelled or uncancelled Immigration papers Welfare documents Cheques or Drafts drawn by Governmental Agencies Identification Documents badges or insignias Licences and Certificates of Title to motor vehicles C...

Page 61: ...replace only the cartridge that s empty Bi directional Parallel Interface The parallel interface allows bi directional IEEE 1284 compliant communication with your computer USB Universal Serial Bus Interface allows for fast communication with your computer Straight Paper Path The machine can use various types of paper plain paper Ink Jet Paper glossy paper transparencies and envelopes Using the app...

Page 62: ... and resumes when copying or fax receiving is complete Fax sending continues during PC printing Printer Operation Keys Stop Exit Key If the screen displays REMAINED DATA you can clear data remaining in the printer memory by pressing Stop Exit Ink Key When you press Ink the LCD displays If you are having trouble with one of the ink colours you may need to clean the print heads See Troubleshooting a...

Page 63: ...r Paper Tab The paper tab screen allows you to set up the Paper Size Paper Source Paper Thickness Orientation Scaling and Copy Page Order To access the Brother printer driver select Print from the File menu In the Print dialog box select Brother MFC 580 from the name drop down list Click the Properties button The Brother MFC580 on BRMFC Properties dialog box will appear Select the Apply button to ...

Page 64: ... Page Order Copies The Copies selection sets the number of copies that will be printed Collate The collate selection is active if more than one copy is selected With the collate check box selected one complete copy of your document will be printed and then repeated for the number of copies you selected If the collate check box is not selected then each page will be printed for all the copies selec...

Page 65: ...ss selection to achieve the best paper handling and improved output for that paper type Regular Thin Thick Thicker Scaling The Scaling feature reduces or enlarges your document from 50 to 200 From the pull down box you can select from the preset settings or a free setting You can also select 2 in 1 printing for printing two pages on one sheet of paper Paper Source The Paper Source pull down allows...

Page 66: ... print resolution you want to use for your document Print quality and speed are related The higher the quality the longer it will take to print the document The quality selections available vary depending on the media selection Draft The fastest print mode and gives lower ink consumption Use this mode to print large volume documents or a document for proofing Normal Recommended mode for ordinary p...

Page 67: ...lect this mode for photographic images Graphics Select this mode for documents that contain text or business graphics charts or clip art Custom If you want to select the colour matching method and halftone method manually select this mode Paper Type Recommended Print Quality Selection Plain Paper Normal Inkjet Paper Fine Glossy Paper 4 colour Super Fine Glossy Paper 3 colour Super Fine Transparenc...

Page 68: ...he machine can use several methods to arrange where to place dots to express halftones There are some predefined patterns used to place dots and you can select which one is used for your document Select the appropriate method Photo This method creates smooth halftones so that this is suitable for photographic images It takes more time to process data but this can express more levels of halftones a...

Page 69: ...usts the hue of the white sections of an image Lighting camera settings and other influences will effect the appearance of white The white parts of a picture may appear to be slightly pink yellow or some other colour By using this adjustment you can correct this effect and bring the white sections back to pure white Brightness Change the brightness of the whole image lighter or darker Moving the s...

Page 70: ...d cyan ink Advanced Tab Select the Apply button to apply your selected settings To return to the default settings click the Default button then click the Apply button Change the tab settings by selecting one of the following icons Watermark Device Option Watermark To place a logo or text into your document as a Watermark use a bitmap file or text you created as your source file or select one of th...

Page 71: ...he page by selecting the Watermark and clicking the Edit button If you want to add a new Watermark click the New button and select Text or Bitmap from the Watermark Style Watermark Text Enter your Watermark Text into the Text Box and select the Font Size Colour and Style Watermark Bitmap Enter the file name and location of your bitmap image in the File box or Browse for the file location You can a...

Page 72: ...ng button to change the Date and Time in Format Position and Font To include a background with the Date and Time select Opaque When Opaque is selected you can click on the Colour button to change the colour of the Date and Time background The Date and Time indicated in the selection box represents the format that will be printed The actual Date and Time printed on your document is automatically re...

Page 73: ...pdate Web sites Click the Support tab to display the following screen Web Update Web Update checks the Brother web site for updated drivers and automatically downloads and updates the driver on your computer Brother Solutions Center The Brother Solutions Center is a Web site offering information about your Brother product including FAQs User Guides Driver updates and Tips for using the machine ...

Page 74: ...egories of functions 1 Scan directly to a file E mail word processor or graphic application of choice 2 Copy functions 3 PC Faxing using the Brother PC Fax Software AutoLoad the Brother Control Centre The Control Centre is initially configured to automatically load each time Windows is started When the Control Centre is loaded the Control Centre icon will appear in the task bar If you don t want t...

Page 75: ...can documents from the ADF into your word processing graphics or E mail applications The advantage of using the Scan to key is that you avoid the mouse clicks required to scan from your PC Before you can use the Scan to key on the control panel you must have connected the machine to your Windows based PC and loaded the appropriate Brother Drivers for your version of Windows When you are ready to u...

Page 76: ...Press or to select SCAN TO OCR and then press Menu Set The machine will scan the original perform OCR in ScanSoft TextBridge and then display the result in your word processing application for viewing and editing Scan to E mail You can scan either black and white or colour documents into your E mail application as a file attachment Although the Brother Control Centre can be configured to send only...

Page 77: ...ted for the Word Processor Scanning Operations Scan to File allows you to scan directly to a file with two mouse clicks You can change the file type destination directory and file name as needed Scan to E mail enables you with just two mouse clicks to scan a picture or text document directly into an E mail application as a standard attachment You have the option of selecting the file type and reso...

Page 78: ...PC Fax Operation Send a Fax allows you to scan a picture or text original and automatically send the image as a fax from the PC using the Brother PC Fax software Scanner Settings When the Pop Up screen is displayed you can access the Scanner Settings window Click the Configuration icon at the top right of the Brother Control Centre screen OR Click the Modify Settings button on any of the Configura...

Page 79: ...t Slide the adjuster from 0 to 100 Click OK to save your changes If you make a mistake or later decide to return to the original default setting just click the Restore Defaults button when the scanning mode is displayed To access the Scanner Configurations screen 1 Insert the document face down in the ADF 2 Right click the appropriate Control Centre button to display Configurations then click it T...

Page 80: ... document as another file type and or into another directory folder File If you selected Other Folder from the pull down list select the type of file PaperPort Files MAX Self Viewing Files EXE PaperPort 5 0 Files MAX PaperPort 4 0 Files MAX PaperPort 3 0 Files MAX Windows Bitmap BMP PC Paintbrush PCX Multi page PCX DCX JPEG Image Files JPG TIFF Uncompressed TIF TIFF Group 4 TIF TIFF Class F TIF Mu...

Page 81: ...of file Faxing Filing and Copying Text for OCR Photos Photos High Quality Photos Quick Scan Custom Draft Copy or Fine Copy To change any of the settings for that mode click the Modify Settings button E mail Application E mail Application From the pull down list select your E mail application E mail Settings Click the E Mail Settings button to set up links The Link Preferences window will appear ...

Page 82: ...l files that have been processed through OCR to colour Show QuickSend Menu Click this checkbox if you want the Select QuickSend Recipient window to be displayed when you choose Scan to E mail This feature works only with MAPI type E mail applications such as Microsoft Exchange Microsoft Outlook and Eudora QuickSend List You can create a list of E mail names and addresses for quick selection Click ...

Page 83: ...xing Filing and Copying Text for OCR Photos Photos High Quality Photos Quick Scan Custom Draft Copy or Fine Copy To change any of the settings for that mode click the Modify Settings button Word Processor Word Processor From the pull down list select the word processor you want to use Click the Link Settings button to display a screen to set up a link to the version of OCR and document format that...

Page 84: ...want your word processor application to read across the entire page from left to right Document Format From the pull down list select the file format you want to use for your word processor or text documents User Defined Button Scanner Settings From the pull down list select the scanning mode that is appropriate for the type of file Faxing Filing and Copying Text for OCR Photos Photos High Quality...

Page 85: ...the type of file Faxing Filing and Copying Text for OCR Photos Photos High Quality Photos Quick Scan Custom Draft Copy or Fine Copy To change any of the settings for that mode click the Modify Settings button Copy Settings Copies Enter the number of copies you want to print To change the copy options click the Copy Options button Click the OK button to save your Copy settings ...

Page 86: ...ustom Draft Copy or Fine Copy To change any of the settings for that mode click the Modify Settings button FAX Settings Brother PC FAX FAX Resolution Fine 200 x 200 1 To change the fax options click the FAX Options button The Brother PC FAX Properties screen appears 2 Select the Paper Size and Orientation Portrait or Landscape and click OK To return to the factory default settings click the Restor...

Page 87: ... of different formats for printing or filing PaperPort can be accessed through the PaperPort program group The complete ScanSoft PaperPort Owner s Manual including ScanSoft TextBridge OCR is in the Manual on the CD ROM This chapter is only an introduction to the basic operations When you install MFC Software Suite ScanSoft PaperPort for Brother and ScanSoft TextBridge OCR are installed with it aut...

Page 88: ...ter to display it you can also double click a non PaperPort item to open it Organizing Your Items in Folders PaperPort has an easy to use filing system for organizing your items The filing system consists of folders and items that you select to view in Desktop View An item can be a PaperPort item or a non PaperPort item Folders are arranged in a tree structure in the Folder View You use this pane ...

Page 89: ...tically installed when you install PaperPort on your computer PaperPort can quickly convert the text on a PaperPort item which is really just a picture of the text into text that you can edit with a word processing application PaperPort uses the optical character recognition application ScanSoft TextBridge which comes with PaperPort OR PaperPort uses your application if it is already on your compu...

Page 90: ...oose the file type or select a name from the File Name text box You can scroll through the Directories and File Name listing for prompting 4 Select the OK button to save your file or Cancel to return to the PaperPort without saving it Scanning a Document TWAIN COMPLIANT The Brother MFC Software Suite includes a TWAIN compliant scanner driver TWAIN drivers meet the standard universal protocol for c...

Page 91: ...the PaperPort window select Acquire from the File drop down menu or select the TWAIN or Scan button The Scanner Setup dialog box will appear Scanning a Document into your PC 1 Insert the document face down in the ADF 2 Adjust the following settings if needed in the Scanner Setup window Resolution Scan Type Black White Gray Error Diffusion True Grey 256 Colour 24 bit colour Brightness Contrast Size...

Page 92: ...mes larger than a file created with 256 Colour Brightness Adjusting the brightness settings to obtain the best image The Brother MFC Software Suite offers 100 brightness settings 50 to 50 The default value is 0 representing an average setting You can set the brightness level by dragging the slidebar to the right to lighten the image or to the left to darken the image You can also type a value in t...

Page 93: ...ust the scanning area further by using the left mouse button to drag the dotted outline of the scanning area This is required when you want to crop an image when scanning Business Card Size To scan business cards select the Business Card 60 x 90 mm size setting and place the business card at the top centre of a carrier sheet When scanning photographs or other images for use in a word processor or ...

Page 94: ...nned into the PC and will appear in the Scanning Area of the Scanner window 3 To crop a portion of the document to be scanned drag any side or corner of the dotted outline in the Scanning Area with the left mouse button Adjust the dotted outline until it surrounds only the portion of the document you wish to scan 4 Insert the document face down in the ADF again 5 Adjust the settings for Resolution...

Page 95: ...rinter Driver automatically load the Resource Manager as needed The Resource Manager allows the single bi directional Parallel port on the machine to simulate a Communications port for faxing and scanning and to simulate a Parallel port for Windows GDI printing MFC Remote Setup The MFC Remote Setup application allows you to quickly set up the machine by taking advantage of the ease and speed of pr...

Page 96: ... to use your PC to send a file You can create a file in any application on your PC and then send it as a PC FAX You can even attach a cover page All you have to do is set up the receiving parties as Members or Groups in your PC FAX Address Book Then you can use the Address Book Search feature to quickly find them to address your fax Setting Up User Information 1 From the Start menu select Programs...

Page 97: ...etup dialog box click the Sending tab Outside line access Enter the number needed to access an outside line This is sometimes required by the local PBX telephone system Include header To add header information to the top of the fax pages being sent check the Header box Addressbook file You can select different database files for use with the address book You must enter the path and file name of th...

Page 98: ...cking the Speed Dial tab To use the feature you must select the Facsimile Style user interface You can register any address or group on one of the ten Speed Dial buttons To register an address on a Speed Dial location 1 Click the Speed Dial location you want to program 2 Click the address or group you wish to assign to the Speed Dial location 3 Click the Add button to program the Speed Dial locati...

Page 99: ...other Address Book dialog box will appear Setting Up a Member in the Address Book In the Brother Address Book dialog box you can add edit and delete stored information for members and groups 1 In the Address Book dialog box click the icon to add a member The Brother Address Book Member Setup dialog box will appear 2 In the Brother Address Book Member Setup dialog box type the member s information ...

Page 100: ...lable Names box select each member to be included in the Group and then click Add Members you add to the group will be listed in the Group Members box 4 After all the members have been added click OK Editing Member Information To edit a Member or Group 1 Select the Member or Group you want to edit 2 Click the icon 3 Edit the Member or Group information 4 Click OK to save your changes Deleting a Me...

Page 101: ...n To export the current telephone book 1 From the Address Book select File point to Export and then click Text OR Click Vcard and go to Step 5 2 Select the data fields you wish to Export from the Available Items column and then click Add 3 If you are exporting to an ASCII file Text select Divide Character Tab or Comma This selection inserts a Tab or Comma between each data field when it is exporte...

Page 102: ... point to Import and then click Text OR Click Vcard and go to Step 5 2 Select the data fields you wish to Import from the Available Items column and click Add 3 Select Divide Character Tab or Comma based on what file format you are importing 4 Select the OK button to import the data If you selected Vcard in Step 1 the Save as Type will be Vcard vcf Select the fields from the Available Items list i...

Page 103: ...Setting from the FAX Sending dialog box by clicking See User interface page 90 The Brother PC FAX Cover Page Setup dialog box will appear To You can enter information in each box If you selected a text file in Step 1 the Files of type will be Text file csv If you are sending a fax to multiple recipients the recipient information will not be printed on the Cover Page ...

Page 104: ...rowse button and then select the alignment style Count Cover Page When this box is checked the Cover Page will be included in the page numbering When this box is not checked the Cover Page will not be included Sending a File as a PC FAX Using the Simple Style 1 Create a file in Word Excel Paint Draw or any other application on your PC 2 From the File menu select Print The Print dialog box will app...

Page 105: ... Cover Page and note check the Cover page On check box You can also click the to create or edit an existing cover page 6 When you are ready to send your fax click the icon 7 If you wish to cancel the fax click the icon Sending a File as a PC FAX using the Facsimile Style 1 Create a file in Word Excel Paint Draw or any other application on your PC 2 From the File menu select Print The Print dialog ...

Page 106: ...mber or Group from the Address Book 5 To include a cover page check the Cover Page On You can also click the icon to create or edit an existing cover page 6 Click Start to send the fax Redial If you wish to redial a number click Redial to scroll through the last five fax numbers and then click Start If you make a mistake you can use the Clear button to clear all the entries If you wish to cancel t...

Page 107: ...cintosh must be set up with Mac OS 8 5 8 5 1 8 6 9 0 9 0 4 9 1 The Brother Scanner Driver works only with Mac OS 8 6 9 0 9 0 4 9 1 Using Brother Printer Driver with your Apple Macintosh To select the Printer 1 From the Apple menu open the Chooser 2 Click the MFL Pro Colour icon On the right side of the Chooser click the printer to which you want to print Close the Chooser Before you can connect th...

Page 108: ...or Paper Size Paper Thickness Paper Source Orientation and Scaling then click OK 4 From application software click File menu and select Print Click Print to start printing If you want to change Copies Pages Quality Media Type and Colour Mono select your settings before clicking Print Option Setup allows you to change Document and Printing Options ...

Page 109: ...lication 2 To begin the fax transmission select Print from the File menu The Printer dialog box appears When Printer is selected the top button shows Print and the Address button is greyed 3 From the Output pull down menu select Facsimile When Facsimile is selected the top button shows Send Fax and the Address button is available To select and send only certain pages of the document enter the page...

Page 110: ... and then click Your recipient will appear in the Destination Fax Numbers box 6 If you want to you can add your new recipients to the Stored Fax Numbers at this time by clicking New See Adding a New Member page 103 OR You can add a new group by clicking Group See Adding a New Group page 104 7 If you are finished addressing your fax click Send Fax Click OK to return to the Send Fax dialog box You c...

Page 111: ...n while you are addressing a fax Adding a New Member 1 To add a new member to the Address Book in the Facsimile dialog box click Address The Address Book dialog box appears 2 Click New The following dialog box appears 3 Type the name and fax number 4 If you want to you can store a comment in the Memo field up to 15 characters 5 Click OK to return to the Address Book dialog box ...

Page 112: ...up The Group Setting dialog box appears 2 In the Group Name field type a name for your Group 3 From the Stored Fax Numbers box select the recipients for your Group and then click Your selection will appear in the box under the Group Name field 4 Click OK The Address Book dialog box reappears ...

Page 113: ... Apple Macintosh The Brother MFC software suite includes a TWAIN Scanner driver for Macintosh This Macintosh TWAIN Scanner driver can be used with application that supports the TWAIN specification Accessing the Scanner Run your Macintosh TWAIN compliant application software The first time you use the Brother Twain driver set it as default by choosing the Select Source Afterwards for each document ...

Page 114: ...lutions take more memory and transfer time but can achieve a finer scanned image Colour Type Black White Set the image Type to Black White for text or line art For photographic images set the image type to Grey Error diffusion or True Grey Grey Error Diffusion is used for documents that contain photographic images or graphics Error Diffusion is a method for creating simulated grey images by placin...

Page 115: ... 5 inches Business Card 90 x 60 mm Custom User adjustable from 0 35 x 0 35 inches to 8 5 x 14 inches After you choose a custom size you can adjust the scanning area Click and hold the mouse button as you drag the mouse to crop the image Business Card Size To scan business cards select the Business Card size setting 90 x 60 mm and then place the business card at the top centre of a carrier sheet Wh...

Page 116: ...ng the contrast level by dragging the slidebar to the right emphasizes dark and light areas of the Image while decreasing the contrast level by dragging the slidebar to the left reveals more detail in grey areas Instead of using the slidebar you can type a value in the box to set the contrast Click OK Colour Sync Dialog Perceptual Matching All the colours of a given gamut are scaled proportionally...

Page 117: ...ut it will stay the same colour However if the colour is outside the gamut it will be mapped to the edge of the gamut This intent is best suited for logos or spot colours where colour must match Absolute Colourimetric Matching A close appearance match may be achieved over most of the tonal range but if the minimum density of the idealized image is different from that of the output image the areas ...

Page 118: ... the document face down in the ADF 2 Click PreScan The entire document will be scanned into your Macintosh and will appear in the Scanning Area of the Scanner dialog box 3 To scan a portion of the prescanned image click and drag the mouse to crop it 4 Insert the document face down in the ADF again 5 Adjust the settings for Resolution Colour Type Grey Scale Brightness Contrast and Size in the Scann...

Page 119: ...and then press Mono Fax Start CHECK PAPER SIZE Your paper is smaller than A4 size The machine can not print fax messages Help list or any other fax reports if the paper isn t A4 size Reload the A4 paper and then press Mono Fax Start COMM ERROR Poor phone line quality caused communication error Try the call again If problem continues call Telephone Company to check your phone line CONNECTION FAIL Y...

Page 120: ...e machine at the warm room or warm your room MACHINE ERROR XX MFC has a mechanical problem Unplug the machine and then call Brother or your dealer for service NEAR EMPTY XXXX One or more of the ink cartridges are running out of ink The machine will stop receiving colour faxes The machine s handshake will request that it be sent in black and white if the sending machine has the feature to convert i...

Page 121: ...nts were not inserted or fed properly or were too long 1 Remove any paper from the ADF that is not jammed 2 Carefully pull the document toward the front of the machine 3 Press Stop Exit Document Jam Inside Back of Control Panel 1 Remove any paper from the ADF that is not jammed 2 Open the control panel cover 3 Pull the jammed document out toward the back of the machine 4 Close the control panel co...

Page 122: ...to pull it while pushing down the Paper Release Lever To improve the reliability of paper feeding turn on Secure Feed mode by pressing the Ink and Scan to keys simultaneously The machine will then feed paper more securely but paper feeding will take a longer time To turn off the Secure Feed mode simultaneously press Ink and Scan to again If Paper Jam occurs repeatedly install the Card Stock Suppor...

Page 123: ...g it toward you then lift the top cover toward the back 2 Remove the jammed paper 3 Close the control panel cover and top cover Paper is jammed inside the front of the machine 1 Pull the paper toward you If the jammed paper is under the Print Heads unplug the machine and then you can move the Print Heads to remove the paper ...

Page 124: ... the back of the machine 1 Remove any paper from the multi purpose sheet feeder that is not jammed 2 Open the paper jam Cover 3 To loosen the paper slide the Paper Width Guide to the widest position 4 Use tweezers to pull out the ripped pieces of paper 5 Close the Paper Jam Cover Paper Jam Cover Paper Width Guide ...

Page 125: ...in the Paper tab of the Print dialog box in the printer driver setting If you are copying or receiving a fax message make sure the thickness of paper you are using matches the specifications See Paper Specifications page 137 Printing Too Dark or Too Light Make sure your ink cartridges are fresh and within their expiry dates Cartridge expiry dates are printed on the package Make sure the Printer Dr...

Page 126: ...ing when you call the machine call your Telephone Company to check the line No dial tone on the external telephone s handset Lifting the external phone s handset OR Press any dial pad key then Mono Fax Start If you hear no dial tone check telephone line cord connections at the machine and wall socket Check that the external telephone is connected to the machine correctly Test the wall socket with ...

Page 127: ...s ECM feature should help overcome this problem This condition is related to the telephone system industry and is common to all devices that send and receive information on a single shared line with custom features If avoiding a slight interruption is crucial to your business a separate line with no custom features is recommended Sending Copying or Scanning Difficulties A Vertical black or white l...

Page 128: ...n Please use at least 24 bit colour data with the Colour enhance feature Unable to write to LPT1 or LPT1 already in use Error Message appears 1 Make sure the machine is on plugged into the AC outlet and that it is connected directly to the computer using the IEEE 1284 bi directional parallel cable The cable must not go through another peripheral device such as a Zip Drive External CD ROM Drive or ...

Page 129: ...oose the colour combination you want to clean 4 Press Menu Set to clean the print head automatically When cleaning is finished the machine will go back online automatically Print Quality Check If the print quality is not satisfactory you can print a Print Quality Check Sheet to help you identify settings you may need to change 1 Press Menu Set 4 2 Press Mono Fax Start The machine begins printing t...

Page 130: ...ning the colours After cleaning is finished press Mono Fax Start The machine will start printing the Print Quality Check Sheet again and then return to STEP A If STEP A is OK press 1 to proceed to STEP B STEP B Alignment Check The LCD shows Check the 600 DPI and 1200 DPI test prints to see if number 5 most closely matches number 0 If the number 5 sample of both the 600 DPI and 1200 DPI are the bes...

Page 131: ...s at least five times If ink is still missing after the fifth cleaning and test print replace the ink cartridge for the clogged colour Perhaps the ink cartridge was in the machine over six months or the expiration date written on the cartridge package has passed Or the ink may not have been stored properly before use After replacing the ink cartridge check it by printing another Print Quality Chec...

Page 132: ...touch the print heads Touching the print heads may cause permanent damage and may void the print head s warranty Do not unplug the machine until a print job is finished If you are unable to locate the white shipping cover do not remove the ink cartridges before shipping It is essential that either the shipping cover or the ink cartridges be in position during shipment Otherwise the print heads wil...

Page 133: ...jack 4 Unplug the machine from the AC outlet 5 Unplug the Parallel cable or USB cable from the machine 6 Remove telephone line cord paper wire extension paper tray document support document wire extension and place them in original packing materials or protective wrapping 7 Wrap the machine in the plastic bag 8 Place the machine in the original carton with the original packing material Protective ...

Page 134: ...126 Chapter 17 9 Pack additional parts cord printed materials into the carton Do not pack the used ink cartridges in the carton 10 Close the carton ...

Page 135: ...machine Printer Platen 1 Open the control panel and lift the top cover To clean the machine printer platen wipe it with a lint free cloth that is dry 2 Close the top cover and the control panel and then connect the power cord Be careful not to touch the paper feed star wheels flat cable and encode film Be sure to unplug the machine from the main power outlet before cleaning the printer platen Do N...

Page 136: ...empty skip to Step 3 1 Press Ink 2 Press 2 to choose 2 REPLACE INK If one or more ink cartridges are empty for example Black the screen displays INK EMPTY BLACK and PLS OPEN COVER 3 Open control panel cover and lift the top cover 4 Push the appropriate coloured ink cartridge covers and remove the ink cartridge 5 Open the new ink cartridge bag for the colour shown on the display and take out the in...

Page 137: ... NOT remove ink cartridges if you do not need to replace them If you do so it may reduce the ink quantity and the printer will not know the quantity of ink left in the cartridge DO NOT shake the ink cartridges because the ink may spill when you take off the sealing tape DO NOT refill the ink cartridges Attempting to use refilled cartridges and using incompatible inks may cause damage to the print ...

Page 138: ...h a suitable earthed power outlet This product is equipped with a 3 wire earthed plug This plug will fit into only an earthed socket This is a safety feature If you are unable to insert the plug into the outlet contact your electrician to replace your obsolete socket Do not defeat the purpose of an earthed plug 7 Do not allow anything to rest on the power cord Do not locate this product where peop...

Page 139: ...the cabinet has been damaged If the product exhibits a distinct change in performance indicating a need for service 14 We do not advise the use of an extension lead IMPORTANT For Your Safety To ensure safe operation the three pin plug supplied must be inserted only into a standard three pin power point which is effectively grounded through the normal household wiring Extension cords used with the ...

Page 140: ...racters Polling types Standard Secure Delayed Sequential Contrast control Automatic Light Dark manual setting Resolution Horizontal 8 dots mm Vertical Standard 3 85 line mm B W 7 7 line mm Color Fine 7 7 line mm B W Color Photo 7 7 line mm B W Superfine 15 4 line mm B W Memory Capacity 2MB up to 85 pages 1 Speed Dial 40 stations Automatic redial 4 times at 2 minute intervals 4 times at 3 minute in...

Page 141: ...tion less than 1 8 m 6 feet long should be used USB A USB Universal Serial Bus Interface that is no longer than1 8 m 6 feet should be used You must attach the bundled filter core and cable tie to the shield parallel cable or USB cable For Windows Operating System CPU Pentium RAM Hard Disk Space 95 98 98SE 75 MHz 24 MB 32 MB recommended 50 MB NT Workstation4 0 75 MHz 32 MB 64 MB recommended 2000 Pr...

Page 142: ...proximately 50 sheets of plain paper Face up print delivery to the paper output tray It is recommended that printed sheets are taken from the paper output tray immediately after printing Ink Black and 3 individual colour ink cartridges separate from the two print heads Service life of ink cartridge Approximately 950 pages Black cartridge at 5 coverage with 600 x 150 dpi resolution Approximately 45...

Page 143: ...ion Link Pro is registered trademark of Brother Industries Ltd Brother is a registered trademark of Brother Industries Ltd The brother logo is a registered trademark of Brother Industries Ltd Windows Windows NT Microsoft MS DOS Excel Word Paint and Draw are registered trademark of Microsoft in the U S and other countries NT is a trademark of Northern Telecom Limited Macintosh is a registered trade...

Page 144: ...flat and away from moisture direct sunlight and heat The coated side of glossy paper is shiny Do not touch the shiny coated side Load glossy paper with the shiny side facing up toward you Do not touch either side of transparencies because they absorb water and perspiration easily and may cause decreased output quality Transparencies designed for laser printers copiers may stain your next document ...

Page 145: ...thick paper such as postcards index cards envelopes and glossy paper in the multi purpose sheet feeder you must first install the Card Stock Support in the feeder Cut Sheet Paper Weight Plain Paper 64 to 120 g m2 Inkjet Paper Up to 120 g m2 Glossy Paper Up to 150 g m2 Postcard Up to 170 g m2 Index card Up to 120 g m2 Thickness Plain Paper 0 08 to 0 15 mm Inkjet Paper Up to 0 15 mm Glossy Paper Up ...

Page 146: ...y Colour Copy Printer Executive Printer 3 mm 11 mm 3 4 mm 3 4 mm Envelopes Printer 10 mm 20 mm 3 4 mm 3 4 mm Do not use the following types of paper and envelopes Damaged curled wrinkled or irregularly shaped paper and envelopes Extremely shiny or highly textured paper and envelopes Envelopes with clasps Envelopes of baggy construction Envelopes not sharply creased Embossed envelopes Paper and env...

Page 147: ...ctly and want to change it press to move the cursor after the last correct letter Then press Stop Exit all letters above and to the right of the cursor are deleted Re enter the correct text and or digits You can also back up and type over incorrect letters Repeating letters If you need to enter a character assigned to the same key as the previous character press to move the cursor to the right Spe...

Page 148: ...um standard of Modified Huffman MH The machine is capable of greater compression method Modified Read MR Modified Modified Read MMR and Joint Photographic Experts Group JPEG if the receiving machine has the same capability Compatibility Group The ability of one fax unit to communicate with another Compatibility is assured between ITU T Group Contrast Setting to compensate for dark or light documen...

Page 149: ... Menu Mode The programming mode for changing the setting of the machine OCR optical character recognition The bundled ScanSoft TextBridge software application converts an image of text to text you can edit Out of Paper Reception Receives faxes into the machine s memory when the machine is out of paper Overseas Mode Makes temporary changes to the fax tones to accommodate noise and static on oversea...

Page 150: ... quickest transmission Station ID The stored information that appears on the top of faxed pages It includes the sender s name and fax number Super fine resolution 392 x 203 dpi Best for very small print and line art System Setup List A printed report that shows the current setting of the machine Temporary Setting You can select certain options for each fax transmission or copy without changing the...

Page 151: ...er 133 Copy 2in1 50 Copy Multiple 46 Copy Quality 48 Copy Brightness 51 Copy Contrast 51 Copy Operations 46 Copy Quality 47 51 Copy Quality Default Settings 51 Corrections 139 D Date and Time 15 Deactivation Code 37 Delayed Batch Transmission 32 Device Options 64 Dialling a Number 21 Dialling Mode Tone Pulse 18 Difficulty 117 Document Size 1 Document Jam 113 Dual Access 23 E Entering Text 139 Erro...

Page 152: ...SY 112 NOT ASSIGNED 112 O On Screen Programming iv Options Key for Copy 48 ORDER FORM 31 Order Form 31 OUT OF MEMORY 47 Outgoing Message of external TAD 7 Overseas Mode 32 P PABX 4 17 Packing and Shipping 124 Paper Jam 114 Paper Size 137 Paper Specifications 137 Paper Type 137 PaperPort 79 Pause 22 PC FAX 88 PC FAX Sending 96 PC FAX Setting 88 PC FAX Sending For Macintosh 101 Photo Resolution 20 P...

Page 153: ... File 72 Scan to Word Processor 75 Scan OCR 68 Scanning into PC 83 ScanSoft PaperPort 79 Search 9 21 28 Sheet Feeder Capacity 137 Simultaneous Printing Fax 54 Special characters 139 Specifications 132 Speed Dial Changing 19 Speed Dial Storing 19 Speed Dialling 21 Standard Resolution 20 Station ID 16 Storing Telephone number 19 SYSTEM SETUP 31 T Timer 32 To change Remote Codes 38 Tone Pulse 18 Trad...

Page 154: ...messages received 1 long beep Fax message s No beeps no messages 4 After 2 short beeps enter a command 5 Press 9 0 to reset the machine when you finish 6 Hang up Change Remote Access Code 1 Press Menu Set 2 5 3 2 Enter the 3 digit number The cannot be changed 3 Press Menu Set 4 Press Stop Exit Change Receive Mode Press 9 8 then for TAD press 1 FAX TEL press 2 FAX press 3 Exit Remote Operation Pres...

Page 155: ...ote fax machine where you want your fax message forwarded and then press Turn Fax Storage on press 6 Turn Fax Storage off press 7 Retrieve Fax Press 9 6 Retrieve all faxes press 2 then enter the number of remote fax machine and then After the beep hang up and wait Erase all fax messages press 3 Check the Receiving Status Press 9 7 1 1 long beep Fax message s 3 short beeps no messages then to then ...

Page 156: ...This machine is approved for use in the country of purchase only local Brother companies or their dealers will only support machines purchased in their own countries UK IRE SAF PAN NORDIC Version A ...

Reviews: