- 44 -
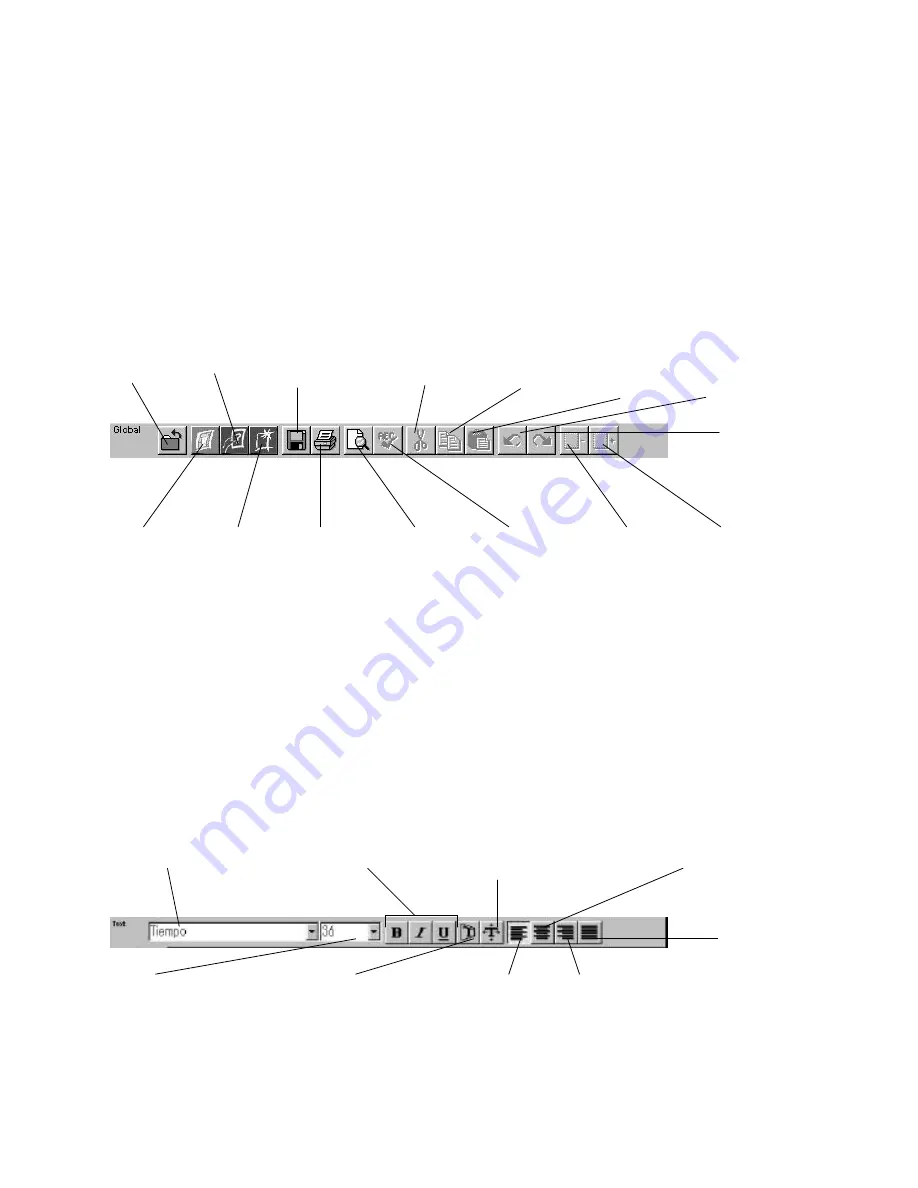
The Global Toolbar
The Global Toolbar, which is displayed across the top of the Workspace, provides quick mouse access to
some of the most commonly used PrintMaster Gold actions such as closing the current project, going to the
Ready Made Gallery, starting a With Help project, and starting a Brand New project. These buttons are also
one-step alternatives to using the menu bar for saving, printing, viewing Print Preview, cutting, Pasting, and
others. To hide or display the Global toolbar, access the View menu, then Toolbars/Global Bar.
Text Toolbar
The Text toolbar is where you can make adjustments to the text in your project. Notice that whenever you
click on text in your project, the Text toolbar will be immediately updated. You can also use this toolbar to
bold, italicize, stretch, bend, or align your text.
To hide or display the Text toolbar, access the View menu, then Toolbars/Text Bar.
Close
Click
here to
return
to the
Hub.
With Help
Click here to go
to the With Help
Designer, where
you will be
prompted, step-
by-step, to
create your own
personalized
project.
Save
Click here to
save the current
project. If you
have not already
provided a file
name for your
project, you will
be prompted to
do so at this
point.
Cut
Click here to
remove the
selected text
and/or
graphic to the
Clipboard.
Copy
Click here
to copy the
selected
text and/or
graphic to
the
Clipboard.
Paste
Click here to
insert a copy of
the clipboard
contents into
your project.
Undo
Click here to
quickly undo
changes in
editing,
formatting, and
other actions.
To quickly undo
multiple actions,
click this button
more than
once.
Redo
Click here to
reverse changes
made using the
Undo button.
Ready Made
Click here to
go to the
Ready Made
Gallery.
Brand New
Click here to
start a new
project from
scratch.
Print
Preview
Click here to
preview your
project before
Check Spelling
Click here to
check the
spelling of the
text in your
project.
Select
Previous
Object
Click here
to select the
object in the
previous
Layer.
Print
Click here
to send
your
project to
your
printer.
Select Next
Object
Click here
to select the
object in the
next layer.
Font
Shows the name
of the font that is
currently selected.
Bold, Italic, and Underline
To make any character bold,
italic, or underlined, highlight the
character and click on the
appropriate button.
Stretch text
This option is great for large text.
Click here to have PrintMaster
Gold automatically adjust the text
size to fill the limits of a text box.
Center Alignment
Aligns the text in a
paragraph to the
center of the text box.
Font size
Shows the size of
the font that is
currently selected.
Text Shape
Click here to select one
of many shapes for
your text. Note: your
text shape selection will
affect all of the text in
the active text box.
Flush Left
Alignment
Aligns the text
in a paragraph
to the left side
of the text box.
Flush Right
Alignment
Aligns the text in
a paragraph to
the right side of
the text box.
Justified
Alignment
Stretch the text
so it aligns to
both the right
and left sides
of the text box.
Summary of Contents for LX-900
Page 1: ...1 e H Owner s Manual ...


