background image

3 - 6   CONTROL PANEL

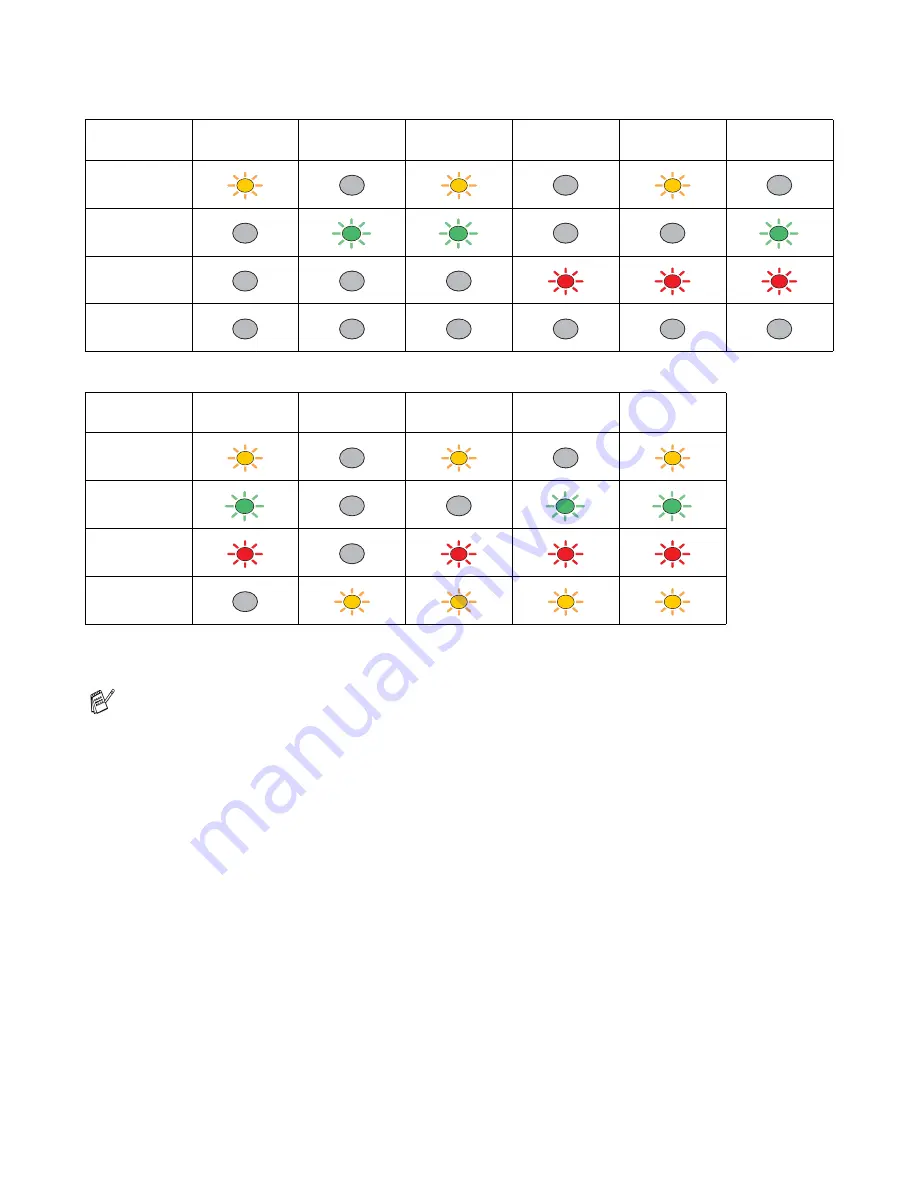
Table 1: LED indications when the service error occurs

Make a note of the indication and report the error status to your dealer or a Brother authorized service 
center by referring to the above table.

LEDs

Fuser 

Malfunction

Laser BD 

Malfunction

Scanner 

Malfunction

ROM Error

D-RAM Error

Service A

Drum

Ready

Alarm

Data

LEDs

Service B

Engine 

Interface Error

NV-RAM 

Error

Main Motor 

Malfunction

CPU Runtime 

Error

Drum

Ready

Alarm

Data

Make sure that the front cover is fully closed before you report a service call.

Summary of Contents for HL-1435

Page 1: ...se the printer Please use the Quick Setup Guide to set up the printer You can find a printed copy in the box or view it on the CD ROM we have supplied Please read this User s Guide thoroughly before you use the printer Keep the CD ROM in a convenient place so you can use it quickly if you need to Please visit our web site at http solutions brother com where you can get answers to Frequently Asked ...

Page 2: ...d notes We use the following terms throughout this User s Guide You must follow these warnings to prevent possible personal injury You must follow these instructions to make sure you use the printer properly and do not damage it Remember these useful tips when you use the printer ...

Page 3: ... you have just used the printer some parts inside the printer will be extremely hot When you open the front or rear cover of the printer never touch the shaded parts shown in the illustrations below There are high voltage electrodes inside the printer Before you clean the printer clear a paper jam or replace parts make sure you have turned off the power switch and unplugged the printer from the AC...

Page 4: ...may support an insurance claim by you in the event of product loss covered by insurance and will help us notify you of enhancements to your product and special offers Please complete the Brother Warranty Registration or for you convenience and most efficient way to register your new product register on line at The Brother Solutions Center is our one stop resource for all your Printer needs You can...

Page 5: ...Brother authorized service center call 1 800 284 4357 Service center locations Canada only For the location of a Brother authorized service center call 1 877 BROTHER Brother fax back system USA only Brother has an easy to use fax back system so you can get instant answers to common technical questions and product information This is available 24 hours a day 7 days a week You can use the system to ...

Page 6: ... Web Site For Frequently Asked Questions FAQs Product Support and Technical Questions and Driver Updates and Utilities In USA Only For Brother Accessories Supplies http www brother com http solutions brother com http www brothermall com ...

Page 7: ...ion This equipment has been tested and found to comply with the limits for a Class B digital device pursuant to Part 15 of the FCC Rules These limits are designed to provide reasonable protection against harmful interference in a residential installation This equipment generates uses and can radiate radio frequency energy and if not installed and used in accordance with the instructions may cause ...

Page 8: ...ernational ENERGY STAR Program is to promote the development and popularization of energy efficient office equipment As an ENERGY STAR Partner Brother Industries Ltd has determined that this product meets the ENERGY STAR guidelines for energy efficiency Laser Safety 100 to 120 volt model only This printer is certified as a Class I laser product under the U S Department of Health and Human Services...

Page 9: ...eeded This printer has a Class 3B laser diode which produces invisible laser radiation in the scanner unit You should not open the scanner unit under any circumstances Caution Use of controls or adjustments or performance of procedures other than those specified in this manual may result in hazardous radiation exposure Internal laser radiation Maximum radiation power 5 mW Wave length 760 810 nm La...

Page 10: ...ury and equipment damage The fact that the equipment operates satisfactorily does not imply that the power is grounded and that the installation is completely safe For your safety if in any doubt about the effective grounding of the power call a qualified electrician Disconnect device You must install this printer near a power outlet that is easily accessible In case of an emergency you must disco...

Page 11: ...ered trademarks of their respective companies Compilation and Publication Notice Under the supervision of Brother Industries Ltd this manual has been compiled and published covering the latest product s descriptions and specifications The contents of this manual and the specifications of this product are subject to change without notice Brother reserves the right to make changes without notice in ...

Page 12: ...ntents xii 1 About this printer 1 1 What is in the box 1 1 Interface cable 1 1 Front view 1 2 Back view 1 3 Positioning the printer 1 4 Power supply 1 4 Environment 1 4 What kind of paper can I use 1 5 Type and size of paper 1 5 Recommended paper 1 6 Printable area 1 7 Printing methods 1 8 Printing on plain paper 1 8 Printing on plain paper from the paper tray 1 8 Printing on plain paper from the ...

Page 13: ... Toner cartridge 5 2 Toner Low message 5 2 Toner Empty message 5 3 Replacing the toner cartridge 5 3 Drum unit 5 8 Change Drum message 5 8 Replacing the drum unit 5 9 Cleaning 5 12 Replacing maintenance parts 5 13 6 Troubleshooting 6 1 Identifying your problem 6 1 Error messages in the status monitor 6 2 Error message printouts 6 3 Paper handling 6 4 Paper jams and how to clear them 6 5 Other prob...

Page 14: ...cable for the interface you intend to use It is recommended to use a Parallel interface cable or USB interface cable that is no longer than 6 feet 2 metres For Parallel interface cable use a shielded interface cable that is IEEE 1284 compliant Do not connect the USB cable to the front of your PC or to the iMac s keyboard About this printer Components may differ from one country to another The powe...

Page 15: ...Front view Front View Figure 1 1 1 Face down Output Tray Support Flap Support Flap 2 Face down Output Tray Top Output Tray 3 Front Cover 4 Paper Tray 5 Manual Feed Paper Guides 6 Manual Feed Slot 7 Control Panel 1 7 2 3 4 6 5 ...

Page 16: ...ABOUT THIS PRINTER 1 3 Back view Back view Figure 1 2 1 Rear Cover 2 Power Switch 3 AC Power Connector 4 Parallel Interface Connector 5 USB Interface Connector 1 5 4 2 3 ...

Page 17: ... Only use the printer within the following ranges of temperature and humidity Temperature 10 C to 32 5 C 50 F to 90 5 F Humidity 20 to 80 without condensation To avoid ozone building up put this machine in a large well ventilated room Put the printer on a flat horizontal surface Keep the printer clean Do not put the printer in a dusty place Do not put the printer where the ventilation hole of the ...

Page 18: ...ct the Media type from the printer driver Plain paper 60 g m2 to 105 g m2 16 to 28 lb L L Plain paper Recycled paper L L Bond paper L Bond paper Thick paper 105 g m2 to 161 g m2 28 to 43 lb L Thick paper or Thicker paper Transparency L Up to 10 sheets A4 or Letter L A4 or Letter Transparencies Labels L A4 or Letter Thick paper Envelopes L Thicker paper Card stock L Thick paper or Thicker paper Tra...

Page 19: ...e content of approximately 5 Caution Do not use ink jet paper or it may cause a paper jam and damage your printer To help you choose which paper to use with this printer see Important information for choosing your paper on page A 3 Europe USA Plain paper Xerox Premier 80 g m2 Xerox Business 80 g m2 Modo DATACOPY 80 g m2 IGEPA X Press 80 g m2 Xerox 4200DP 20 lb Hammermill Laser Paper 24 lb Recycled...

Page 20: ... 17 in 4 2 mm 0 17 in 4 2 mm 0 17 in 4 2 mm 0 17 in 4 2 mm 0 17 in 4 6 01 mm 0 24 in 6 35 mm 0 25 in 6 35 mm 0 25 in 6 01 mm 0 24 in 6 35 mm 0 25 in 6 01 mm 0 24 in 6 01 mm 0 24 in 6 01 mm 0 24 in A4 Letter Legal B5 ISO Executive A5 A6 B6 ISO 1 4 2 mm 0 17 in 4 2 mm 0 17 in 4 2 mm 0 17 in 4 2 mm 0 17 in 4 2 mm 0 17 in 4 2 mm 0 17 in 4 2 mm 0 17 in 4 2 mm 0 17 in 2 5 0 mm 0 19 in 5 08 mm 0 2 in 5 0...

Page 21: ... slot For the paper you want to use please see What kind of paper can I use in this chapter Printing on plain paper from the paper tray 1 Select the Paper Size Media Type Paper Source and other settings in the printer driver Media Type Plain Paper Paper Source Tray1 2 Pull the paper tray completely out of the printer Figure 1 5 ...

Page 22: ...sing the blue paper guide release lever slide the paper guides to fit the paper size Check that the guides are firmly in the slots Figure 1 6 4 Put paper in the tray Check that the paper is flat in the tray at all four corners Figure 1 7 ...

Page 23: ...may occur Check that paper is below the maximum paper mark Figure 1 8 For two sided printing put the side that is going to be printed on blank side face down with the top of the paper at the front of the tray Pull up the support flap to prevent paper from sliding off the top output tray Figure 1 9 If you choose not to pull out the support flap we recommend that you remove printed pages immediately...

Page 24: ...edia Type Plain Paper Paper Source Manual 2 Send the print data to the printer The printer automatically turns on the Manual Feed mode when you put paper into manual feed slot A NO PAPER message is shown in the Status Monitor and indicated by the control panel LEDs until you put a sheet of paper in the manual feed slot Figure 1 10 Ready Alarm Paper Toner Data Drum ...

Page 25: ...of the paper touches the paper feed roller Hold the paper in this position until the printer automatically feeds the paper in for a short distance and then let go of the paper Figure 1 13 Pull up the support flap to prevent paper from sliding off the top output tray Figure 1 12 If you choose not to pull out the support flap we recommend that you remove printed pages immediately after they come out...

Page 26: ...print Put the paper into the manual feed slot with the side to be printed face up Make sure that the paper is straight and in the proper position on the manual feed slot If it is not the paper may not be fed properly resulting in a skewed printout or a paper jam Do not put more than one piece of paper in the manual feed slot at any one time or it may cause a jam ...

Page 27: ... printer Use this paper feed and output method when you want to print on thicker paper or card stock When you select the paper you want to use please see What kind of paper can I use in this chapter 1 Select the Paper Size Media Type Paper Source and other settings in the printer driver Media Type Thick paper or Thicker paper Paper Source Manual 2 Open the rear cover Figure 1 14 ...

Page 28: ... the paper into the manual feed slot until the front edge of the paper touches the paper feed roller Hold the paper in this position until the printer automatically feeds the paper in for a short distance and then let go of the paper Figure 1 17 A NO PAPER status is shown by the control panel LEDs until you put a sheet of paper in the manual feed slot Figure 1 15 Ready Alarm Paper Toner Data Drum ...

Page 29: ...nting Stacking the sheets may cause a paper jam or the paper to curl Figure 1 18 Put the paper into the manual feed slot with the side to be printed face up Make sure that the paper is straight and in the proper position in the manual feed slot If it is not the paper may not be fed properly resulting in a skewed printout or a paper jam Do not put more than one piece of paper in the manual feed slo...

Page 30: ...e envelopes will have feed and print quality problems because of the way they have been made A suitable envelope should have edges with straight well creased folds and the leading edge should not be thicker than two pieces of paper The envelope should lie flat and not be of baggy or flimsy construction You should buy quality envelopes from a supplier who understands that you will be using the enve...

Page 31: ...ot to the back of the printer Use this paper feed and output method when you want to print envelopes 1 Select the Paper Size Media Type Paper Source and other settings in the printer driver Media Type Thicker paper Paper Source Manual 2 Open the rear cover Figure 1 20 The printer automatically turns on the Manual Feed mode when you put paper in the manual feed slot ...

Page 32: ...ope in the manual feed slot until the front edge of the envelope touches the paper feed roller Hold the envelope in this position until the printer automatically feeds it in for a short distance and then let go of the envelope Figure 1 23 A NO PAPER status is shown by the control panel LEDs until you put a sheet of paper in the manual feed slot Figure 1 21 Ready Alarm Paper Toner Data Drum ...

Page 33: ...pe is straight as you insert it sideways in the manual feed slot If it is not the envelope may not be fed properly resulting in a skewed printout or a jam Do not put more than one envelope in the manual feed slot at any one time or it may cause a jam Put the envelope in the manual feed slot with the side to be printed face up Envelope joints that are sealed by the manufacturer should be secure All...

Page 34: ...feed slot Printing on transparencies from the paper tray 1 Select the Paper Size Media Type Paper Source and other settings in the printer driver Media Type Transparencies Paper Source Tray1 2 Pull the paper tray completely out of the printer Figure 1 24 Do not put more than 10 transparencies in the paper tray ...

Page 35: ...ides to fit the transparency size Check that the guides are firmly in the slots Figure 1 25 4 Put transparencies in the tray Check that the transparencies are flat and below the maximum paper mark Do not put more than 10 transparencies in the tray at any one time or it may cause a jam Figure 1 26 ...

Page 36: ...Put the paper tray firmly back in the printer 6 Send the print data to the printer Caution Remove each transparency immediately Pull out the support flap to prevent transparencies from sliding off the top output tray Figure 1 27 ...

Page 37: ... cover is lifted up the printer has a straight paper path from the manual feed slot to the back of the printer 1 Select the Paper Size Media Type Paper Source and other settings in the printer driver Media Type Transparencies Paper Source Manual Figure 1 28 2 Open the rear cover Figure 1 29 ...

Page 38: ...parency in the manual feed slot until its front edge touches the paper feed roller Hold the transparency in this position until the printer automatically feeds it in for a short distance and then let go of the transparency Figure 1 32 A NO PAPER status is shown by the control panel LEDs until you put a transparency in the manual feed slot Figure 1 30 Ready Alarm Paper Toner Data Drum ...

Page 39: ...mediately after printing Stacking the printed transparencies may cause a paper jam or the transparency to curl Put the transparency into the manual feed slot with the side to be printed face up Make sure that the transparency is straight and in the proper position on the manual feed slot If it is not the transparency may not be fed properly resulting in a skewed printout or a jam Do not put more t...

Page 40: ...ng For more information about how to choose the settings see the Help text in the printer driver Manual duplex printing from the paper tray 1 Choose the Duplex printing mode from the Advanced tab in the printer driver Figure 1 33 2 Select the Paper Size Media Type Paper Source and other settings in the printer driver 3 The printer will automatically print all the even numbered pages on one side of...

Page 41: ...utput tray and put them back in the paper tray placing the paper with the side to be printed on blank side face down Follow the instructions on the computer screen Figure 1 35 5 The printer will now automatically print all the odd numbered pages on the other side of the paper ...

Page 42: ...per jams or poor print quality If there is a paper jam see Paper jams and how to clear them on page 6 5 1 Choose the Duplex printing mode from the Advanced tab in the printer driver Figure 1 36 2 Select the Paper Size Media Type Paper Source and other settings in the printer driver 3 Using both hands put the paper in the manual feed slot with the side to be printed on first facing up Follow the in...

Page 43: ... them in the same order back into the manual feed slot Place the paper with the side that is going to be printed on the blank side face up Follow the instructions on the computer screen Figure 1 38 5 Repeat Step 3 until you have printed all the odd numbered pages on the other side of the paper ...

Page 44: ...t will print page 6 then page 5 on the third sheet of paper and so on When doing manual duplex printing the paper must be put in the paper tray in the following way For the upper paper tray tray1 Put the side to be printed on first face down with the leading edge top of the paper at the front of the tray To print the second side put the paper face up with the leading edge top of the paper at the f...

Page 45: ...ollowing operating systems are on the CD ROM that we have supplied You can also download the latest printer driver from the Brother Solutions Center at http solutions brother com You can see the operations and detailed information in the Install Software section of the supplied CD ROM For Windows 95 98 Me Windows NT 4 0 and Windows 2000 XP Brother GDI Printer driver for Windows For Mac OS 8 6 to 9...

Page 46: ...c tab 1 Select the Paper Size Multiple Page Orientation and so on 2 Select the Paper Source and so on The screens in this section are from Windows XP The screens on your PC will vary depending on your Operating System If you are using Windows NT 4 0 Windows 2000 or XP you can access the Basic tab by clicking Printing Preferences in the General tab of the Brother HL 1435 series Properties screen 1 ...

Page 47: ... following icons 1 Print Quality 2 Duplex 3 Watermark 4 Page Setting 5 Device Options If you are using Windows NT 4 0 Windows 2000 or XP you can access the Advanced tab by clicking Printing Preferences in the General tab of the Brother HL 1435 series Properties screen 1 2 3 4 5 ...

Page 48: ...ightness contrast and other settings 2 Duplex If you select the Duplex button the dialog box for the manual duplex settings appears Six types of manual duplex binding directions are available for each orientation 3 Watermark You can place a watermarked logo or text into your documents When you use a bitmap file as a watermark you can change the size of the watermark and place it anywhere you like ...

Page 49: ... can set the following Printer Function modes in this tab You can jump to the page for each Printer Function by clicking the function name in the list below Job Spooling Quick Print Setup Sleep Time Status Monitor Page Protection Print Date Time ...

Page 50: ...e off go to the Advanced tab select Device Options and then select Sleep Time Double click the word Sleep Time in the Sleep Time screen this will allow the Sleep Time Off function to appear click Sleep Time Off to stop the printer going into sleep mode The Sleep Time Off function can be hidden by double clicking the word Sleep Time in the Sleep Time screen again We recommend that you keep Sleep mo...

Page 51: ...elect its settings in the Accessories tab as follows 1 You can manually add and remove the options for any optional unit device that is installed on the printer Tray settings will match the installed options 2 Paper Source Setting This feature recognizes the paper size in each paper tray 1 2 ...

Page 52: ...SOFTWARE 2 8 Support tab You can download the latest driver by accessing the Brother Solutions Center at http solutions brother com You can see the printer driver version You can check the current driver settings ...

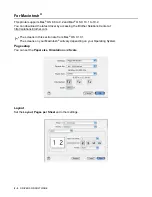
Page 53: ...atest driver by accessing the Brother Solutions Center at http solutions brother com Page setup You can set the Paper size Orientation and Scale Layout Set the Layout Pages per Sheet and other settings The screens in this section are from Mac OS X 10 1 The screens on your Macintosh will vary depending on your Operating System ...

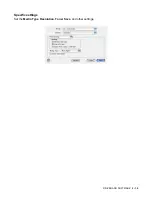
Page 54: ...DRIVER AND SOFTWARE 2 10 Specific settings Set the Media Type Resolution Toner Save and other settings ...

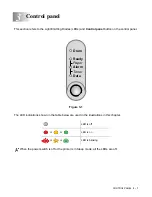
Page 55: ...on the control panel Figure 3 1 The LED indications shown in the table below are used in the illustrations in this chapter Control panel LED is off or or LED is on or or LED is blinking When the power switch is off or the printer is in Sleep mode all the LEDs are off Drum Ready Alarm Paper Toner Data ...

Page 56: ...eady mode Figure 3 4 Warming up Blinking at 1 second intervals The printer is warming up Cooling down or stop printing Blinking at 2 second intervals The printer is cooling down and stops printing until the internal temperature of the printer lowers Figure 3 5 Receiving data The printer is either receiving data from the computer processing data in memory or printing the data Drum Ready Alarm Paper...

Page 57: ...tridge and have it ready for when Toner Empty is indicated Figure 3 8 Toner empty Replace the toner cartridge with a new one See Replacing the toner cartridge on page 5 3 Figure 3 9 Drum unit near end of life The drum unit is near the end of its life We recommend that you buy a new drum unit to replace the current one See Replacing the drum unit on page 5 9 LED Printer status Ready Alarm Paper Ton...

Page 58: ... not start printing press the Control panel button No paper Put paper in the printer See Printing on plain paper on page 1 8 Then press the Control panel button Misfeed Put the paper back in properly and then press the Control panel button The printer will start printing again LED Printer status Ready Alarm Paper Toner Data Drum ...

Page 59: ...e error occurs on page 3 6 If you see the service call indication above turn off the power switch wait a few seconds and then turn it back on and try to print again If you cannot clear the error and see the same service call indication after turning the printer back on call your dealer or a Brother authorized service center For example the LED indication below shows a Fuser Malfunction Figure 3 11...

Page 60: ...rized service center by referring to the above table LEDs Fuser Malfunction Laser BD Malfunction Scanner Malfunction ROM Error D RAM Error Service A Drum Ready Alarm Data LEDs Service B Engine Interface Error NV RAM Error Main Motor Malfunction CPU Runtime Error Drum Ready Alarm Data Make sure that the front cover is fully closed before you report a service call ...

Page 61: ...rinter to reach the Ready state Form feed If the orange Data LED is on press the Control panel button The printer will print any data that is left in the printer memory Error recovery If there is an error the printer will recover automatically from some errors If an error is not automatically cleared press the Control panel button to clear the error and then continue to use the printer Reprint If ...

Page 62: ...l panel button as you turn on the power switch All the LEDs light up and then go off again Keep the Control panel button pressed down until the Drum LED comes on When the Drum LED comes on release the Control panel button 4 Press the Control panel button again The printer will print a test page Using the printer driver If you are using Brother s Windows printer driver click the Print Test Page but...

Page 63: ...lied with the NC 2100p For more information see Network User s Guide on the supplied CD ROM with the NC 2100p TCP IP NetBIOS and AppleTalk protocols Superior network and printer management BRAdmin Professional Windows based Management utility SNMP MIB I and MIB II over IP or IPX Remote console management via DEC NCP TELNET or NetWare Embedded web server support Flash memory for easy updating of fi...

Page 64: ...indows NT 4 0 and Windows 2000 infrared printer device Transmits and receives data at up to 4 Mbits sec Connects to the PC parallel port and connects to the Centronics parallel port on the printer Allows a printer to communicate with an infrared equipped portable computer Transmission range 1 cm 3 9 inch up to 100 cm 39 inch meets the IrDA standard 30 degree cone angle Selects between infrared or ...

Page 65: ...rovided with the printer 1 You can see how to replace the toner cartridge 2 You can see how to replace the drum unit 3 You can see how to clean the scanner window 4 You can see how to clean the corona wire in the drum unit 5 You can see how to clean the surface of the OPC in the drum unit These instructions are also included in Improving the print quality on page 6 10 Routine maintenance 5 4 3 2 1...

Page 66: ...n the toner cartridge see Replacing the toner cartridge on page 5 3 The amount of toner used varies according to what is printed on the page and the print density setting The more that is printed the more toner will be used If you change the print density setting for lighter or darker printing the amount of toner that is used will change Wait to unpack the toner cartridge until immediately before ...

Page 67: ...n also view the toner cartridge replacement method in the instructional video on the supplied CD ROM 1 Open the front cover of the printer 2 Pull out the drum unit assembly Figure 5 3 To make sure you get high quality print use quality toner cartridges When you want to buy toner cartridges call the dealer you bought the printer from We recommend that you clean the printer when you replace the tone...

Page 68: ...Caution Handle the toner cartridge carefully If toner scatters on your hands or clothes immediately wipe or wash it off with cold water 4 Unpack the new toner cartridge Hold the cartridge level with both hands and gently rock it from side to side five or six times to spread the toner evenly inside the cartridge Figure 5 6 Be sure to seal up the toner cartridge tightly so that toner powder does not...

Page 69: ...n your printer may cause damage to the printer itself and or it may result in unsatisfactory print quality Our warranty coverage does not apply to any problem that wa caused by the use of unauthorized third party toner and toner cartridges To protect your investment and guarantee your print quality please continue to replace consumed toner cartridges with only Genuine Brother Branded Supplies Prin...

Page 70: ...own in Figure 5 8 and Figure 5 9 to prevent any degradation to the print quality 6 Put the new toner cartridge firmly into the drum unit until you hear it lock into place If you put it in properly the lock lever will lift automatically Figure 5 10 Caution Make sure you fit the toner cartridge properly or it may separate from the drum unit Figure 5 8 Figure 5 9 ...

Page 71: ...from right to left and left to right several times Return the tab to the home position before you put the drum unit assembly back in the printer If you do not printed pages may have a vertical stripe Figure 5 11 8 Put the drum unit assembly back in the printer Close the front cover of the printer Figure 5 12 ...

Page 72: ... that determine the actual drum life such as the temperature humidity type of paper type of toner used number of pages per print job and so on Under ideal conditions the average drum life is estimated at up to 20 000 pages The actual number of pages that your drum will print may be significantly less than this estimate Because we have no control over the many factors that determine the actual drum...

Page 73: ...he printer 2 Pull out the drum unit assembly Figure 5 14 Caution We recommend that you place the drum unit assembly on a piece of disposable paper or cloth in case you accidentally spill or scatter toner To prevent damage to the printer from static electricity do not touch the electrodes shown in Figure 5 15 Figure 5 15 We recommend that you clean the printer when you replace the drum unit See Cle...

Page 74: ...m light may damage the drum unit 5 Put the toner cartridge in the new drum unit until you hear it lock into place with a click If you put the cartridge in properly the blue lock lever is lifted automatically Figure 5 17 Caution Make sure you fit the toner cartridge properly or it may separate from the drum unit when you pick up the drum unit assembly Discard the used drum unit according to local r...

Page 75: ...he Drum and Alarm LED are lit Figure 5 18 7 Reset the drum counter See the instructions supplied with the new drum unit Caution The Drum LED indication does not disappear until you reset the drum counter Do not reset the drum counter when you replace only the toner cartridge 8 Close the front cover 9 Make sure that the Drum LED is now off ...

Page 76: ...the inside of the printer If printed pages are stained with toner clean the inside of the printer with a dry soft cloth See the Maintenance Tutorial section in the supplied CD ROM You can see instructional videos on your computer screen showing you how to perform these tasks 1 You can see how to clean the scanner window 2 You can see how to clean the corona wire in the drum unit 2 1 ...

Page 77: ...he following number of pages The actual number of printed pages may vary depending on your average type of print job and paper These figures are based on 5 coverage per page Item Approximate Life To Purchase Replacement Fixing unit 50 000 pages Call Customer Service Separator pad holder assembly 50 000 pages Call Customer Service Pick up roller assembly 50 000 pages Call Customer Service ...

Page 78: ...ter port Printer does not print If you did not solve your problem with the above checks please find your problem and then go to the section listed Printer LED is blinking See Control panel buttons on page 3 7 Status Monitor Error Message appears See Error messages in the status monitor on page 6 2 Printer printed an Error Message See Error message printouts on page 6 3 Paper handling See Paper han...

Page 79: ...r in the paper tray make sure it is straight If the paper is curled straighten it before printing Sometimes it is helpful to remove the paper turn the stack over and put it back in the paper tray Reduce the amount of paper in the paper tray and then try again Make sure you use paper that meets Brother s recommended paper specifications See What kind of paper can I use on page 1 5 Paper Jam Take ou...

Page 80: ...e data left in the printer Reduce the print resolution or reduce the complexity of your document Print Overrun Press the Control panel button to print the data left in the printer If this does not clear the error reduce the complexity of your document or reduce the print resolution Resolution Adapted The printer has printed the document at a reduced resolution Reduce the complexity of your documen...

Page 81: ...elected in the printer driver The printer does not feed paper from the manual feed slot Re insert the paper firmly one sheet at a time Make sure that manual feed mode is selected in the printer driver The printer will not feed envelopes The printer can feed envelopes from the manual feed slot Your application software must be set up correctly to print on the envelope size you are using This is usu...

Page 82: ...inting automatically press the Control panel button If the printer still does not start printing please check that all the jammed paper has been removed from the printer Then try printing again After you have just used the printer some parts inside the printer are extremely hot When you open the front cover or rear cover of the printer never touch the shaded parts shown in Figure 6 2 Figure 6 2 Al...

Page 83: ...6 6 TROUBLESHOOTING 1 Pull the paper tray completely out of the printer Figure 6 3 2 Pull the jammed paper up and out of the printer Figure 6 4 3 Open the front cover ...

Page 84: ...printer If you cannot remove the drum unit assembly easily at this time do not use extra force Instead pull the edge of the jammed paper from the paper tray Figure 6 5 Caution To prevent damage to the printer caused by static electricity do not touch the electrodes shown in Figure 6 6 Figure 6 6 ...

Page 85: ...he printer are extremely hot Wait for the printer to cool down before you touch the internal parts of the printer Figure 6 8 6 Close the rear cover If you have to pull the paper toward the back of the printer the fuser may get dirty with toner powder and it may scatter on the next printouts Print a few copies of the test page until the scattering of toner stops HOT ...

Page 86: ...wn and take the toner cartridge out of the drum unit assembly Take out the jammed paper if there is any inside the drum unit Figure 6 9 8 Put the drum unit assembly back in the printer 9 Put the paper tray in the printer 10 Close the front cover ...

Page 87: ...oor print quality Recommendation Faint Check the printer s environment Conditions such as humidity high temperatures and so on may cause this print fault See Positioning the printer in Chapter 1 If the whole page is too light Toner Save mode may be on Turn off Toner Save mode in the printer Properties tab of the driver Try installing a new toner cartridge See Replacing the toner cartridge on page ...

Page 88: ... drum unit See Replacing the drum unit on page 5 9 Hollow print Make sure that you use paper that meets our specifications See What kind of paper can I use on page 1 5 Choose Thick paper mode in the printer driver or use thinner paper than you are currently using Check the printer s environment because conditions such as high humidity can cause hollow print See Positioning the printer on page 1 4 ...

Page 89: ...e poor print 2 Turn the drum unit gear by hand while looking at the surface of the OPC drum 3 When you find the mark on the drum that matches the print sample wipe the surface of the OPC drum with a cotton swab until the dust or paper powder on the surface comes off Caution Do not try to clean the surface of the photosensitive drum with a sharp object such as a ball point pen The drum unit may be ...

Page 90: ...been used for a long time The drum unit may be damaged Put in a new drum unit See Replacing the drum unit on page 5 9 Lines across the page Clean the inside of the printer and the primary corona wire in the drum unit See Cleaning on page 5 12 The drum unit may be damaged Put in a new drum unit See Replacing the drum unit on page 5 9 Black lines down the page Printed pages have toner stains down th...

Page 91: ...l cause paper to curl See What kind of paper can I use on page 1 5 If you don t use the printer very often the paper may have been in the paper tray too long Turn over the stack of paper in the paper tray Also try fanning the paper stack and then rotating the paper 180 in the paper tray Try printing using the straight through output path See Printing on plain paper from the paper tray on page 1 8 ...

Page 92: ...Status Monitor in the Device Options tab in the printer driver The printer cannot print full pages of a document An error message PRINT OVERRUN is printed Press the Control panel button to print the data left in the printer If this does not clear the error reduce the complexity of your document or reduce the print resolution The printer cannot print full pages of a document An error message MEMORY...

Page 93: ...rint time 1 Less than 15 sec Resolution 1200 dpi x 600 dpi 600 dpi x 600 dpi 300 dpi x 300 dpi Processor Fujitsu MB86833 66MHz Memory Standard 4MB Option N A Interface Standard USB Parallel Option Optional Ir DA IR 1000 2 Network Connectivity 3 Interface Optional 10 100Base TX NC 2100p Protocol for optional 10 100Base TX NC 2100p TCP IP NetBEUI Emulation GDI Printer driver For Windows Brother GDI ...

Page 94: ... 16 to 28 lb Media sizes Manual feed slot Width 69 8 to 216 mm 2 75 to 8 7 in Length 116 to 356 mm 4 57 to 14 0 in Paper tray Standard A4 Letter Legal B5 ISO A5 B6 ISO A6 Executive Toner Standard yield cartridge 3 000 pages A4 Letter pages 5 coverage High yield cartridge 6 000 pages A4 Letter pages 5 coverage Drum 20 000 A4 Letter pages 1 page job Dimensions W D H For USA Canada Latin America 360 ...

Page 95: ...in Long grain paper s fiber direction is parallel to the carriage direction of the paper in the printer Short grain paper s fiber direction is vertical to the carriage direction of the paper in the printer Though most plain paper for copying is long grain some is short grain We recommend that you use long grain paper for this printer Short grain paper is too weak for the paper carriage of the prin...

Page 96: ...paper changes greatly The fixing of the toner may become worse For storage of the paper and during use we recommend that the humidity of the surrounding environment is between 50 and 60 Rough estimate of basis weight Paper size g m2 lb Bond Index 60 16 64 17 75 20 90 24 105 28 120 32 135 36 161 43 90 200 53 110 Letter 8 5 11 in Legal 8 5 14 in Executive 7 25 10 5 in A4 210 297 mm A5 148 210 mm A6 ...

Page 97: ...ual feed tray 1 2 1 11 1 18 1 24 1 29 media specifications A 2 memory A 1 misfeed 3 4 N NC 2100p 4 1 Network Connectivity A 1 no paper 3 4 P paper 1 5 A 3 paper handling 6 4 A 2 paper jams 3 4 6 5 Parallel interface cable 1 1 pick up roller 5 13 plain paper 1 6 power supply 1 4 print media 1 5 print quality 2 4 6 10 Print server 4 1 print test page 3 8 printable area 1 7 printer driver 2 1 A 1 pri...

Reviews: