background image


27 

Connection to a PC 

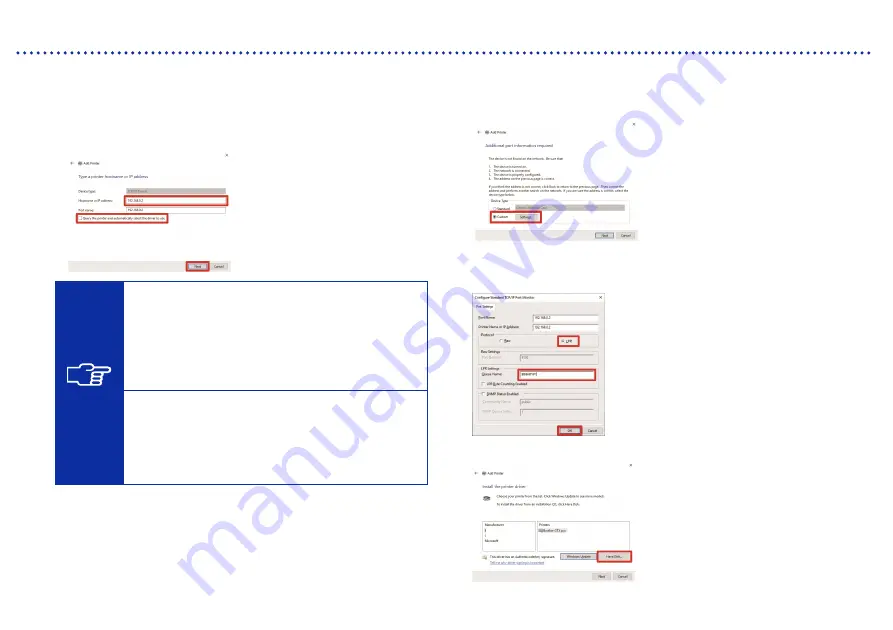
6) Enter the static IP address of the printer into [Hostname or 

IP address] -> Uncheck the check box of [Query the printer 
and automatically select the driver to use] -> [Next] 


TIPS 

If you set the printer's IP address by automatic 
acquisition, you must check the IP address of 
the printer in advance. You can confirm the IP 
address by selecting [Confirm network setting] 
-> [IP Address] from the menu. For details, refer 
to "8-23. Confirm network setting" in the 
Instruction Manual. 
If you are using a DNS server, you can use a 
host name and domain name instead of the IP 
address. In that case, enter the host name that 
has been acquired automatically and set for the 
printer IP address (see P.25). As for the domain 
name, check with your network administrator. 


7) From [Device Type], select [Custom] -> [Settings] 


8) From [Protocol], select [LPR] -> Enter "BINARY_P1" in the 

[Queue Name] of [LPR Settings] -> [OK] -> [Next] 


9) Click on [Have Disk] 


Summary of Contents for GTX pro Bulk

Page 1: ...to read this manual before using this product Keep this manual in a safe place for future use Please be sure to read SAFETY INSTRUCTIONS before use Installation 1 Setup of the printer 6 Connection to a PC 23 Adjustment 29 Maintenance list 32 Table of contents ...

Page 2: ...serious injury CAUTION The instructions which follow this term indicate situations where failure to follow the instructions may result in minor or moderate injury IMPORTANT The instructions which follow this term indicate situations where failure to follow the instructions may result in damage to property NOTE The instructions which follow this term indicate precautions and restrictions for use Sy...

Page 3: ...re cords Otherwise it may cause fire or electric shocks Printing If a foreign object gets inside the printer immediately turn off the power disconnect the power cord and contact the place of purchase or a qualified technician If you continue to use the printer while there is a foreign object inside it may result in fire or electric shocks or problems with correct operation Do not allow the printer...

Page 4: ...use it it may result in fire or electric shocks or poor printing quality Do not place the printer on a shaky table or high shelf or other unstable location Otherwise it may tip over or fall down and cause injury For information on the table that supports the printer contact the dealer Do not set up the printer in a place where it will be affected by vibration Otherwise the printing quality may be ...

Page 5: ...a problem occurs with the operation of the printer contact the place of purchase or a qualified technician Maintenance Be careful not to get your fingers caught when closing the front cover otherwise it may result in injury to your fingers When you mount or replace the head be careful not to get your hands or fingers caught Otherwise you may be injured Do not drink liquids such as the ink maintena...

Page 6: ...nd avoid placing any objects The platen may be hit and damaged NOTE Use the printer in an area which is free from sources of strong electrical noise such as electrical line noise or static electric noise Sources of strong electrical noise may cause problems with correct operation Any fluctuations in the power supply voltage should be within 10 of the rated voltage for the printer Voltage fluctuati...

Page 7: ...ted States and other countries The official name of Windows 8 1 is Microsoft Windows 8 1 operating system represented as Windows 8 1 in this manual The official name of Windows 10 is Microsoft Windows 10 operating system represented as Windows 10 in this manual Microsoft Windows 8 1 and Windows 10 are trademarks and registered trademarks of Microsoft Corporation in the United States of America and...

Page 8: ...r your work When the label is peeled off or illegible contact the place of purchase 1 3 4 5 6 2 7 X0447 10 1 3 3 9 9 9 11 7 6 8 5 4 2 9 9 China only Watch your fingers or you may be injured High temperature warning display Cleaning solution Grease Waste ink tank Pretreatment 5 kg 11 lb Pretreatment 20 kg 44 lb Refill ink bottle 1 8 L Refill ink bottle 18 L ...

Page 9: ...viii 8 9 10 11 China only ...

Page 10: ...Battery 1 by pulling out the holder in the direction of the arrow 3 Pickup the Lithium Battery 1 to the direction of the arrow 1 1 1 Note based on California law USA on the use and handling of Perchlorate This product contains a CR Coin Lithium Battery which contains Perchlorate Material special handling may apply See http www dtsc ca gov hazardouswaste perchlorate ...

Page 11: ... 六价铬 汞 多溴联苯 多溴二苯醚 部件名称 Pb Cd Cr VI Hg PBB PBDE 框架机制 盖板机制 台板机制 导轴机制 维护机制 供墨机制 打印头机制 电气部品 操作面板机制 配件 使用手册 其他零件 包装 框架机制 本表格依据 SJ T 11364 的规定编制 表示该有害物质在该部件所有均质材料中的含量均在 GB T 26572 规定的限量要求以下 表示该有害物质至少在该部件的某一均质材料中的含量超出 GB T 26572 规定的限量要求 由于技术的原因暂时无法实现替代或减量化 China only ...

Page 12: ...ation Working Environment 1 10 C 50 F to 35 C 95 F Recommended Print Environment 2 18 C 64 4 F to 30 C 86 F 35 to 85 no condensation Electrical Requirements Power Power Consumptions Single phase 100 240 V 50 60 Hz 160 W 1 Environmental range where the printer can be operated 2 Environmental range where sufficient printing quality can be secured X0356 Checking the installation site 1 X0355 17 7 in ...

Page 13: ...ard the rear side keep 7 9 in 20 cm or more space from the exhaust opening If this space is not secured you will have to move peripherals or the printer when making a repair When installing the printer place a level gauge on the top surface of the cover and the top surface of the platen to make adjustments so that the main unit is set horizontally In preparation for a major earthquake or other nat...

Page 14: ...aning the maintenance unit x 4 Carriage fixing pin Tweezers Flushing receiver x 2 Flushing foam x 2 Waste ink tank Print head for color printing Print head for white Rear cover installation screw x 2 Screws are already fixed with the machine Rear cover Wiper cleaner x 2 Adult platen Setup Manual this manual Driver Connector cover Cord holder x 2 Cord holder installation screw x 2 Waste ink tube X0...

Page 15: ...4 Prepare the following items along with the supplied accessories Refill ink bottle Black Magenta Cyan Yellow 1 8 L x 2 or 18 L x 1 for each White 1 8 L x 3 or 18 L x 1 Cleaning solution Pretreatment ...

Page 16: ...43 kg Transporting and installing the printer requires four or more people to hold it at the marked positions which are located where the printer can be held Otherwise the machine may fall down causing injury or resulting in failure of the printer X0357 X0353 Transporting the printer 3 ...

Page 17: ...6 Setup of the printer Remove all the tapes strings and sheets shown in the below illustration Main body Tank unit X0358 X0005 Removing the protection materials 1 X0382 ...

Page 18: ...cover 2 Mount the bracket with screws TIPS If the bracket comes off insert it into the third groove from the tube end 3 Remove the screw binding the tube and apply maintenance solution to the tip of the tube TIPS Perform steps 3 and 4 for each tube X0300 X0299 2 X0297 Main body and tank unit connection X0356 Align with the corner Align with the front side Align with the corner Align with the front...

Page 19: ...necting the tubes 5 Mount the fastening holder with screws Install the removed right cover and tighten the screws Electric wiring connection 1 Remove the tank unit screws and remove the cover by lifting it up a little and drawing it out in the arrow pointed direction 2 Loosen the nut and fit the connector cover with the harness TIPS The connector cover hole b may be oriented to either side X0301 a...

Page 20: ...elow TIPS Press down the connector c while tightening the nut 4 Connect the relay connector and fasten the harness with four clamps IMPORTANT Slacken the harness in a U shape to make ease of draining when connecting the relay connector TIPS Fasten the relay connector between clamps X0369 c X0451 ...

Page 21: ...d connect the connector to the board 6 Fasten the earth wire and harness with clamps IMPORTANT Be sure to fasten the harness with clamps 7 Fasten the harness with two cord holders Install the removed cover and tighten the screws X0373 X0371 X0372 ...

Page 22: ...en should be mounted after turning on the power Rear cover CAUTION Be careful not to touch the claws of mounting portion on the upper side of the rear cover Otherwise you may be injured Cable clamp This is used to put the cables together Filter cover and Fan filter X0361 X0360 X0359 Mounting the supplied accessories 3 ...

Page 23: ...nk tube should be cut so that the length from the tube connection is 150 mm The waste ink tube should be cut diagonally Avoid placing the waste ink tube horizontally as much as possible and be sure not to let it bend Otherwise the waste ink may have difficulty flowing through the tube TIPS The table provides a place where to install the waste ink tank Install the waste ink tank there Mount the fol...

Page 24: ...firing of the print heads Carriage fixing pin TIPS The carriage fixing pin will be needed when the power is turned OFF due to power outage while the printer is running and the recovery is not expected for a while Secure the pin in the place illustrated above so as not to lose it The front cover will not close completely if the carriage is fixed with the carriage fixing pin Wiper cleaner TIPS Waste...

Page 25: ...the carriage toward the center of the printer to the position above the platen If you perform the mounting of the head when the carriage is directly above the maintenance unit it may damage the maintenance unit or the heads TIPS Do not confuse the color side print head with the white side print head The color side red print head is located in front and the white side white color print head on the ...

Page 26: ...ounting the head be careful not to move the carriage as much as can be avoided Your hand may be caught in the carriage and injured In addition the tubes may be rolled together possibly damaging them 3 Push with force in the direction as indicated in s so that the c area makes contact with the side of the metal plate of the head CAUTION When you mount d hold it down from the top Otherwise your fing...

Page 27: ...e two claws of the resin cover d to remove the resin cover 5 Remove the core claw using the supplied screwdriver TIPS Hold the core center by hand to make it easy to insert the screwdriver into the claw X0378 d X0427 ...

Page 28: ... flat cable as shown in the illustration 8 Remove four caps of the head Check that the head and the marker of each tube are matched and connect the tubes one by one from back to front of the machine by rotating the nut until it stops IMPORTANT Do not rotate the nut as illustrated in e It could disconnect the tube and leak the contained ink Be sure to remove the caps attached to the head before con...

Page 29: ...he cover of the machine and insert the AC power cord into a and the outlet Press the power button b to turn the printer power ON TIPS Error messages Perform Initial Ink Installation and Please Refill Ink may be displayed on the screen of the printer but it will be no problem so please continue to perform the ink installation according to the procedures described in this manual X0430 b a X0364 Turn...

Page 30: ...UTION Be sure to wear a pair of plastic gloves and protective glasses while refilling the ink IMPORTANT Agitate the white ink before refilling For details refer to the Instruction Manual For information on using the 18 L refill ink tank to refill ink refer to the Instruction Manual TIPS When agitating the white ink remove the IC stick to prevent it from falling off 1 Refill Ink Select the color yo...

Page 31: ...er nozzle once you have used it Do not use a non standard funnel or other part because doing so may cause ink contamination or deterioration possibly resulting in printer failure IMPORTANT Take care not to lose the IC stick that comes standard with the refill ink bottle TIPS Store the IC stick by attaching it to the handle of the refill ink bottle Waste should be disposed of in accordance with reg...

Page 32: ...tion s and tighten the platen fixing lever in direction d TIPS Use with the knob a tightened when printing Depending on the height of the platen the platen fixing lever may strike against the platen and prevent rotation In that case move the platen fixing lever in the direction b draw the edge of the platen fixing lever forward as shown in c then loosen it again X0374 Mounting the platen 8 X0288 X...

Page 33: ...inter and perform the operation while the printer is in Standby mode 1 Maintenance Initial Ink Installation All Print Heads 2 Follow the precautions on the screen and press it takes about 90 minutes and further takes about 30 minutes if below 18 C 3 When the printer returns to Standby mode the operation will be completed Configuring the language 9 Installing the ink 10 ...

Page 34: ...d LAN cable together use P 11 Cable clamps 2 Follow the instructions on the screen TIPS This screen may prompt more than once And this also may require several minutes to complete We recommend you to set Brother GTX pro or Brother GTX pro FileOutput as the default printer for your convenience TIPS Although the description of this section is based on operation with Windows you can also use Macintos...

Page 35: ...dministrator of the setting site The static IP address can also be set on the printer For details refer to the Instruction Manual 1 Perform the procedures of P 23 When connecting via USB 2 Start menu Brother GTX pro Tools Activate GTX pro Maintenance 3 Select Set an IP Address Next 4 Select the setting method Next When connecting via LAN 2 B ...

Page 36: ...k Default Gateway Next The steps are completed when the message IP address was successfully assigned to the Printer is displayed If you selected Automatically acquire the IP address 5 Enter the hostname Next The steps are completed when the message IP address was successfully assigned to the Printer is displayed ...

Page 37: ...ws 10 Settings Device Devices and Printers 3 Click on Add a printer 4 Windows 8 1 The printer that I want isn t listed Select Add a local printer or network printer with manual settings Next Windows 10 The printer that I want isn t listed Select Add a local printer or network printer with manual settings Next 5 Select Create a new port From Type of port select Standard TCP IP Port Next ...

Page 38: ...ting Confirm network setting IP Address from the menu For details refer to 8 23 Confirm network setting in the Instruction Manual If you are using a DNS server you can use a host name and domain name instead of the IP address In that case enter the host name that has been acquired automatically and set for the printer IP address see P 25 As for the domain name check with your network administrator...

Page 39: ...8 10 Browse Select 64bit_OS folder in the installer OK Next 11 Select Replace the current driver Next 12 Enter the Printer name Next 13 When the next screen appears select Do not share this printer Next ...

Page 40: ...es 2 When the printer stops with a sound and the printer returns to Standby mode the operation is completed 1 Make sure that the platen height adjustment lever a is set at the A position TIPS Use a platen sized 14 in x 16 in 356 mm x 406 mm which is included at the time of your purchase Adjusting the carriage speed 1 Checking the nozzle check pattern 2 X0290 a ...

Page 41: ...rt is also acceptable 5 Test Print Nozzle Check White 6 Check the printed results for both nozzle check prints and determine if there is a problem If missing nozzles are found as indicated by the arrows below there is a problem concerning the firing of the print heads TIPS Even if the lines of the white side printed result are light since white ink is fired from more than one nozzle on the same pl...

Page 42: ... refer to the Instruction Manual 3 Following the instructions on the GTX pro Maintenance screen run the following menu options Menu name Things to prepare 1 Initial settings after head replacement 1 2 Firing Adjustment Black paper or transparent sheet such as OHP sheet White paper 3 Platen Rolling Adjustment White paper 4 White Color Alignment Black paper or pretreated black or dark color T shirt ...

Page 43: ... disposal of waste ink Confirmation and refilling of cleaning solution Print out of the nozzle check pattern checking on the print heads Refilling ink Cleaning of the nozzle guard wiper exhaust cap and suction cap Replacing the wiper cleaner Replacing the flushing foam Replacing the fan filter When the printer becomes dirty Head cleaning White ink circulation Cleaning the CR carriage plate Cleanin...

Page 44: ...itajizoyama Noda cho Kariya 448 0803 Japan 2020 Brother Industries Ltd All Rights Reserved Please note that the contents of this manual may differ slightly from the actual product purchased as a result of product improvements This is the original instructions ...

Reviews: