BrookVent Aircycle 1.1 Installation And Maintenance Manual Download Page 11

aircycle 1.1/1.2 – In-built Control & SB  

Last Updated 02-01-13  

 Page 11 of 14 


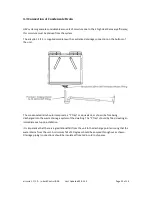
5.0  Electrical Connections/ Wiring


Important:

 All the electrical connections must be carried out by a qualified electrician. 

Installations  and  wiring  must  conform  to  current  IEE  regulations  (UK),  local  or  appropriate 
regulations (applying to other countries). 

 
Electrical Details:  


Voltage: 

230 V AC ~


Fuse rating: 

5 A


Warning: 

This unit must be earthed. 

 
Please Note:

 The core cable from the mains power supply must be connected to a fixed wiring 

installation, via a 5 amp fused isolator, as to comply with current IEE wiring regulations. 
 
A switch or circuit breaker must be used in the power supply circuit. It should be in close proximity 
to the HRV unit and should be clearly marked as the disconnecting device for the HRV Unit. 


Connecting to Mains:  

The  aircycle  1.1/1.2  unit  comes  pre-wired  with  1m  length  of  4-core  cable,  which  should  be 
connected into a fan-isolation switch. In turn a 3-core mains cable should be used to connect to a 5A 
fused spur, which should be located close to the unit. 
 

Yellow  = Earth 
Black   = Neutral 
Brown   = Live 
Grey 

= Switch    

 
The grey switch wire is used to boost the system. When a live 240v signal is applied, the Auto Boost 
function will be triggered. 

 
Wiring Schematic 


aircycle 1.1/1.2


(In-built Control & 

Summer Bypass)


Summary of Contents for Aircycle 1.1

Page 1: ...e 1 of 14 Heat Recovery Ventilation Applicable to aircycle 1 1 1 2 Ws For Wall Mounting with In built Control Summer Bypass Installation and Maintenance Instructions for the Installer Please refer to...

Page 2: ...by persons including children with reduced physical sensory or mental capabilities or lack of experience and knowledge unless they have been given supervision or instruction concerning use of the app...

Page 3: ...and supplied into the habitable rooms such as bedrooms dining rooms and living rooms 1 1 Model Variations This installation manual refers to the Brookvent aircycle 1 1 and pertains to the following m...

Page 4: ...quirements and local additional rules Explanation of the ventilation system to the user Warning for the user to check or replace the air filters on time All the above as set out in the latest edition...

Page 5: ...aircycle 1 1 1 2 In built Control SB Last Updated 02 01 13 Page 5 of 14 3 0 Specifications Front...

Page 6: ...r Media G2 3 Electrical 240V EC Quiet Fan Technology Controls Extremely Efficient In built Control Board Single 240v boost input Light switch humidistat PIR etc Single 240v boost supply line optional...

Page 7: ...aircycle 1 1 1 2 In built Control SB Last Updated 02 01 13 Page 7 of 14 3 2 Airflow Pressure Performance Curve Airflow Performance Curve...

Page 8: ...to ductwork wiring and the connection of the condensate drain It is important that filters to the system can also be accessed for replacement 4 1 Mounting The aircycle 1 1 1 2 Ws is designed for Wall...

Page 9: ...es to a minimum Where it is not possible to continue throughout the dwelling in rigid 125mm diameter round pipe due to the void spaces available a conversion to rigid 204mm x 60mm flat rectangular duc...

Page 10: ...ction on the bottom of the unit The condensate drain should incorporate a P Trap or equivalent as shown before being discharged into the waste drainage system of the dwelling The P Trap should be fill...

Page 11: ...s to comply with current IEE wiring regulations A switch or circuit breaker must be used in the power supply circuit It should be in close proximity to the HRV unit and should be clearly marked as the...

Page 12: ...uch as a Wall Switch or Humidity Stat If the Boost is required to be set it should always be set higher than the Trickle Turing these Speed Pots clockwise increases the fan speed 6 1 Tempering Summer...

Page 13: ...o the levels required 7 1 Filter Replacement The filters of this HRV unit will usually need to be changed every 6 12 months depending on occupancy use and the type of environment the dwelling is locat...

Page 14: ...carried out to ensure that the required air flows are achieved throughout the property The volume airflow at each point should be measured using a suitably calibrated Airflow Meter anemometer this is...

Reviews: