background image

GSS2520JAN 
Instruction Manual   
Guide d’utilisation


15

Flare-ups 


“Flare-ups” sometimes occur when food drippings fall onto the hot heat distribution plate or burners and ignite. Some flaring is 
normal and desirable as it helps impart the unique flavors associated with grilled foods. Controlling the intensity of the flare-ups is 
necessary, however, in order to avoid burned or unevenly cooked foods and to prevent the possibility of accidental fire. 

WARNING: 

Always monitor the grill closely when cooking and turn the flame level down to LOW or OFF if flare-ups intensify. 
Shutting Off Burners 

1.  Always turn the valve knob(s) clockwise to the ‘’HIGH’’ position, and then press and turn it to ‘’OFF’’. Never force the knob


without pressing it. This could damage the valve.


2.  Promptly turn the gas supply to the “OFF” position on the natural gas valve.


3.  Close the lid of the grill.


Excess flow safety valve reset procedure 

● 

The new regulators are equipped with a safety device that restricts the gas flow in the event of a gas leak. However, 
unsafe practices of grill operation could activate the safety device without having a gas leak. 

● 

A sudden shut off of the gas flow typically occurs if you open the natural gas valve rapidly, or if one or more of the burner 
control knobs is in an open position when opening the natural gas valve. 

● 

This procedure effective with natural gas. 


● 

To ensure the procedure is safely and successfully performed, please carefully follow these instructions:


1. Close 

the 

natural gas valve.


2. 

Turn all burner control knobs to the OFF position.


3. 

Disconnect the natural gas hose from the natural gas inlet.


4. 

Open the lid of the grill.


5. 

Turn burner control knobs to HIGH.


6. 

Wait at least 1 minute.


7. 

Turn burner control knobs OFF.


8. 

Wait for at least 5 minutes.


9. 

Re-connect the natural gas hose to the natural gas supply.


10.  Slowly turn the natural gas valve ¼ turn at a time and have the valve all the way open.


11.  With the lid open: For grill with ignition button: turn on only ONE burner control knob to the HIGH position. Ignite   


the grill by pushing the ignition button. For grill with an automatic ignition: Push down the control knob you want to   
light, turn counter-clockwise until you hear the ignition click.


12.  After the first front burner is lit, turn on the other control knob(s) to the HIGH position. If you have more than two 


burners, turn them on only ONE AT A TIME.


13.  When all front burners are lit, close the grill lid.


14.  Wait for 10-15 minutes; the temperature should reach 400 – 450°F

.


Care and Maintenance 

IMPORTANT 

Always allow to completely cool off before covering your grill to prevent corrosion from condensation. 

CAUTION: 

All cleaning and maintenance should be done when the grill is cool, with the fuel supply turned off at the control dial and the 
natural gas valve disconnected. DO NOT clean any grill part in a self-cleaning oven. The extreme heat will damage the finish. 

Cleaning


Burning off the grill after every use (approx. 15 minutes) will keep excessive food residue from building up. Clean the grill 
before and after cooking is recommended. 

Recommended cleaning materials

Mild dishwashing liquid detergent                                          Hot water 
Nylon cleaning pad                                                                    Wire brush 
Paper clip                                                                                    Putty knife/scraper 
Compressed air 
DO NOT use cleaners that contain acid, mineral spirits or xylene. 

Outside surfaces 

Use a mild dishwashing detergent and hot water solution to clean. Rinse thoroughly with water. 

Inside surface 

If the inside surface of the grill lid has the appearance of peeling paint, baked on grease has turned to carbon and is flaking off. 
Clean thoroughly with a strong solution of detergent and hot water. Rinse with water and allow it to completely dry. 
Interior of grill bottom – Remove residue using brush, scraper and/or cleaning pad. Wash with a dishwashing detergent and 
hot water solution. Rinse with water and let dry. 
Cooking Grates – The porcelain grates have a glass-like composition that should be handled with care. Use a mild 
dishwashing detergent or baking soda and hot water solution. Non-abrasive scouring powder can be used on stubborn stains. 
Rinse with water. 
Heat Plates – Clean residue with wire brush and wash with soapy water. Rinse with water. 
Grease Cup – Periodically empty the grease cup and clean with a dishwashing detergent and hot water solution. 

Summary of Contents for 06695007

Page 1: ...GSS2520JAN Instruction Manual Guide d utilisation 1 Model Modèle 06695007 Natural Gas Barbecue Operators Manual p 2 Barbecue au gaz naturel Guide de I utilisateur p 21 ...

Page 2: ...njury or property damage NOTE This grill must be used with natural gas only Retain this manual for future reference WARNING 1 Do not store or use gasoline or other flammable liquids or vapour in the vicinity of this or any other appliance DANGER If you smell gas 1 Shut off gas to the appliance 2 Extinguish any open flame 3 Open lid 4 If odour continues keep away from the appliance and immediately ...

Page 3: ...mbly instructions suggestions for grilling and helpful hints as well as guidelines for the safe operation proper care and use of your grill Our expert staff strives to provide you with an easy to assemble product Should you have any questions or problems with this product please call our customer service department at 1 855 630 5390 7 A M 4 P M EST Monday Friday NOTE The use and installation of th...

Page 4: ...the grill in any manner 3 Clean and inspect the hose before each use If there is evidence of abrasion wear cuts or leaks the hose must be replaced prior to operation The replacement hose assembly should be in accordance with the manufacturer s specifications 4 Move gas hoses as far away as possible from hot surfaces and dripping hot grease 5 Never keep a filled gas container in a hot car or car tr...

Page 5: ...ur For your safety an odorant has been added This grill has been designed to be used with natural gas use only CAUTION It is essential to keep the grill s valve compartment burners and circulating air passages clean Inspect the grill before each use Step 1 Inspect all hoses and connections and make certain they are secure Step 2 Check and clean the burner venturi tubes for insects and insect nests...

Page 6: ...t panel 1 PC I Body assembly 1 PC Q Warming rack 1 PC C Cart right panel 1 PC J Left side shelf 1 PC R Grease cup support 1 PC D Cart back panel 1 PC K Right side shelf 1 PC S Grease cup 1 PC E Front beam 1 PC L Knob 1 PC T Tool hanger 1 PC F Latch magnet 1 PC M Knob seat 1 PC U Swivel caster 2 PCS G Heat insulator 1 PC N Side burner 1 PC V Rigid caster 2 PCS H 1 Left door 1 PC O Heating plate 4 P...

Page 7: ...nutes Part Description Quantity Picture AA M6 x 15 Bolt 32 PCS BB M4 x 10 Bolt 9 PCS CC M6 Flat Washer 24 PCS DD M6 Lock Washer 24 PCS EE M4 Flat Washer 6 PCS FF M4 Lock Washer 4 PCS GG M4 Nut 4 PCS HH Screwdriver 1 PC Step 1 Casters assembly a Align the hole on one the two swivel casters U with the holes on left bottom side of the cart base A b Insert a M6 x 15 bolt AA one M6 lock washer DD and o...

Page 8: ...gth extending from the cart base A b Align the holes on the left side of cart base A with the holes on the cart left panel B and tighten the pre installed bolts by hand c Repeat the procedure with the cart right panel C on the upper right side of cart base A d Go back and tighten all bolts using the screwdriver provided Step 4 Cart back panel assembly a Align the holes on cart left panel B with th...

Page 9: ...o the pre drilled hole on left front side of front beam E c Repeat the procedure with the right door H 2 and front beam E d Close the two doors First step Second step E AAX4 DDX4 CCX4 Step 7 Install the firebox into the cart a Put the firebox I onto the assembled cart b Align the holes on the right side of body assembly I with the holes on the right panel C c Insert one M6 x 15 bolt AA one M6 lock...

Page 10: ...d hole of the side burner N d Insert one M4 flat washer EE M4 lock washer FF and M4 nut GG into bolt BB e Go back to tighten all the bolts using the screwdriver provided f Connecting ignition line with the electrode Step 8 Side shelf assembly a Loosen the five pre installed bolts on right side of body assembly and a leave 1 4 of the bolt s length extending from body assembly b Align the large hole...

Page 11: ...ut the cooking grids P upon the heating plates c Put the warming rack Q on the side walls of firebox Step 12 Install the grease pan a Insert the grease pan G into grill from back underneath grill body Step 13 Install the grease cup and grease cup support a Hook the grease cup support R into the grooves beneath the grease pan b Put the grease cup S onto the grease cup support ...

Page 12: ...lso check with your gas company or with local building codes for instructions to install gas supply line or call a licensed and qualified installer It is recommended that an ON OFF manual shut off valve be installed at the gas supply source Outdoors after the gas line exits outside wall and before quick disconnect or before gas supply line enters ground Pipe sealing compound or pipe thread tape of...

Page 13: ...ave a leak Proceed to step 6 6 Disconnect the natural gas hose from the valve and reconnect Make sure the connection is secured 7 Retest with solution 8 If you continue to see bubbles replace the quick release connector or and natural gas hose Lighting Your Grill DANGER Failure to open lid while igniting the grill s burners or not waiting five minutes to allow gas to clear if the grill does not li...

Page 14: ...se the knob immediately once the burner is lit 8 To ignite remaining burners repeat same procedure for adjacent burner and continue in sequence 9 Adjust valve knob to the desired cooking temperature Using the Lighting Stick to Light the Side Burner 1 Open lid while lighting the burner Lid must remain open while burner is lit 2 Remove the lighting stick then insert a match into the end of lighting ...

Page 15: ...the grill by pushing the ignition button For grill with an automatic ignition Push down the control knob you want to light turn counter clockwise until you hear the ignition click 12 After the first front burner is lit turn on the other control knob s to the HIGH position If you have more than two burners turn them on only ONE AT A TIME 13 When all front burners are lit close the grill lid 14 Wait...

Page 16: ...ked hose Reengage burner and valve Clean venturi Clean burner ports No gas flow Coupling nut and regulator not fully connected Obstruction of gas flow Disengagement of burner to valve Spider webs or insect nests in venturi Burner will not light using a match Irregular flame pattern flame does not run the full length of burner Flame is yellow or orange Flame blow out Burn grill for 15 minutes with ...

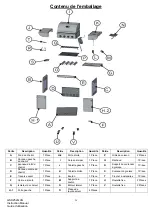
Page 17: ... BACK PANEL 1pc 34 LIGHTING ROD 1pc 53 LEFT SIDE TABLE 1pc 16 GREASE PAN 1pc 35 BEZEL 5pcs 54 RIGHT SIDE TABLE 1pc 17 HEAT INSULATOR 1pc 36 GREASE CUP 1pc 55 SIDE BURNER LID 1pc 18 CONTROL PANEL 1pc 37 MAIN BURNER 4pcs 19 BURNER SUPPORT 1pc 38 CART BOTTOM PANEL 1pc Irregular flame Inside of lid is peeling like paint peeling Flashback fire in burner tubes Flare up Persistent grease fire Grease buil...

Page 18: ...GSS2520JAN Instruction Manual Guide d utilisation 18 Exploded View ...

Page 19: ...ern time Broilchef reserves the right to repair or replace the defective product at this discretion The product is guaranteed for 2 years if used for normal trade purchase and is valid for the original buyer only Any warranty is deemed invalid if the product has been overloaded or used improperly or subject to neglect or attempted repairs other than by an authorized agent Heavy duty daily professi...

Page 20: ...tériels possibles Veuillez toujours conserver ce guide pour vous y référer ultérieurement AVERTISSEMENT 1 N entreposez et n utilisez pas d essence ou tout autre liquide à vapeurs inflammables à proximité de cet appareil ou de tout autre appareil DANGER Si vous détectez une odeur de gaz vous devez 1 Fermer l alimentation en gaz de votre appareil 2 Éteindre toute flamme nue 3 Ouvrir le couvercle 4 S...

Page 21: ...it facile à assembler Si vous avez des questions ou des problèmes concernant ce produit veuillez téléphoner à notre service à la clientèle au 1 855 630 5390 entre 7 h et 16 h EST du lundi au vendredi REMARQUE L utilisation et l installation de ce produit doivent être conformes aux codes locaux En l absence de tels codes utilisez le Code national de gaz naturel ANSI Z223 1 NFPA54 Référez vous au Co...

Page 22: ... barbecue d aucune façon 3 Nettoyez et inspectez le boyau avant chaque utilisation Si vous constatez de l usure ou de l abrasion ou s il est coupé ou qu il fuit il est important de remplacer le boyau avant de faire fonctionner l appareil L ensemble de boyau de remplacement doit être conforme aux spécifications du fabricant 4 Éloignez les boyaux à gaz le plus loin possible des surfaces chaudes ou d...

Page 23: ...rant a été ajouté Ce barbecue a été conçu pour une utilisation au gaz naturel seulement MISE EN GARDE Il est essentiel de toujours garder propres le compartiment de la vanne du barbecue ses brûleurs et les conduits d aération Inspectez le barbecue avant chaque utilisation Étape 1 Inspectez tous les tuyaux et raccords et assurez vous qu ils sont solidement fixés Étape 2 Vérifiez et nettoyez les tub...

Page 24: ...Q Réchaud 1 Pièce C panneau droit du chariot 1 Pièce J Tablette gauche 1 Pièce R Support du contenant à graisse 1 Pièce D Panneau arrière du chariot 1 Pièce K Tablette droite 1 Pièce S Contenant à graisse 1 Pièce E Traverse avant 1 Pièce L Bouton 1 Pièce T Crochet à ustensiles 1 Pièce F Verrou aimanté 1 Pièce M Support de bouton 1 Pièce U Roulette fixe 2 Pièces G Isolateur de chaleur 1 Pièce N Brû...

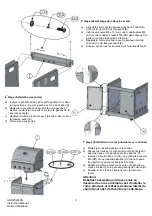
Page 25: ...tion Quantité Image du contenu AA Boulon M6 x 15 32 Pièces BB Boulon M4 x 10 9 Pièces CC Rondelle plate M6 24 Pièces DD Rondelle à ressort M6 24 Pièces EE Rondelle plate M4 6 Pièces FF Rondelle à ressort M4 4 Pièces GG Ecrou M4 4 Pièces HH Tournevis 1 Pièce 1re étape Assemblage des roulettes a Alignez les trous sur les roulettes pivotantes U avec les trous sur le côté gauche du fond du chariot A b...

Page 26: ...fond du chariot A avec les trous sur le panneau gauche du chariot B et serrez les boulons préinstallés à la main c Répétez la même procédure avec le panneau droit du chariot C sur le coté supérieur droit du fond du chariot A d Ensuite serrez tous les boulons avec le tournevis fourni B Pre installed Bolt 6 C 4e étape Assemblage du panneau arrière du chariot a Alignez les trous sur le panneau gauche...

Page 27: ...ns le trou perforé sur le coté gauche de la traverse avant E c Répétez la même procédure avec la porte droite H 2 et la traverse avant E d Fermez les deux portes I DDX 4 CCX4 A A X 4 7e étape Installation du corps principal avec le chariot a Mettez le corps principal I sur le chariot b Alignez les trous sur le coté droit du corps principal I avec les trous sur le panneau droit du chariot C c Insér...

Page 28: ...atéral est bien connecté avec la valve b Alignez le trou sur le brûleur latéral N avec le trou sur la tablette droite c Insérez un boulon M4 x 10 BB dans chaque trou perforé du brûleur N d Insérez une rondelle plate M4 EE une rondelle à ressort M4 FF et un écrou M4 GG dans coté inférieur du boulon BB e Ensuite serrez tous les boulons avec le tournevis fourni f Connectez le tuyau d allumage avec l ...

Page 29: ... de rayonnement c Placez le réchaud Q sur les murs latéraux du corps du barbecue G 12e étape Installation du contenant à graisse a Insérez le contenant à graisse G dans la barbecue sous l arrière du corps principal 13e étape Installation du contenant à graisse et du support du contenant à graisse a Accrochez le support du contenant à graisse R dans les rainures sous le contenant à graisse b Placez...

Page 30: ...l varie d une région à l autre Pour installer le tuyau d alimentation du barbecue consultez le Code du bâtiment de votre région ou communiquez avec votre fournisseur de gaz naturel ou un installateur qualifié Il est recommandé d installer une valve manuelle d arrêt sur le tuyau d alimentation en gaz naturel Tous les raccords filetés mâles doivent être enduits de mastic ou de ruban d étanchéité qui...

Page 31: ...de gaz naturel puis rebranchez le Assurez vous que le connecteur est sécuritaire 7 Vérifiez de nouveau à l aide de la solution savonneuse 8 Si vous continuez à voir des bulles remplacez le tuyau connecteur de dégagement rapide ou et de gaz naturel Allumage du barbecue DANGER L omission d ouvrir le couvercle pendant l allumage des brûleurs du barbecue ou le fait de ne pas attendre cinq minutes pour...

Page 32: ...que le bouton de commande est à la position d arrêt OFF 3 Ouvrez la valve de la bonbonne ou valve du gaz naturel 4 Pour allumer les brûleurs enfoncez un des boutons de contrôle à la fois et tournez le vers la position max jusqu à ce que cous entendiez un déclic 5 Le déclic indique que l ignition est activée Si le brûleur ne s allume pas répétez 2 ou 3 fois 6 Si le brûleur ne s allume pas dans 5 se...

Page 33: ...OFF 3 Déconnectez le tuyau de gaz naturel de l admission de gaz 4 Ouvrez le couvercle du barbecue 5 Tournez les boutons de commande du brûleur à la position élevée HIGH 6 Attendez au moins une 1 minute 7 Tournez les boutons de commande à la position d arrêt OFF 8 Attendez au moins cinq 5 minutes 9 Reconnectez le tuyau de gaz naturel à la fourniture de gaz naturel 10 Tournez lentement la valve du g...

Page 34: ...robinet de la bouteille de propane 2 Retirez les grilles de cuisson et la plaque de distribution de la chaleur 3 Retirez le contenant à graisse 4 Retirez le brûleur en dévissant l écrou situé sous le pied du brûleur à l aide d un tournevis et de pinces 5 Soulevez le brûleur et éloignez le de l orifice du robinet de gaz 6 Nettoyez l entrée du brûleur le tube du diffuseur à l aide d air comprimé ou ...

Page 35: ...pe d excès de débit Montée de flammes Accumulation de graisse Trop de gras dans les viandes La température de cuisson est trop élevée Nettoyez le barbecue Enlevez la graisse des viandes avant de les faire cuire Ajustez réduisez la température en conséquence Feu de graisse persistant La graisse est emprisonnée par les accumulations de nourriture autour du système du brûleur Tournez les boutons à la...

Page 36: ...tenant à graisse 1pièce 45 Grille du brûleur latéral 1pièce 8 Capuchon de poignée 2pièces 27 Bouton 5pièces 46 Poignée de porte 2pièces 9 Pince 2pièces 28 Valve du brûleur latéral 1pièce 47 Capuchon de poignée de porte 4pièces 10 Thermomètre 1pièce 29 Grille de cuisson 2pièces 48 Base du loquet 1pièce 11 Panneau arrière du foyer 1pièce 30 Grille de réchaud 1pièce 49 Roulette pivotante et bloquante...

Page 37: ...GSS2520JAN Instruction Manual Guide d utilisation 37 Vue éclatée ...

Page 38: ...placer le produit défectueux à sa discrétion Le produit est garanti 2 ans s il est utilisé à des fins commerciales normales La garantie est valable pour I acheteur d orgine seulement Elle est considérée nulle si le produit a été surchargé ou mal utilisé ou s il a fait I objet de négligence ou de tentatives de réparation autres que par un agent autorisé L utilisation industrielle professionnelle et...

Reviews: