background image

SA-SRVG8-20, SA-SRVG8-40

2

Security Analytics Gen14 Dell Server Quick Start Guide

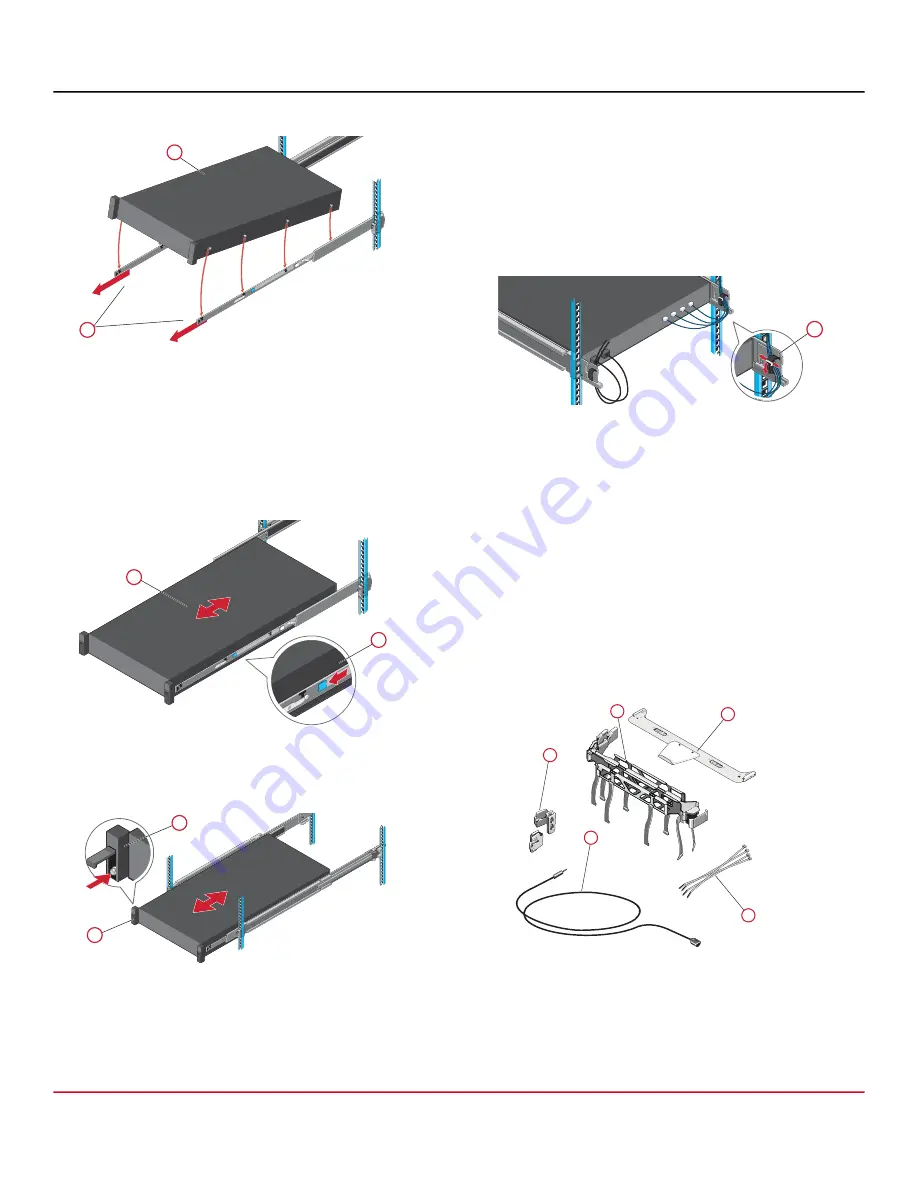
3. Install the server into the rack:

Pull the inner rails out of the rack until they lock in place (

1

).

Locate the rear rail standoff on each side of the server 

and lower them into the rear J-slots on the slide 

assemblies (

2

).

Rotate the server downward until all the rail standoffs 

are seated in the J-slots.

Push the server into the rack until the lock levers click in 

place (

3

).

Pull the blue slide release lock tabs forward on both 

rails and slide the server into the rack (

4

).

4. Secure the server to the rack:

Push the server all the way into the rack until the slam 

latches engage and lock (

1

).

To secure the server for shipment in the rack or in 

unstable environments, locate the hard mount captive 

screw under each latch and tighten each screw with a 

Phillips #2 screwdriver (

2

).

To release the server from the rack, lift the slam latches 

and slide the server out of the rack.

5. To secure the rails to the rack for shipping or in unstable 

environments, install the supplied screws in the rails:

For square hole racks, install the supplied conical 

washer to the screw before installing the screw.

For unthreaded round hole racks, install only the screw 

without the conical washer.

Align the screws with the designated U spaces on the 

front and rear rack flanges.

Make sure that the screw holes on the tab of the server 

retention bracket are seated on the designated U spaces.

Tighten the two screws with a Phillips #2 screwdriver.

3 — Install the CMA

1. Locate the components for installing the Cable 

Management Arm (CMA) assembly:

CMA tray (

1

)

CMA (

2

)

Nylon cable tie wraps (

3

)

CMA attachment brackets (

4

)

Status indicator cable (

5

)

2

1

3

4

1

2

1

2

1

3

4

5

Summary of Contents for Symantec SA-SRVG8-20

Page 1: ... the rack until the latch locks into place For the front end piece rotate the latch outward and pull the rail forward until the pins slide into the flange and release the latch to secure the rail in place 2 Repeat the preceding steps to install the right rail WARNING Before setting up your server appliance follow the safety instructions included in the Safety Environmental and Regulatory Informati...

Page 2: ...e hard mount captive screw under each latch and tighten each screw with a Phillips 2 screwdriver 2 To release the server from the rack lift the slam latches and slide the server out of the rack 5 To secure the rails to the rack for shipping or in unstable environments install the supplied screws in the rails For square hole racks install the supplied conical washer to the screw before installing t...

Page 3: ... will mount the CMA SIDE A or SIDE B Install the CMA attachment bracket at the back of the slide rail with the corresponding SIDE A or SIDE B marking Align the holes on the bracket with the pins on the slide rail and push the bracket downward until it locks in place 4 Install the CMA At the back of the server fit the latch on the front end of the CMA on the innermost bracket of the slide assembly ...

Page 4: ...only straight through Ethernet cables Category 5E cables or better are recommended for 1000Base T operation Category 6A cables are recommended for 10GBase T operation 1 Connect a USB keyboard to the server s front or rear panel USB port 2 Connect a VGA cable to the server s front or rear panel VGA port and connect the other end of the cable to a VGA monitor The VGA ports are not hot pluggable 3 Co...

Page 5: ...r sends the license key and license seed file to the Symantec license server which generates the license file license tgz and returns it to the server which automatically reboots 4 If your server does not have Internet access do the following Click Download DS Seed to download the seed file dsseed tgz to your workstation On a workstation with Internet access go to license soleranetworks com Type t...

Reviews: