Briteq BT-GLOWPANEL Operation Manual Download Page 4

ENGLISH 


OPERATION MANUAL 


BRITEQ

®


2/23 

BT-GLOWPANEL 

SAFETY INSTRUCTIONS:


  To protect the environment, please try to recycle the packing material as much as possible. 

  To prevent fire or shock hazard, do not expose this appliance to rain or moisture. 

  To avoid condensation to be formed inside, allow the unit to adapt to the surrounding temperatures when 

bringing  it  into  a  warm  room  after  transport.  Condense  sometimes  prevents  the  unit  from  working  at  full 
performance or may even cause damages. 

  This unit is for indoor use only.  


Don’t place metal objects or spill liquid inside the unit. Electric shock or malfunction may result. If a foreign 
object enters the unit, immediately disconnect the mains power. 

  Locate the fixture in a well ventilated spot, away from any flammable materials and/or liquids. The fixture 

must be fixed at least 50cm from surrounding walls. 


Don’t cover any ventilation openings as this may result in overheating.  

  Prevent use in dusty environments and clean the unit regularly. 

  Keep the unit away from children. 

  Inexperienced persons should not operate this device. 

  Maximum safe ambient temperature is 40

°C. Don’t use this unit at higher ambient temperatures. 

  Make  sure  the  area  below  the  installation  place  is  free  from  unwanted  persons  during  rigging, de-rigging 

and servicing. 

  Allow the device about 10 minutes to cool down before to start servicing. 

  Always unplug the unit when it is not used for a longer time or before to start servicing. 

  The electrical installation should be carried out by qualified personal only, according to the regulations for 

electrical and mechanical safety in your country. 

  Check that the available voltage is not higher than the one stated on the unit. 

  The power cord should always be in perfect condition. Switch the unit immediately off when the power cord 

is squashed or damaged. It must be replaced  by the  manufacturer, its service agent or similarly  qualified 
persons in order to avoid a hazard. 

  Never let the power-cord come into contact with other cables! 

  This fixture must be earthed in order to comply with safety regulations. 


Don’t connect the unit to any dimmer pack. 

  Always use an appropriate and certified safety cable when installing the unit. 

  In  order  to  prevent  electric  shock,  do  not  open  the  cover.  Apart  from  the  mains  fuse  there  are  no  user 

serviceable parts inside. 


Never

 repair a fuse or bypass the fuse holder. 

Always

 replace a damaged fuse  with a fuse  of the same 

type and electrical specifications! 

  In the event of serious operating problems, stop using the fixture and contact your dealer immediately. 

  The housing and the lenses must be replaced if they are visibly damaged. 

  Please use the original packing when the device is to be transported. 

  Due to safety reasons it is prohibited to make unauthorized modifications to the unit. 


CAUTION:

  To  reduce  the  risk  of  electric  shock,  do  not  remove 

the  top  cover.  No  user-serviceable  parts  inside.  Refer  servicing 
to qualified service personnel only. 


The lightning flash  with arrowhead symbol  within the  equilateral triangle  is intended to alert  the 
use or the presence of un-

insulated “dangerous voltage” within the product’s enclosure that may 

be of sufficient magnitude to constitute a risk of electric shock. 


The exclamation point within the equilateral triangle is intended to alert the user to the presence 
of  important  operation  and  maintenance  (servicing)  instructions  in  the  literature  accompanying 
this appliance. 


This symbol means: indoor use only


This symbol means: Read instructions


This  symbol  determines:  the  minimum  distance  from  lighted  objects.  The  minimum  distance 
between light-output and the illuminated surface must be more than 1 meters


The device is not suitable for direct mounting on normally flammable surfaces. (suitable only for 
mounting on non-combustible surfaces) 


CAUTION: 

Do not stare at operating lamp.  

May be harmful to the eyes. 

Summary of Contents for BT-GLOWPANEL

Page 1: ......

Page 2: ......

Page 3: ...erful ever changing light shows Silent operation thanks to natural convection The internal shows work in standalone master slave or can be selected by DMX static colors fading colors different static...

Page 4: ...must be replaced by the manufacturer its service agent or similarly qualified persons in order to avoid a hazard Never let the power cord come into contact with other cables This fixture must be earth...

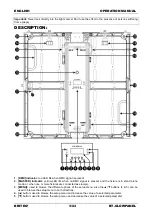
Page 5: ...cator yellow LED lits when no DMX signal is present and the fixture is in stand alone mode or when one or more fixtures are connected as slave s 3 MENU used to browse the different options of the setu...

Page 6: ...tup 19 CARRYING HANDLE on the top of the panel there is a folding carrying handle to easily transport the fixture or insert remove it from its flight case 20 Inner thread M8 for use with eye bolts or...

Page 7: ...ENGLISH OPERATION MANUAL BRITEQ 5 23 BT GLOWPANEL...

Page 8: ...ENGLISH OPERATION MANUAL BRITEQ 6 23 BT GLOWPANEL...

Page 9: ...trobe programs letters numbers RGB panel dimming 13CH pixel dimming strobe programs letters numbers speed RGB panel dimming 43CH individual pixel dimming programs letters numbers individual panel RGB...

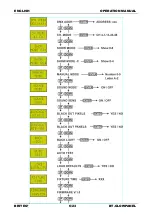
Page 10: ...to select the desired mode Yes white pixels will work if no DMX signal is present No white pixels will not work if no DMX signal is present Press the ENTER button to select the desired value The sele...

Page 11: ...of this unit can be upgraded using the Briteq Firmware Updater order code 4319 with Windows software More information about this can be found in the user manual of the Firmware Updater and or our webs...

Page 12: ...to control the projectors by any DMX controller Connect the projectors as shown in the drawing below First put the projectors in the desired DMX mode see the different DMX charts and choose the one th...

Page 13: ...due to interferences you must use a 90 to 120 terminator at the end of the chain Never use Y splitter cables this simply won t work Make sure that all units are connected to the mains Each light effec...

Page 14: ...16 136 143 Program 17 144 151 Program 18 152 159 Program 19 160 167 Program 20 168 175 Program 21 176 183 Program 22 184 191 Program 23 192 199 Program 24 200 207 Program 25 208 215 Program 26 216 223...

Page 15: ...129 Letter L 130 138 Letter M 139 147 Letter N 148 156 Letter O 157 165 Letter P 166 174 Letter Q 175 183 Letter R 184 192 Letter S 193 201 Letter T 202 210 Letter U 211 219 Letter V 220 228 Letter W...

Page 16: ...000 044 Blackout 045 067 White Pixels full on 068 247 Blackout 248 255 Sound activated show Channel 7 068 to 127 8 000 007 Blackout 008 015 Program 1 016 023 Program 2 024 031 Program 3 032 039 Progra...

Page 17: ...umber 4 116 135 Number 5 136 155 Number 6 156 175 Number 7 176 195 Number 8 196 215 Number 9 216 235 Count from 0 to 9 slow fast 236 255 Count from 9 to 0 slow fast Channel 7 188 to 247 8 000 021 Blac...

Page 18: ...00 255 Green color dimmer 0 100 13 000 255 Blue color dimmer 0 100 43CH Mode DMX Channel DMX value function remarks 1 000 255 Pixel 1 dimmer 0 100 2 000 255 Pixel 2 dimmer 0 100 3 000 255 Pixel 3 dimm...

Page 19: ...55 Pixel 30 dimmer 0 100 31 000 255 Pixel 31 dimmer 0 100 32 000 255 Pixel 32 dimmer 0 100 33 000 255 Pixel 33 dimmer 0 100 34 000 255 Pixel 34 dimmer 0 100 35 000 255 Pixel 35 dimmer 0 100 36 000 255...

Page 20: ...255 Program 1 30 Random Channel 37 128 to 187 38 000 015 Blackout 016 035 Number 0 036 055 Number 1 056 075 Number 2 076 095 Number 3 096 115 Number 4 116 135 Number 5 136 155 Number 6 156 175 Number...

Page 21: ...trobe Slow Fast 132 139 Full on 140 181 Ramp up effect slow fast 182 231 Ramp down effect slow fast 232 239 Full on 240 247 Strobe Sound triggered 248 255 Full on 41 000 255 Red color dimmer 0 100 42...

Page 22: ...6 dimmer 0 100 27 000 255 Pixel 27 dimmer 0 100 28 000 255 Pixel 28 dimmer 0 100 29 000 255 Pixel 29 dimmer 0 100 30 000 255 Pixel 30 dimmer 0 100 31 000 255 Pixel 31 dimmer 0 100 32 000 255 Pixel 32...

Page 23: ...ernal and external optical lenses and or mirrors must be carried out periodically to optimize light output Cleaning frequency depends on the environment in which the fixture operates damp smoky or par...

Page 24: ...ENGLISH OPERATION MANUAL BRITEQ 22 23 BT GLOWPANEL DIMENSIONS...

Page 25: ......

Page 26: ......

Page 27: ......

Page 28: ......

Reviews: