


ENGLISH
OPERATION MANUAL
BRITEQ
®
8/23
BT-GLOWPANEL
•
Press [ENTER] to confirm the selected value.
•
Press [MENU] to leave this mode.
•
Press the [MENU] button for 2 seconds to leave the setup menu.
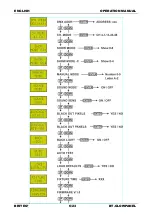
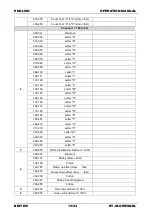
[SOUND MODE]
Used to set the projector to standalone sound mode with different chases playing in endless loops.
•
Press the [MENU] or
▲/▼buttons until “SOUND MODE” is shown on the display.
•
Press the [ENTER] button: [On] or [Off] will start blinking.
•
Press the
▲/▼buttons to select the desired mode:
•
[On] : fixture will operate sound activated.
•
[Off] : fixture will operate at fixed speed.
•
Press the [ENTER] button to select the desired mode.
•
Press the [MENU] button for 2 seconds to leave the setup menu.
[SOUND SENS]
Used to set the sensitivity of the internal microphone.
•
Press the [MENU] or
▲/▼buttons until [SOUND SENS] is showing on the display.
•
Press the [ENTER] button: the value starts blinking and can be changed.
•
Use
▲/▼ buttons to selected the desired value: 0-100
•
Press the [ENTER] button to select the desired value. The selected value stops blinking.
•
Press the [MENU] button for 2 seconds to leave the setup menu.
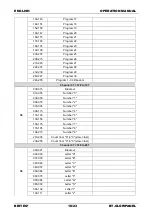
[BLACKOUT PIXELS]
Used to set the pixel mode (ON or OFF) when no DMX signal is present.
•
Press the [MENU] or
▲/▼buttons until [BLACKOUT PIXELS] is showing on the display.
•
Press the [ENTER] button: [Yes] or [No] will start blinking.
•
Use
▲/▼ buttons to select the desired mode:
•
[Yes] : white pixels will work if no DMX signal is present.
•
[No] : white pixels will not work if no DMX signal is present.
•
Press the [ENTER] button to select the desired value. The selected value stops blinking.
•
Press the [MENU] button for 2 seconds to leave the setup menu.
[BLACKOUT RGB PAN]
Used to set the RGB panel mode (ON or OFF) when no DMX signal is present.
•
Press the [MENU] or
▲/▼buttons until [BLACKOUT RGB PAN] is showing on the display.
•
Press the [ENTER] button: [Yes] or [No] will start blinking.
•
Use
▲/▼ buttons to select the desired mode:
•
[Yes] : the RGB panels will work if no DMX signal is present.
•
[No] : the RGB panels will not work if no DMX signal is present.
•
Press the [ENTER] button to select the desired value. The selected value stops blinking.
•
Press the [MENU] button for 2 seconds to leave the setup menu.
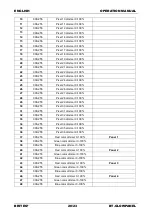
[BACK LIGHT]
Used to set the back light of the display.
•
Press the [MENU] or
▲/▼buttons until [BACK LIGHT] is showing on the display.
•
Press the
▲/▼buttons to select the desired mode:
•
[On] : the display will stay on.
•
[Off] : the display will turn off after some time. (+/- 1 min.)
•
Press the [ENTER] button to select the desired mode.
•
Press the [MENU] button for 2 seconds to leave the setup menu.
[AUTO TEST]
Used to run a selftest on the fixture.
•
Press the [MENU] or
▲/▼buttons until [AUTO TEST] is showing on the display.
•
Press the [ENTER] button: [Test…] starts blinking. The fixture runs a continuous test.
•
Press the [ENTER] or [MENU] button to stop the test.
•
Press the [MENU] button for 2 seconds to leave the setup menu.
Summary of Contents for BT-GLOWPANEL
Page 1: ......
Page 2: ......
Page 7: ...ENGLISH OPERATION MANUAL BRITEQ 5 23 BT GLOWPANEL...
Page 8: ...ENGLISH OPERATION MANUAL BRITEQ 6 23 BT GLOWPANEL...
Page 24: ...ENGLISH OPERATION MANUAL BRITEQ 22 23 BT GLOWPANEL DIMENSIONS...
Page 25: ......
Page 26: ......
Page 27: ......
Page 28: ......


